Wednesday, November 25, 2020

Medieval

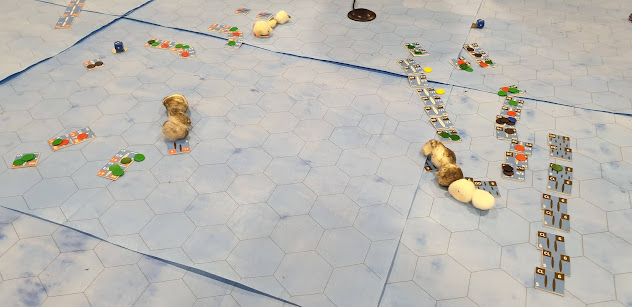
 Jim & Gary of York v. Mike & Chris of Lancaster

The Yorks are in the foreground.  They have placed their cavalry in the centre with a division of spears & bows on their left guessing that the Lancs would mass their superior numbers of cavalry on their right.
On their left the Yorks have deployed their spearmen to face the Lancs cavalry with bow men in the orchard to fire at the enemy's flank.  On the right 2 divisions of York infantry have advanced with their cavalry kept in reserve.
On the left the Yorks spearmen are holding off the enemy knights.  On the right the Yorks withdrew their bowmen after a short exchange of arrows & attacked with their billmen.  The infantry are holding their own on the right, but not so good on their left. Half the York cavalry have been sent suport the infantry in the centre. 
Mitzi inspects the troops.
The Yorks spearmen are still holding off the knights, but sergeants are working around their flank.  The Yorls cavalry attack in the centre have a bad case of the dice yips & has failed to break thru.  The infantry continue to slug it our on the right.
On the left some York cavalry covered the spearmen's flank & the Lancs knights have broken.   On the right, the Yorks centre infantry div has broken & their cavalry has been destroyed.  But the Lancs left flank infantry has also broken.  The Lancs have lost 2 divisions, York only , but their cavalry is trouble.
On the left, the Lancs sergeants broke the York cavalry, but then fell back n the face of the York spearmen with bows on their flank.  The Yorks began moving to support their right, but the sergents returned to pin them down.  On the right, the York's other remaining infantry division is falling back , outnumbered by the Lanc's centre infantry div. At this stage time was called, the battle a draw with both sides blaming bad luck for their failure to win.  

The Lancs knights were unlucky against the York spearmen, but their infantry did threw very good dice in the centre beating the Yorks best infantry & half their cavaly, and several times bad command dice prevented the Yorks from exploiting opportunities.


Saturday, November 21, 2020

Tank War

 Jim's Panzers v. Chris' Brits on 10'x6' table. Deployment in turn 0 up to 24" in.

Pics from behind German right flank.  Both sides put their 2 infantry squads in the centre.  The Germans concentrated their armour on the right with only a Pak 38 covering their left.
The Pak 38 drew 1st blood taking out the Sherman on the far flank.  In the centre the Germans have got to the objective on the bridge first.  On the near flank both sides have lost 1 tank, but the Germans have seized the objective on the hill.
The Pak is being suppressed by the 25 pdr & Honey, but still lives.  The infantry is exchanging ineffective fire in the farm.  The MkIVs are getting on top on the right.
The Honey has finally killed off the Pak crew & the German infantry are pinned down by the 25pdr & infantry, but a swarm of Panzer IVs is coming.
The British cannot stop the wave of Panzers.  By game's end only the British 25pdr on the far flank survives & the Germans have 3 objectives to 1 having lost just 1 MkIII & their Pak. 

Wednesday, November 18, 2020

Pike & Shot: The Empire v. the Swedes

 Swedes Mark & Chris v. Imperialists Mike & Jim

The Empire is on the near side of the table.  The Swedes are veterans & have a higher proportion of musketeers. The Empire's troops are regulars, but their pike, swordsmen & cavalry are more heavily armoured than the Swedes.   The Swedes put most of their cavalry on their right & are advancing that flank.  The Empire strengthened their right with their Landsknecht swordsmen brigade & are advancing on that flank.

On the far flank the outnumbered Imperial horse are so far holding on against the larger Swedish cavalry brigade.  Left of centre, the Swedes are using their superior nos of musketeers to soften up the Imperial tercios. On the right, Imperial cavalry have ridden down the Swedish gunners but are contained

On the left the Imperial foot is attacking while the cavalry of both sides have regrouped.  On the right one of the Imperial tercios has broken thru on the left of the cavalry.
On the near flank, the Swede's left has done well near the creek, but their left flank is crumbling & on the verge of breaking.
On the far flank it is the Empire that is hanging on desperately against superior nos of cavalry & shot.
On the far flank, the Imperial cavalry has been broken & the Imperial Infantry on the verge of doing so. But on the near flank, the hedgehog on the Swede's flank has been surrounded by Landsknechts & is broken.  With it, the whole Swedish left wing is below half strength & breaks giving the Empire victory.  


Wednesday, November 11, 2020

Jutland Campaign Finale

 Tonight we were finally able to continue the campaign battle off the coast of Denmark.

The battle commenced with the High Seas Fleet running South (to the left on map above) after securing the 4th Economic Victory Point they needed to achieve Minor Victory in the campaign by bombarding shipping in the Skagerrak.  The British had as usual detected the Germans leaving port & had steamed southeast from Scarpa Flow & Cromarty to intercept the HSF on its way home.

Admiral Sheer had expected the Grand Fleet to come out & try cut his fleet off from base & he wanted battle, but on his terms.  His plan was to run south to turn & fight close to home base where he had set a trap of submarines & minefields.  However, Sheer miscalculated & stayed in the Skagerrak a little too long & the Grand Fleet were able to pincer him between themselves & the Danish coast.  

On the plus side for the Germans, they had their entire fleet in the area - mostly coming south, but 5 pre-dreadnoughts & some DDs were coming north to join the HSF, whereas the British did not have Beatty's 4 battlecruisers & 4 Queen Elizabeth surper dreadnoughts (who were late getting to sea apparently for some reason).  The other ace the Germans had up their sleeve was a minefield laid early in the campaign off the coast of Denmark that they believed the Brits did no know about.

In the first phase of the battle described in an earlier post, the HSF steamed south as the Grand Fleet approached steaming SE slightly in front of them.  The German battle cruisers took a pounding in the van, but in their haste to get ahead of the HSF the right wing of  Jellico's fleet ran into the German minefield.  A battleship was sunk & 3 battlecruisers severely damaged on the minefield.

In running the Brits onto the minefield the HSF was running into a pocket between the GF & the Danish coast & was about to have their T crossed.  Sheer ordered his battered battlecruisers to do a battle turn away behind smoke while the battleships turned to starboard onto a course that would both  provide him sea room & the chance of cross the British rear.
The improved tactical position the turn gave the Germans was backed up with some hot dice.  The rear British squadron copped a pounding & the Kaiser sunk the KGV with a devastating salvo.
The Brits turned east to improve their firepower & in a heavy exchange of fire between 2 squadrons of each side, ships of both sides suffered heavy damage. 
Several damaged ships of both sides have pulled out of the front line.  The Germans have replaced their damaged squadrons with 2 fresh ones.  The Brits have also brought fresh squadrons up, but the Germans have a neat line to face the ragged British formations.  The last German squadron is their 4 undamaged Konig class (their best ships) & the Brits fall back behind smokescreens as damage mounts & Ajax is sunk by Thuringen.  

While the main fleets have been going at it in the centre, there have been secondary actions north & south.  Behind the HSF there was a force of British CLs & DDs, but the Germans matched them with their own CLs & DLs.  The Brits made one tentative attack, but were driven back without getting into torpedo range of the battleships.  To the south the old German BBs & some DDs were a distraction that kept some the the British occupied, though they old BBs withdrew avoiding combat.

At this stage the British are heading NE towards the Skagerrak while the HSF is heading past them going SW.  Neither side is keen on risking further heavy action.  
 
The Brits have lost 3 ships sunk (1 to mines & 2 to gun fire) & 9 ships badly damaged. 
They have 14 ships with no or minor damage.
The Germans have lost no ships sunk & 9 badly damaged.
They have 11 ships with no or minor damage.

The Brits still have more battleships in fighting trim, but they are content to call the action off because:
- The 4 best German ships are totally undamaged whereas the 6 undamaged British ships are older Dreadnoughts. 
- The Germans are in a tight efficient fighting formation whereas the Brits are scattered.
- Night is approaching & the Germans fight better than the Brits at night.

The Germans are  also content to break off because while Beatty isn't present, they know he is at sea & don't want to have to face him & his Queen Elizabeths with their damaged fleet.  They have a minor victory through the Economic VPs they have amassed, so are content to go home after an indecisive battle with a small balance of sunk ships in their favour  of 3:0.

This has been a epic campaign.  Peter Williams has done a great job setting it up & umpiring.  All the players have enjoyed it immensely.  The tension & danger of catastrophe engendered by the hidden movement & limited intel made it a nerve wracking but very exciting experience for the players.  

Tuesday, November 10, 2020

Bolt Action; US v. Japan

Die to it being Melbourne Cup day Admiral Jellico was unable to attand to allow us to finish the Jutland campaign battle, so  again used to small table for BA.

Mike's US v. Chris' Japanese 1000 pts.  Key Positions Scenario.

Pics taken from US side.  There are 3 objectives - the village & the hills each side of the centre.
It was a crushing US victory.