Wednesday, March 29, 2017

The Mahdi v. Martini-Henry again

Following his crushing victory last Sunday, this time the Mahdi took on the Anglo-Egyptians in open battle.
The Mahdi deployed first, placing his 3 infantry divisions in front of the oasis the British have to reach.  His cavalry is out of sight behind ridges & coud be on either flank.  The Brits deployed second. The Egyptians are on their right & their cavalry in the far corner.
 The Mahdi's centre advances with 2 division n successive lines with skirmishers in front.
The Mahdi's cavalry on the left & infantry on the right has been slow to advance in support of the main attack.   The Mahdi's first wave hesitated after taking along range volley, but the second wave charged home.  Two British units broke on their right leaving an ominous hole in the line, but the Egyptians wheeled left and poured fire into the victorious fuzzy wuzzy units, either breaking them or forcing them to retire. The rest of the attack bounced back with more losses. 
The cavalry has engaged on the far flank & the Mahdi infantry is now attacking on the left. 
The patch of broken ground is protecting the Egyptian infantry & preventing the Mahdi cavalry using its superior numbers to effect.  he cavalry fight is still indecisive, but the Egyptians are inflicting a lot of casualties.  The second Mahdi infantry attack  is faltering.
The British cavalry has been broken, but their opponents are mostly shaken &  Egyptian cavalry in the second line are in good shape. In the centre the Mahdi has withdrawn the remaining infantry to rally it. The attack on the near flank has faltered.
The Mahdi infantry on the right has now broken.
The Egyptians have broken one of the Mahdi cavalry divisions & the other is doomed.  The Mahdi has s lost 3 of 5 divisions so fails the army break test.  The Brits have had 2 cavalry & 3 infantry units broken.

It's a tough ask for the Mahdi to attack over open ground, but as it happened a piece of terrain was a major factor in his defeat.  The patch of broken ground that protected the Egyptians was critical in protecting the Egyptian infantry from the Mahdi cavalry allowing them to stop the Mahdi's infantry breakthrough, then help defeat the Mahdi's cavalry.  

Monday, March 27, 2017

The Mahdi tries again

Dale & Steve Daniels were visiting from Canberra but leaving before Tuesday, so we re-did the Colonial battle we did last week.  After that battle we decided to re-base the British on 6" stands tp avoid the problems with different sized stands (with appropriate adjustments to their stats). I also reduced the number of Brits a bit so they had 14 units + 2 guns to the Mahdi's 24 + 6 skirmishers.
Jim comanded the rits, Dale the Mahdi right & Steve the Mahdi left.
The Anglo-Egyptian column moves along the road toward the oasis held by the Mahdi.
 Suddenly a Mahdi infantry & cavalry division appear one each flank forcing a rapid deployement out of the column & a circling of the wagons.  The Egyptians at the tail of the column are in particular strife with 8 cavalry units with good command rolls converging on them.
The Egyptian infnatry is hold on, but their cavalry has been broken leaving them outflanked.  The british on the left are doing alright,  a second line has been deployed behind the Egyptians & the hussars are guarding the front from the troops now advancing from the oasis.  But on the right therehas been a break in the thin red line & the Mahdist's sweepinf advance has hit the gun in flank.
The Mahdi attack advance on the far right is running out of unshaken units, so the Brit right has stabilised.  A unit has broken on their left, the winners were shaken &unable to make a sweeping adcance into the expose flank of the rear guard.  
The Egyptian infantry have broken.   The Brits have contracted their line, but things are looking grim 
The Mahdi makes a coverging charge on the end of the British circle.
One bad break test is all it takes for the British situation to be totally hopeless.   A big difference to last Tuesday's result, but it's unclear whether the main difference was reducing the number of Brits, better Mahdi coordination of their attacks, or bad Break Test for the Brits, but all happened.

Tuesday, March 21, 2017

Sudan 28mm:

We decided it was time to let the Mad Mahdi loose again (with our Hail Queen Victoria rules).  SteveJ & Mich have the Brits.  Mike, Jim & Mark have the Mahdists.
The British column has come on the far end of the table only to have the Mahdi's cavalry charge over the ridges on each side.
More Mahdi infantry have appeared behind the hills halfway up the table as the Brits form a rough square.  The British & Egyptian cavalry have driven the Mahdi cavalry back in the near corner.  The Egyptian infantry are holding off the Mahdi cavalry on the far side.
The Egyptian have repelled the Mahdi cavalry on the far flank.  The Mahdi infantry are trying to get some good command dice to charge.
The mahdi foot attacks on both flanks while their centre hangs back.
The Mahdi has some success on each flank but otherwise repelled.
The Mahdi left is being overlapped by the Egyptian cavalry & driven back  by rifle fire.  The Mahdi's right is doing ok in it's attack onthe angle of the British line.  But the Mahdi's centre infantry division has come up too late.
The Mahdi cavalry on the far flank attacked again & broke the Egyptian infantry but has been broken in turn by the train guards' fire.  The Mahdi's left has broken & the other 2 infantry divisions are on the verge of it. 

The Mahdi failed to coordinate his attacks & it was another clear win for the Anglo-Brits.

Sunday, March 19, 2017

Sunday Bolt Action at Good Games

Good Games in Hobart have expanded and upgraded.  The shop has moved next door with a new games area for the young ones at the rear.  The old shop has become a cafe/bar games room.  Today we tried out Sunday gaming there with Bolt Action.
 We had 3 games of BA going at the far end with a card game going on in the foreground & space for more. there are also video games & pool tables behind the camera
The new coffee machine serves great coffee.
The new kitchen serves great pizza & nachos.  That fridge contains beer.
 Could I say anything to add to this pic?
Mark & Frankie share a bowl of nachos after fighting each other to a draw in the desert. (Yes that is coke Mark is drinking, but we did share a couple of "Blondes" later).
Matthew christened his new Brits with a win against Steve's Germans.
Lt von Flashman was the only survivor when my Panzergrenadiers fought Sean's Yanks.  (Sean & Matt brought this table).

Mike has done a great job creating the sort of facility we have all only dreamed of for years.  It's up to us wargamers to support it to keep it going.  Pizza, nachos, beer & wargames - what else could one ask for?  We intend to make Sunday afternoon BA starting about 12 noon a regular thing. 


Tuesday, March 14, 2017

English Civil War

Parliament: Mike, Mitch & Jim
King: Steve & Mark
Both sides had 2 pike & shot divisions of 2 pike & 4 shot & 2 cavalry division of 4. Parliament's cavalry included 2 cuirassiers & they had 2 cannon.  The King had 2 dragoon units.
Parliament is on the left.  Both sides put their cavalry at the far end.
 A great cavalry mellee soon developed on the far flank.  The Royalists supportedtheir horse with dragoons (now dismounted) while the Roundheads sent an infantry brigade over the stream to help out.
On the near flank the roundheads let their artillery do the talking & the Royalists dived fro cover in the woods.
Initially the roundhead cavalry drove the cavaliers back, somehow they got their act back together counterattacked and now it is the roundheads on the back foot.   On the other flank the roundheads have advanced to engage the enemy infantry, now masking their own guns but with a better organised line bringing more muskets to bear.
The roundhead horse have been defeated with both divisions broken, but they took a cavalier division with them.  The roundhead infantry at the end of their line have formed a hedgehog & is half surrounded by caracolling horse. On the other flank the king's infantry's left flamk has been overlapped and the end division is on the point of breaking.
The king's left flank infantry division has now broken so both sides have lost 2 of their 4 divisions.  The remaining king's infantry is being outflanked & is falling back.  The King's last chance is a cavalry charge behind the hedgehog into the rear of the roundhead foot.  But the roundhead artillery had been redeployed in their direction & musketeers turned around to face them before they could charge.  The charge failed to go home and they were driven back by a hail of fire.  It was now 10 o'clock, nightfall at Camp Cromwell  & the King's army was able to break off & claim a draw as both sides had lost 2 divisions out of 4. 

Sunday, March 12, 2017

Flames of War: Bunker Rats one day touney in the desert

Steve & I took part in a Bunker Rats one day tourney in the Kingston bunker.  The forces were 1450 pts mid war from the North Afrika book.  Steve took a German infantry coy, I took a British Light Armoured coy.
10 players took part with Grigsy as TO.  There were 3 rounds scored with a new points system invented by someone in NZ they were test running with a view of using it in their serious annual tournament in May. 
In 1st round I fought Patrick in a Dust Up Mission on pretty open battlefield.  (The tower on the table is a  dice tower, not part of the scenery).  Half the forces are deployed at the start defending objectives in diagonally opposite corners of the table.  The delayed reserves come on from the corners at the other end of the long edges.  Both of us had infantry & guns on the objectives.  All my reserves were armour, the Germans had 3 MkIIIs, a Tiger & infantry in reserve.
I wasn't game to throw my armour straight at the enemy infantry & anti-tank guns - thinking that their combined arms reserves could beat my defense faster than a frontal attack on theirs.  So my plan was to destroy their armour, then attack their defense from the flank.  The result was a very entertaining tank melee in one corner of with Crusaders v. MkIII's & Grants v. a Tiger.  One side had firepower & the other had numbers & it for went on ever.  Eventually, the MkIII's were destroyed & the Crusaders attacked the objective from the flank while the few remaining Grants kept the Tiger busy.  The attack was going well, but the tank fight had taken too long for my plan to work & the battle was a timed out draw with both sides getting a few points for destroying a tank platoon each.
Steve drew the dreaded Smithy first up and lost his battle, but gained more VPs than I did because he destroyed more enemy.
The second round was Hold the Line.  My enemy this time was US (unfortunately blue on blue happens in FOW tournaments).  I defended, putting artillery on one objective & infantry on the other. I probably won the battle on turn 1 when I had a run of good dice & wiped out a Honey platoon with my artillery & the tank destroyers with my Grants in ambush.  The armoured infantry supported by a lot of Honeys broke my infantry & got onto the objective in village, but the Grants moved up from their ambush position to dispute the objective for long enough for the rest of the cavalry to arrive & break the US coy.
Steve also won his second round match.
After 2 rounds Steve & I were ranked 3rd & 4th so had to fight each other.  It was a Hasty Attack Mission on a difficult battlefield for armour.  My plan was to look like I was attacking on the left until my reserves arrived then use the Crusader's mobilty to switch the attack to the right.   The plan was severely handicapped by Steve's flying tanks with came on nearly every turn and often with 3 planes.  3 Grants brewed up on turn 1 was not a good start & a Crusader platoon went the same way soon after.  Having 2 Crusaders broken down just in range of 2 Pak 40's due to the unreliabilty rule didn't help either.  Nevertheless, in the Tally Ho tradition of British cavalry I pressed on.  My Grants took out the 88 defending Steve's left & the few remaining tanks attacked the objective.  They actually took it, but Steve had had time to redeploy his Pak 38's and he blew them away.  The Luftwaffe finished off my infantry in the same turn & I went from a rough chance of winning to total defeat with every platoon destroyed in one turn.

Smithy was the overall winner, but our Steve came a creditable 3rd.  I ended up back in the pack, but was well pleased with my choice of army.  It engenders a Death or Glory attitude that is good fun even if you lose.

Friday, March 10, 2017

FOW in the desert

As Steve & I are taking part in a one day FOW tournament at the Bunker Rats on Saturday we had a battle to try out our lists & remind ourselves of the rules, not having played FOW since the last tournament several months ago.
Steve had a German infantry coy defending in a Pincer Mission against my Indian Rifles.  My Indians surged bravely forward, but the Luftwaffe kept coming & zapped the British armour support.  The infantry got to the objective but couldn't clear it before the MG 42's destroyed them.   With boths having infantry coys I suspect the battle was lost with toss that decided who defended.

Understandably Steve was happy with his list, but I decided than an infantry coy was too much like hard work for 3 battles in a day.   I decided to ditch the Indians & go for death or glory instead with a British Light Armoured coy for Saturday. 

Tuesday, March 07, 2017

Napoleonics in Spain: 28mm

We are planning a Napoleonic campaign to start in a month or so & tonight we did a training battle to get back up to speed with our Napoleonic rules and to get a feel for just how bad the rules make the Spanish.

Mike's French corps was based on Sebastiani's IV Corps with 2 infantry divisions, one French & one mostly Germans, each 2 brigades of 4 units & a cavalry division of two 3 unit brigades, one hussar & 1 chasseur, plus 4 batteries. 

Steve's Spanish army was based on Venagas' Army of the Centre with 4 infantry divisions, each with  6 units, a light cavalry division of 4 units & a heavy cavalry division of 4 units, & 4 batteries.  We had to substitute Austrians for the Spanish army, but who knows or cares what the Spanish looked like anyway?

The H-T-H ratings of the infantry were 4 for the French & 3 for the Germans & Spanish. The shooting ratings were 4 for the French & Allies, 3 for the Spanish.  The Spanish heavy cavalry & the French hussars had H-T-H 5, the chasseurs 4 & the Spanish light horse 3.  The command ratings were 9 for French brigades, 8 for German brigades & Sebastiani & 7 for the Spanish brigades & Venagas.  The Spanish infantry were also poorly trained.  For all the Spanish troops Break if Shaken results were Break if Spanish. So the Spanish units were severely handicapped, but they had 36 units to 26.
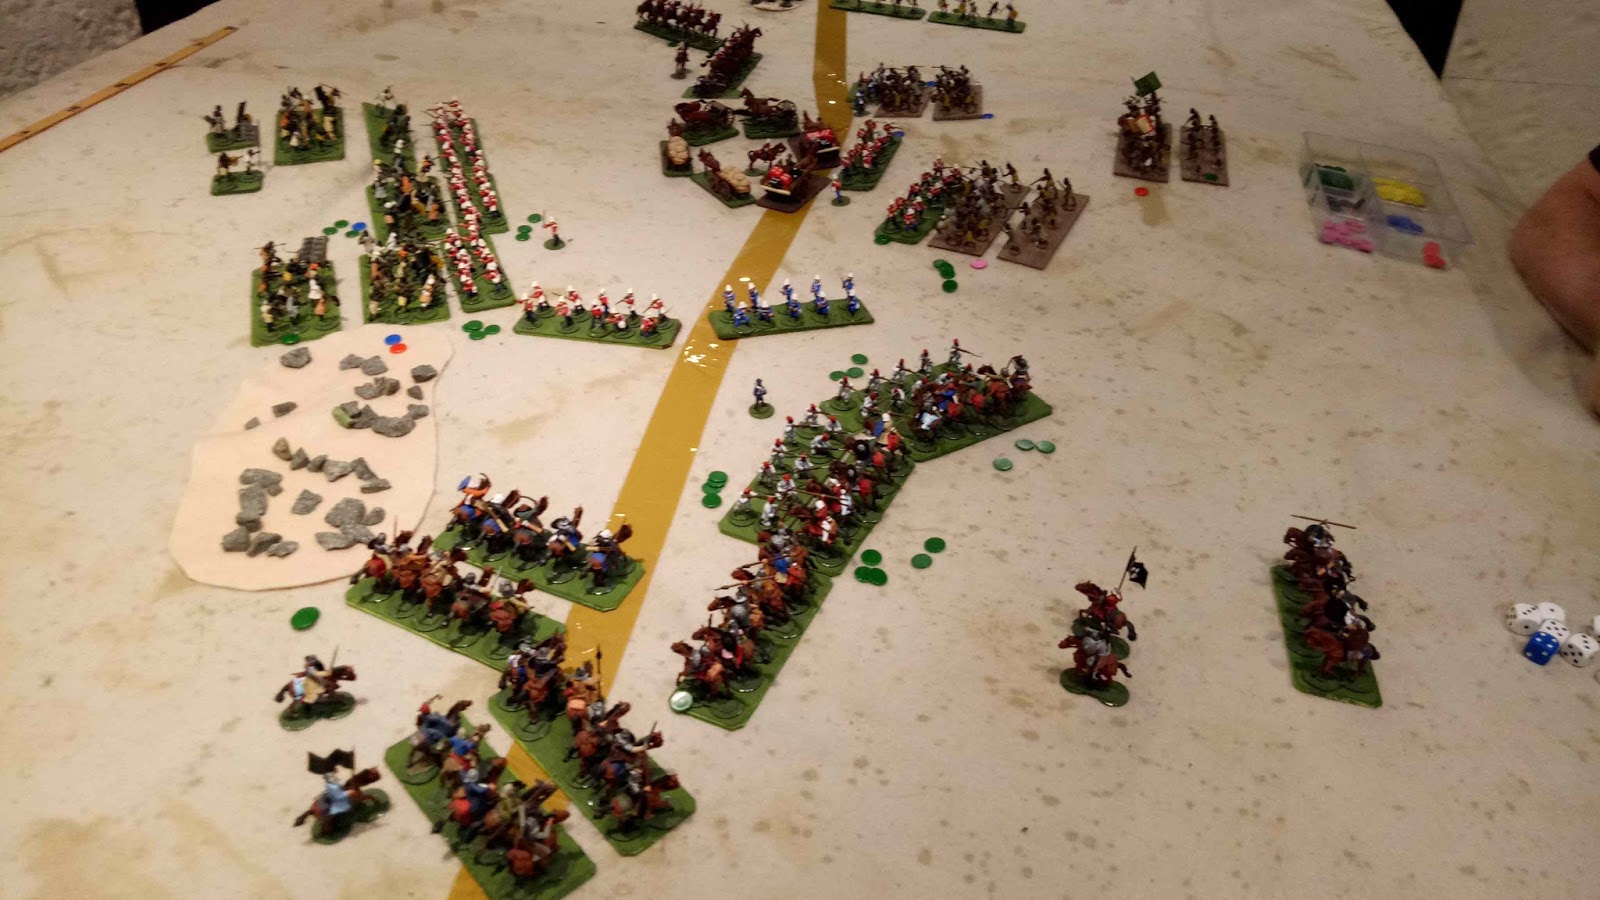
Sebastiani is on the left with the German infantry on the far flank with the chasseurs & the French infantry with the hussars on his right.  Venagas put all his cavalry on his left.
Sebastiani started with an attack on his left.  The Spanish formed a line on the ridge to meet it & advanced their cavalry on their own left. 
Madame Mitzi has suddenly taken an interest in wargames lately and favoured us with a visit and demands for back rubs.
Sebasitiani's columns on the left were disrupted by Spanish fire & the attack came to a halt short of the ridge line.  His French division appeared daunted by the sheer number of Spanish to their front and only advanced slowly. The Spanish cavalry has charged the hussars accross the creek and has been beaten back.
On the far flank the German infantry has managed to sort itself into a ragged firing line & a fierce exchange of musketry is going on.  The chasseurs have moved to support their right flank.  On the near flank the Spanish cavalry has fallen back.
The French hussars have now advanced over the creek.  The Spanish light cavalry has advanced to meet them while the heavy cavalry has attacked the flank of the French infantry advance in the centre.  They caught an infantry unit in line & broke it, but the second line drove them back.
 On the near flank both side's cavalry have fallen back.  In the centre the action amounts to no more than an ineffectual cannonade.  On the far flank the chasseurs have charged down some of the infantry and over-run a battery.
Both sides are content to let the action on the French right peter out and concentrate on the far flank where both's infantry are teetering on the edge.  But the German infantry have survived almost all their break tests while the Spanish have been slowly melting away.  The chasseurs were decisive in the final breaking of both Spanish infantry brigades on the flank.

We declared nightfall at that point with the Spanish losing 2 divisions out of 6 & the French no brigades out of 6.  Technically a draw, but in a campaign situation the Spanish would, given their losses, almost certainly withdraw overnight rather than risk complete rout next day.   My analysis is that Sebastiani erred in his initial deployment in that he should have put his best troops in the open ground on his left to make the attack.  They had a good chance of breaking the Spanish right quickly & then rolling up the Spanish line, while the Germans would have easily have pinned down the Spanish left.  As it was, after initial setbacks the Grman infantry were fortunate to hang on until the cavalry could turn the tide.

The Spanish rules seemed to have the right effect.  The Spanish looked scary with so many troops & sheer numbers give them lots of dice to throw at the enemy, but large divisions & poor command makes decisive maneouvre difficult for them & the Break if Spanish rule gives them an unpredictable vulnerability that feels right.    


Wednesday, March 01, 2017

Hail King Richard!

Mark & Steve v. Jim & Mike

All 4 players selected two 5 unit divisions for a simple bit of medieval mayhem using our Hail King Richard variation of Hail Ceasar.
Mike is far left, Jim near left, Marh far right, Steve near right.
Mike started off supporting Jim left in the centre adding some bow fire into Steve's flank, but marks attack on his left flank looked so disorganised that Mike couldn't resist trying to take advantage.  teh result was a confused melee with heavy losses on both sides, but it was Mike who lost the first division even though all of Marks were on wood.
On the near flank the infantry fought each other to a standstill, both sides on wood & too shaken to finish the enemy off.  On the near flank Steve's unscrupulous selection of more heavily armoured knights than anyone else gave him a decisive advantage.  Jim's right broke, so with 2 of 4 divisions broken while the enemy hadn't lost any, Jim & Mike's army broke.