Saturday, March 31, 2018

Good Friday Musket Action: French & Indian Wars

Chris's French v. Marks's Brits
The forces are both 1350 pts & 15 units. 
BA Envelopment Scenario with some tweaks for large table.
The Brits are the attackers on the near side with Regular infantry on the their left, Colonial infantry in the centre,  Indians on their right & cavalry in reserve.
The French are defending with Canadian Militia on their right, Indians on their left & brought on regular infantry from reserve in the centre.  The cavalry from reserve was delayed but later came on their far left.
On the left British grenadiers have broken the Canadian line.  On the right the Indians of each side have had mixed fortunes. 
The British regulars have taken the farmyard.  One British cavalry unit charged the French line - it broke a front line coy, but their follow up charge on the 2nd line failed.  The other Brit cavalry was sent to the right to deal with the French hussars.
The battle ended as decisive British victory collecting VPs not only from getting units into the French deployment zone, but also destroying a lot more units than they lost.  The French erred in putting their best infantry in reserve.  The Canadians were no match for the Brit Regulars & the French regulars took too long to get into the action.  It was all over in about 2 hours so time for a couple of schooners at Knoppies.

Wednesday, March 28, 2018

Shenandoah 1862 Campaign Ends

The map below shows the campaign moves after the battle of Winchester.
After Winchester Banks & Shields retreated over the Potomac at Harpers Ferry hotly pursued by Ewell & Ashby.  The Rebs declined to charge over bridge under the Union guns but raided the arsenal for weapons & supplies.  Jackson's div rested up a day at Winchester collecting loot before striking east at Leesburg.
The Reb victory at Winchester had finally convinced Lincoln that McDowell & Fremont had to be sent to the valley to deal with him.  McDowell marched north from Manassas just failing to prevent Jackson taking Leesburg.  McDowell's 2nd division (Geary's) came up the next day & pursued Jackson back to the valley.  Jackson blew the bridge over the Shenadoah near Snickers Gap  & rested his battered division at the crossroad while Geary's engineers repaired the bridge, Ewell marched south from Harpers Ferry to join Jackson & Ashby's cavalry went to Winchester. 
After resting up a day after the battle, McDowell's div took over from Geary at the bridge while Geary marched south west to find another crossing over the Shenadoah.  He found the next one also blown & having left his engineers at Snickers didn't try to cross there & headed off towards the Manassas Gap (taking a long way round due to dense forest on the river bank).
Fremont marched his lead division from West Virginia to Winchester where he found Ashby - who conceded the town, but maintained a watch on Fremont.  Fremont moved west to New Town & was joined by his 2nd division.
After rest & reorganisation on the safe side of the Potomac, Shields' division was able to resume operations & follow Ewell on 1 June & Banks' div moved off towards Winchester on 2 June.
The Rebs turned left at the New Town-Front Royal crossroad towards Front Royal with Ashby's cavalry left as rear guard.
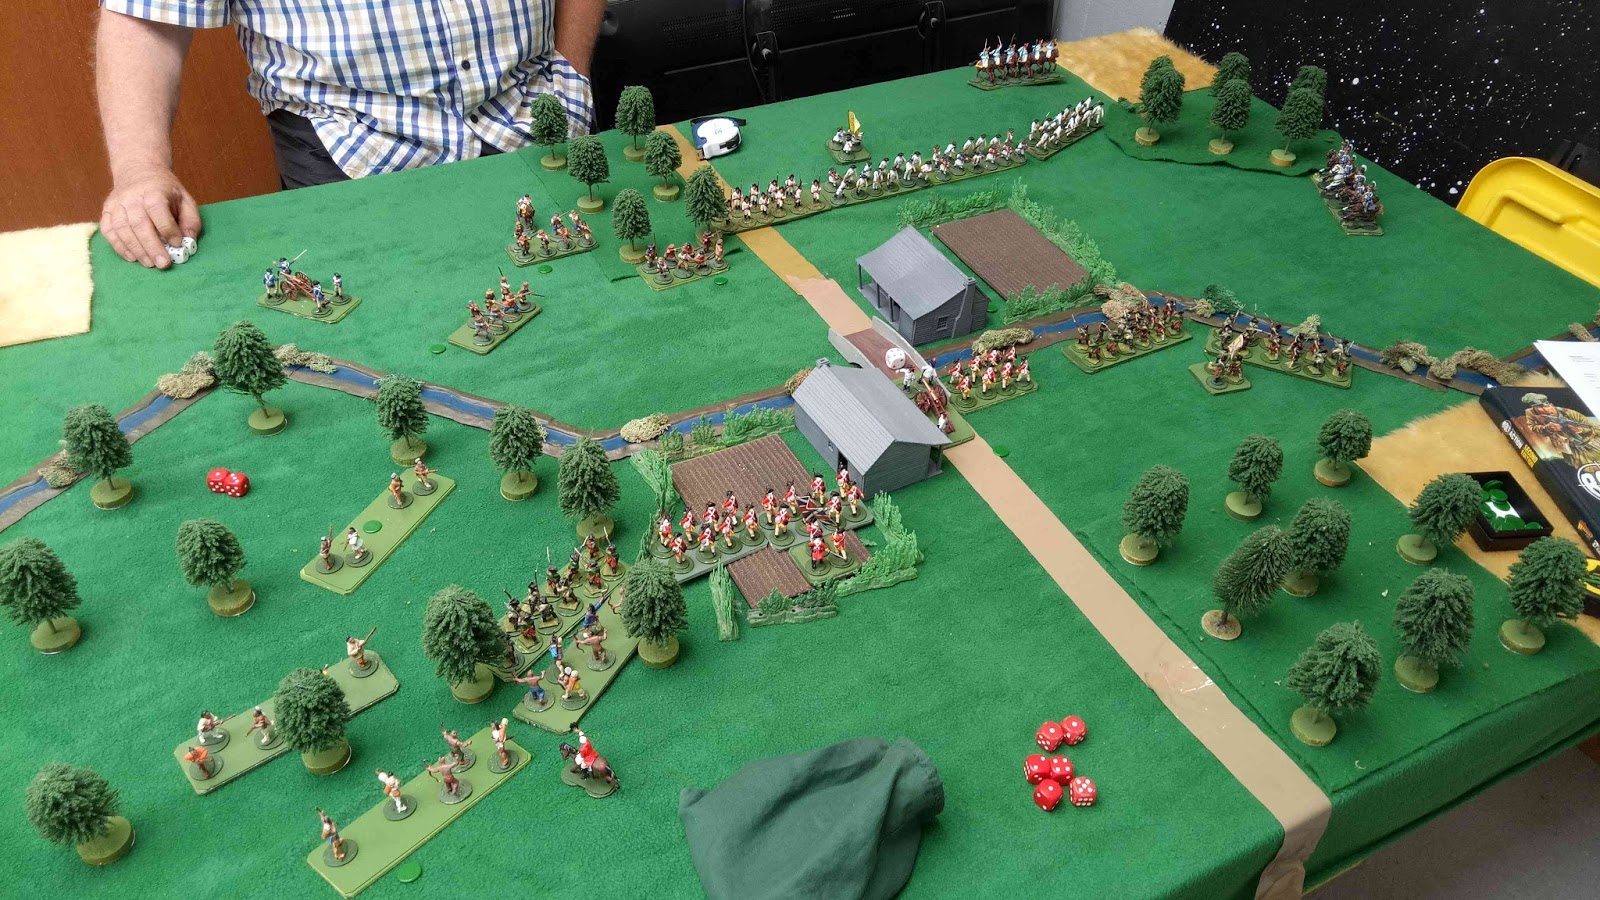
Union cavalry from all 3 Union commands converged on Ashby's rearguard to fight the last action of the campaign.
The road to Front Royal heads off the bottom left corner of the pic.
McDowell's cav has come cross county from the right foreground.
Fremont's cavalry is the column far left.
Shield's cavalry is the small brigade next to them (he came on from the far right.
Ashby's Reb cavalry is in the left foreground having already had 2 units broken by McDowell's 1st charge.
Despite early success, McDowell's men dithered while Freemont's & Shield's came up.
The Rebs never recovered from their early reverse & were also pushed back on their left.  With half their units broken they broke off the action & the remaining units ran down the road to Front Royal having done enough to allow the foot & the wagon train of loot to safely cross the Shenadoah.
 
With the bridge blown behind them, the Rebs had a clear road home & the Union forces were all too far north to be able to intercept them.

The Rebs were deemed to have won a great victory in the campaign having accumulated 8 VPs.
1 each for taking Winchester, Harpers Ferry & Leesburg.
1 each for forcing both McDowell & Fremont to come to the valley.
1 for winning more battles than they lost.
1 for getting the plunder from the Union supply bases at Strasburg, Winchester & Harpers Ferry home. 
1 for getting back to Dixie with the army still a fighting force (while failure to do so would have negated all the above).

Banks was rated the best of the Union generals. 
Banks fought in 3 battles & though he retreated from all of them, he put up a good enough show for the Washington post to laud them as valiant rearguard actions against the odds.  So 3 VPs for battles minus 1 for losing Wincheter = 2 VPs.
McDowell got 1 battle VP for Leesburg but lost 1 VP for failing to stop the Rebs taking it, so net toal 0 VPs.
Fremont's didn't lose any VPs as Jackson chose not to invade West Virginia, but he headed too far north to cut Jackson off & had no opportunity to gain battle VPs.

The real Jackson only got 7 VPs (all the above except Leesburg), so our Rebs (Mike & Chris) did very well - despite the fact that Banks (Mark) & McDowell (Steve) probably did better tactically in the battles.  But the Reb's rolling advance of 2 divisions in succession leapfrogging each other so in each battle they had a fresh division to the fore, while Ashby's cavalry distracted part of the Union force, gave them an advantage in the first 3 battles that better Union tactics couldn't overcome.  The Union on the other hand missed strategic opportunites.  Geary could have cut Jackson off west of Leesburg, but McDowell took the safe option in calling him up to Leesburg in direct support.  The Union had enough men to make a serious attempt to send troops further south (for instance all of Fremont's & some of McDowell's to intercept Jackson's retreat in the Mt Jackson-Laray area), but instead went directly at him & he was able to evade the pursuit.

The campaign was run using our own campaign rules - the same as last year's Spanish campaign with an umpire to provide hidden movement & limited intel.  The battles were all fought using Hail Mr Lincoln = Hail Caesar with our house rules.

Sunday, March 25, 2018

Sunday Musket Action at Good Games

No Bolt Action at Good Games this afternoon but Chris & Jim did some Musket Action.
We fought the Bolt Action Sectors scenario with the same 1,350 pts armies as last time.  The dice gave Chris the French starting in the near table quater & Jim the Brits in the far table quarter. The French deployed their Indians on the left, Caadian Militia in the cntre & French Regs behind.
The Brits put their Regulars on the left, their Colonials on their right with Indians in front & cavalry in reserve.
In this scenario VPs are gained both by destroying enemy units (1 each) & by getting units into the neutral quarters (1 each) or enemy quarter (3 each).  So both sides attacked.
The Grenadiers of each side faced off in the wood.
It was soon apparent that the Brits had a better strategy than the French. 
On the left of pics the Indians neutralised each other, but the Colonials got into the in support before the French & got the upper hand through weight of numbers.
In the centre the Canadian Militia were shot up by British regular volleys.
On the right, the 1st British Cavalry troops destroyed the French Hussars then rode over the guns.  They were then broken by the French infantry about facing & shotting well, but the 2nd British cavalry is heading into the 3VP zone unopposed.  
By the end of turn 6, the Brits were way ahead on VPs.  One French inf coy had stormed thru the village into the 3VP zone, but that was negated by the Brit cavalry & the Brits also had many more units in the 1 VP zone as well as lower losses.  The dice gave us a turn 7 & we played it because we had plenty of time, but it was really all over.

Playing straight Bolt Action last week I noticed that Musket Action is much easier to play than straight BA because there are fewer unit types & most of the complicated bits just don't happen in the Musket era. 

Tuesday, March 20, 2018

Shenandoah 1862: Battle of Leesburg

After the battle of Winchester, Ewell's infantry & Ashby's cavalry chased Banks' Union army all the way to Harpers Ferry where it crossed the Potomac to safety.  Banks has stayed there rallying & reorganising his fatigued & battered army. Meanwhile, Jackson's division had a days rest in Winchester before marching east through Snickers Gap to Leesburg - an objective thought to be close enough to Washington to put the wind up Lincoln & make him withdraw more troops from the Richmond front (so worth a campaign Victory Point).  However Lincoln had sent orders to McDowell at Manassas Junction allowing him to move to the Shenandoah to help deal with Jackson.  McDowell moved north & his advance guard of cavalry found Jackson on the road to Leesburg.  McDowell hurried his infantry north to give battle late in the day.

The head of Jackson's column is coming out of the pass through the hills on the far side of the table.  The Union advance guard of cavalry is in front of the town.  The Union force is coming up the road on the left (after a delay).  The rest of the pics are taken from the other end of the table.

Before the Fed infantry arrived, the Fed cav retreated through the town. The Rebs sent a brigade forward to disrupt the Union deployment & occupied the town.
The Feds deployed a brigade to meet the Reb van & pushed it back while their other 3 brigades deployed to their right.  The Fed cav made a pest of themselves as skirmishers on the far flank.
The Union deployment to the right was painfully slow with inexperienced troops, but the Rebs did a pretty poor job of deploying & did not take advantage to make a sound defensive line.
The Rebs arguably moved too many troops to their centre & left their right too weak & the Union left is gradually pushing their right back.
The Union right has finally got into action & although the pesky dismounted Fed cav has been blown away the Reb left is suffering from a ring of Union fire.   However, they have stabilised their right by bringing some troops back from the centre.
At nightfall the Rebs still hold the town.  No brigades of either side have been broken.  The Rebs have 3 inf units broken, the Feds have had 2 inf & their cav broken.  But casualty count is well to the advantage of the Union & the Union players feel they have done well in pushing back both flanks of the enemy & they appear very confident of finishing the job tomorrow. 

Monday, March 19, 2018

Shenandoah 1862 Campaign: Phase 1

Now that the first phase of the campaign is over I can provide a report on the campaign in general without compromising the hidden movement aspect of the campaign.  The campaign started with Jackson's force deployed in the centre of the Shenandoah valley with 3 Union armies around him - Banks to the north, Fremont to the west & McDowell to the east.  Initially only Jackson & Banks are involved, Fremont & McDowell being constrained in their own areas until Mr Lincoln is sure enough of CSA overall intentions to release them to move against Jackson.
The campaign started on 20th May with the initial deployments of Jackson & Banks' forces as shown on the map.  Jackson has 2 infantry divisions (Jackson's & Ewell's) & a cavalry division (Ashby).  Banks has 2 divisions (Banks & Shields).
On the map, the CSA forces & moves are in red, the Union in blue. 
The campaign started with Banks waiting for Jackson to move.  Initially Ashby moved to Front Royal to observe Shields while Jackson marched up the pike to Strasburg with Ewell following.
At Strasburg Jackson attacked Banks.  Banks held off Jackson's division until Ewell arrived late in the day, then withdrew in good order.
Banks withdrew to New Town & called for Shields to join him there. Jackson's depleted div rested at Strasburg while Ewell followed Banks.  Ewell attacked Banks' depleted division at New Town & took the town.  Shields arrived late in the day but in time to save Banks from defeat.
The next day Ewell's div held their position in New Town while the Union withdrew before Jackson's div came up from Strasburg.
The Union withdrew to Winchester, their main supply base.  Jackson's div followed them while Ewell's rested up at New Town).

On the 26th, Jackson attacked the Union at Winchester. Shield's fresh div took the brunt of the attack while Banks' battered & fatigued div was held back on the Union left.   Shields held Jackon's div off until Ewell arrived but could not stand against another fresh division while Banks' div was in no fit state to launch a counterattack to help him.  Banks broke off the action with his whole force now in bad shape.
Before the battle, Banks had sent his cavalry to Charles Town to guard against Ashby cutting off his line of retreat to Harper Ferry.  It was well he did, as Ashby had been sent to Charleston to do just that.  But the Union cavalry got their first & the Union army, though closely pursued by the Rebs was able to retreat through Harpers Ferry & over the Potomac.
Safe on the far side of the Potomac Banks will need a few days before his battered & fatigued force is fit to fight again.
So far all has gone well for the CSA.  They have driven the Union back over the Potomac scaring the hell out of the North, collecting all the military supplies they can carry from captured Union supply depots, & in campaign terms racked up a lot of Victory Points.  However they are surrounded by three Union armies & it's a long way back to Dixie before they can claim victory.


Sunday, March 18, 2018

Sunday Bolt Action at Good Games

Not a lot of action there today.  Steve wanted to try our his Australians so I took them on with my Ities in a Meeting Engagement to get myself back up to speed with BA rules for the upcoming comp.
The Italians are on this side of the table. 
Things starting going bad for the Italians when the Honey won the tank fight with the A14.  They came back as the Paraducitci stormed thru the village.  But the Oz flame thrower took it back & the Italians didn't have the firepower left to come back from there.
The Oz were well in front at the end of turn 6.  There was a turn 7 & the Itie's nothing-to-lose counterattacks got in some wins, but not enough to even save a draw.

Friday, March 16, 2018

Musket Action: French & Indian Wars

Jim's Brits defending v. Chris' French in a 1350 pts Point Defence Scenario using Musket Action - Camp Cromwell's house rules to take Bolt Action into the musket & bayonet era.
The scenario is slightly varied from the BA book.  The defenders (on the right) deployed 1st, then the attackers deployed up to 24" back from the defenders.  The objectives are the white dots - in the hamlet, & on two hills 24" each side.  The French need to take 1 objective for a draw, two for a win & lose if they take none.
The Brits put their regular army line infantry in the cntre, Colonial Militia on their right, artillery, cavalry & grenadiers on their left & Indians on both flanks.
The French have their regular army infantry regiment in their centre, Canadian Militia on their left & their Indians, cavalry & artillery on their right.  
Mitzi seems to be particularly interested in the French & Indian Wars keeping a keen eye on the battle throughtout.
Seeing the main French attack was on their left & centre, the Brits formed their Colonial militia into a column & marched it to the left behind the line & advanced the rest of their force.  Both sides overlapped the enemy regulars line & the left flank British coy  was blown away & the grenadiers on the French left forced to retire.  The Canadians replaced the grenadiers, the cavalry & artillery covered the British centre.
On the Brit left the French Indians drove the Brit's Indians back but the British Grenadiers moved up to safeguard the objective. In the centre the Brits tried a cavalry charge v. a French line, but it did not go well.  They were thrown back then destroyed by musket fire.
On the left the Brit grenadiers are holding off the French Indians.  In the the cavalry of both sides has been disposed of,, but the Colonial militia has filled the gap in the British line.  On the right the British line has lost another coy but with Indian help is holding on. 
On turn 6 the French made desperate charge in the centre to try & save a draw, but the Colonial Militia held them off & the Brits held all the objectives when the dice decreed no turn 7.  We played out turn 7 anyway because we were enjoying ourselves & had the time, but the French had shot their bolt & it only got worse for them.

The only thing this battle made us consider changing in the rules was to make the cavalry less vulnerable by making then 5+ to kill regardless of whether they are Vet, Reg or Inexp.  This battle took about 2 hours - which has been the norm in all our Musket Actions.  The contrast with our experience with similar sized actions using Sharp Practice 2 or Muskets & Tomahawks regarding ease & speed of play is stark.  In part it's due to our familiarity with Bolt Action making the learning curve for Musket Action almost non-existent, but the main thing is the simplicity & efficiency of the Bolt Action system.  SP2 in particular is overburdened with unnecessary bells & whistles that slow the game down & make having the inclination to learn fiddly detail in the rules more important than tactical skill.

Tuesday, March 13, 2018

Shenandoah 1862 Campaign: Battle of Winchester part 2

We picked up where we left off last Tuesday.
On the eastern flank Union troops appeared in the woods & forced the Reb cavalry back with rifle fire.  The Reb infantry did not advance off the wooded ridge.  Banks battered & fatigued division was content to sit behind the river, but artillery shells don't get tired & his cannon began to do some serious damage to the CSA centre as it advanced on the town. 
On the western flank Jackson continued his attack.  Both sides had suffered heavy casualties on this flank, but Ewell's men were now coming up to help Jackson's out while Shield's men had no reserves & his line was beginning to crumble.
Shields has begun to fall back as the fresh Rebel infantry come up to the front. 
General Mitzi casts an keen eye over proceedings as Shield's division is given a general withdrawal order & breaks off the fight.   Banks' division is still at a safe distance from the Rebs, but it too is now given a general withdrawal order.

We now go back to email & map campaign mode until we get to another battle situation.  Jackson will later this day take Winchester & with it Banks' main supply base.  Bank's army will need some rest before it is fit to fight again, but Banks has a clear line of retreat to alternative supply sources to the north & the expectation that other Union forces should be on the move to help stop Jackson.


Operation Cromwell 2018.1: Bolt Action Event Flyer


Sunday, March 11, 2018

Musket Action: French & Indian Wars at Good Games

Chris' Brits v. Jim's French.
1,250 pts, BA Double Envelopment Scenario.
The French are on the near side. In this scenario both sides start with half their units on the table & the rest in reserve coming on subject to command test from turn 2.  The Brits mainly put their support troops on first & brought on their regulars from reserve.  The French mostly put their regulars on first & then brought on the support troops.  The French advanced their line infantry hoping to blow away the Inexperienced Colonial line infantry quickly.  But with the cover of the hedge & poor French dice the Colonials survived & the British Regulars, coming on promptly from reserve, overlapped the French left & hammered it with converging fire. 
I think not many troops look better than red coats & tricorn hats, even with my basic paint job.
On the far flank, the French hussars tried to drive the Indians away.  The Indians evaded & the British cavalry counterattacked & broke the hussars.  They went on to charge the French line, but were repulsed by defensive fire then finished off by artillery fire.  With the cavalry out of the way the far flank turned into a skirmish fight between the Indians & the Canadian militia.

On the near flank, the French Indians charged & broke the lead British Indian unit then turned right to overlap the right of the French line.  The remaining French Indian unit pressed on down the flank to gain VPs by exiting the far edge of the table.

At the end of 6 turns, the French had 3 VPs for position, 2 for breaking enemy units so 5.  The Brits had 4 points for broken French units so when the dice decreed no 7th turn, the result was a draw.  But the British were in by far the stronger position & when we played a 7th turn (for curiosity, because we had time), more French units broke & they couldn't stop a unit getting into their deployment zone & the Brits hit the lead.

There are a couple of issues with the rules still being debated, but we are very happy with them in general.  We think they fill the niche for a game for small armies in the musket era very well.  Muskets & Tomahawks & Sharp Practice fit in the same niche, but Musket Action has the great advantage for Bolt Action players that if you can play BA you can play MA with a minimal learning curve - there's only 3 pages of rules to learn.  

Tuesday, March 06, 2018

Shenandoah 1862 Campaign: Battle of Winchester

On the night of 24th May both sides stayed on the battlefield at New Town.  Ewells' CSA division had taken the town and formed a defensive position in & on each side of it.  Banks fell back out of cannon range on the Turnpike to Winchester.  Shields fell back into the woods to the east.

In the morning Banks' division (battered & fatigued after 2 battles in 3 days with no chance to rest) withdrew north in good order.  Ewell had no inclination to pursue while Shields' fresh division remained in the woods on his flank.  AS soon as Banks had got out of sight, Shields slipped away on the road east.   Later in the morning Jackson's division arrived from the south after having a days rest in Strasburg & continued north after Banks.  Ewell remained at New Town for the day to recuperate his men after the battle.

Later in the day Banks stopped his retreat at Winchester.  A little later Shields arrived on the Frnt Royal road.  Jackson came up late in the day but did not attack.  Winchester is Banks main supply base so he must fight to defend it or lose campaign Brownie Points.

Overnight both sides prepared for battle in the morning.
Both sides have only put down on the table the troops visible to the enemy.  Banks' fragile division is deployed behind the creek on the Union left. Shields' fresh division division is deployed in the town, in front of it & to the Union left.  Jackson's division is deployed both sides of the turnpike.
 Jackson sent his cavalry tot he far right to keep an eye on the Union left while setting up batteries & sending out a skirmish line on his left & centre.
Jackson has began an attack on the Union centre-right, but Banks had troops hidden in the woods & is counterattacking the end of Jackson's line.
A fierce fire fight is going on on the CSA left.
While the fire fight rages on the left, with both sides accumulating serious casualties, Ewell's division has been marching onto the field on the Turnpike.  His first 2 brigades have moved to the right, the 3rd is moving up in the centre.
Ewell's 1st two brigades are deploying to the right.
About 10pm we called time for the night after about 2 & 1/2 hours play time.  The battle remains in the balance & will be continued next week.  The Union right has been doing well so far, but the Rebs have reinforcements coming up & Banks' battered & exhausted division has not yet been tested.  

Sunday, March 04, 2018

Musket Action at Good Games

Chris & I fought another French & Indian War Musket Action at Good Games this afternoon.  (Musket Action being our house rule variant of Bolt Action for the musket era).  The scenario was the BA Hold Until Relieved.  The British are defending the bridge with the French attacking from the far side.
The Brits started with infantry in the houses.  The French started with their Indians & Canadian Militia on the table & have now brought on their French Regulars.  The Brit have more regular infantry coming on in the centre with Indians & Colonials on their left & cavalry & Colonials on their right. 
All the troops are on the table now. Indians skirmishing on the left.  The French line advancing with Canadians providing fire support. 
The French Grenadiers took the far house, but they were decimated by close range artillery & musket fire & it has been retaken by the Brits.  The Brits have won the Indian fight on the left.  The French have driven off the British cavalry and are wrapping around the British right.
Both sides have had heavy losses, but after 7 turns the Brits still hold the two houses (& thus the objective bridge) & the French have no prospect of getting them out.

The battle took about 2 hours - similar to straight BA.  The rules continue to evolve as we play test them but they already work fine at providing an interesting, fast moving & good looking game.