Tuesday, April 28, 2015

Mare Nostrum Campaign Turn 2.1

Turn 2 of the campaign so far:
The Punic War has the Carthaginian/Spanish army turning away from the Roman counterattack in north Italy to attack Gaul, but the Gauls have retreated in the face of 2:1 odds - so no battles.  Meanwhile the Carthaginians got a nasty surprise when Ptolemy's fleet arrived off Carthage which had been left almost defenceless in their zeal to crush Rome & Gaul.
In the centre, Macedon has attacked Greece - battle yet to be fought.
In the east, Mithradates has pursued Seleucis to Susa.  Seleucis turned to fight on ground of his choosing - this being tonight's battle.

Battle of Susa:
Seleucis (Mark) v. Mithrades (Chris deputising for cousin Dale in Switzerland)
Seleucis is on the left.  Part of his army is not on the table as it is out of sight of the enemy behind the ridge.  Mithradates is advancing, though his cavalry seems rather reluctant.
Mithridades has pushed his lighter infantry forward while still waiting for his cavalry to get moving.
The warband on this side has been beaten back by the elephants & the Thorakiti on the other side by archers.  Still the Pontic cavalry hangs back.
Mithridates phalanxes have made some gains on the near flank, but a Seleucid counterattack has driven his right back.  The Pontic cavalry is finally getting a bit closer to the front.  Seleucis' second line has now been put down on the table behind the ridge.
 Mithridates pushes the attack on his left supporting the phalanx with cavalry.  His cavalry in the centre has caused Seleucis to stop his advance on his left.
 Seleucis's cavalry counterattack has driven back the Pontic left.
 Mithradates' cavalry is fighting back against Seleuci's and his numbers are beginning to tell.
Seleuicis' cavalry has broken leaving his infantry unsupported.  His army fails the Army Break test having lost half its divisions without the enemy losing any.  It was a very close & hard fought battle with the Pontic numbers almost balanced by Seleucis' choice of terrain.

Seleucis has to fall back into the city of Susa, his last possession.  Mithdidates will presumably lay siege expecting to take the city next turn.

    .

Friday, April 24, 2015

Napoleonics at Moleworth

Jim & Chris' French v. Dave & James' British

The British commanders contemplate the initial deployment.  (The British are on the far side of the table in all the pics).
The Brits have advanced a little to a defensive position.  Both sides have their cavalry on the far flank.  The French are making a massed column attack on the right centre.  They have set up a battery to soften up the centre with infantry waiting for the right moment.  They have deployed their weaker left to defend the creek line.
The French column attacks were blessed by poor British defensive fire and the British line is wavering this side of the village.  A column even got away with charging a battery on the hill.

On the far flank the cavalry has finally got to grips with each other.  The Brits had some success in their first charge, but the French have heavier cavalry & have the upper hand overall.  The battery has blown a hole in in British centre leving their left isolated & on the verge of collapse.
The French right has wheeled left to roll up the line.  A British Guards battalion has stopped the French infantry but the battery has redeployed and is about to unlimber in front of them while more infantry come up on both flanks.
The British cavalry ahs now broken on the far flank.  The Guards have broken in the centre and the Brits have failed their Army Break Test.  A good plan backed up with good dice is a pretty powerful combination. Once again Hail Frederick has given us a fast, entertaining & great looking battle.  Gotta love Napoleonics.

Tuesday, April 21, 2015

Campaign Battle & More

Having won the naval battle the Carthaginians landed their army at Parma while the Romans were unable to reinforce their army.  SteveJ commanded the Carthaginians for PeterW v. Mike's Romans.  Mark & PeterC umpired.
 The Carthaginians significantly outnumbered the Romans, but the Romans as defenders had chose the terrain and were able to hide most of the their army behind a low ridge. 
The Carthaginian cavalry on the far flank was slow to advance and the real battle started when the Roman infantry charged over the hill at the Carthaginian foot on the near flank.  They pushed back the Carthaginain left, but the citizen spearmen advanced in the centre
The nifty little drilled Roman units showed their value as they turned to outflank the Carthaginian centre.
The Carthaginian centre broke, but  some critical command dice fails exposed their own right and a counterattack by the Carthaginian left broke the Roman foot.  On the far flank the cavalry had fought each other to a standstill, but when the Carthaginian left got some good command rolls to move quickly to support their cavalry the Romans conceded and withdrew.

It was a tough fight.  The Carthaginians won in the end, but they know they've been in a fight.


Bolt Action on the small table:

Nick was able to make a rare appearance at Camp Cromwell so Chris gave him a Bolt Action battle on the small table.
Chris' British were defending on the right in a Point Defence scenario against Nick's Germans.  The Germans took the near objective with their stormtroopers, but the Cromwell was for once not toasted & picked of the German attack on the other flank.  With the attacker taking one objective the battle was a draw. . 

Saturday, April 18, 2015

Napoleonic Naval Action in Suffolk

My e-friend in England and his mates have been fighting some seriously good looking battles with my Man o' War rules.


Thursday, April 16, 2015

Mare Nostrum: Seleucis v. Mithradates

Having seen off Chris's Egyptians, Mark now has to fight Dale's Pontic army coming at him from the north.  Dale being in Switzerland, Chris commanded his army.
The battle was fought at Black Hill using PeterC's troops.  His basing system gives us rather smaller units than at Camp Cromwell, but Hail Caesar copes just fine. The Seleucids are on the left above & the far side below.  The Pontic army has a heavy infantry division on their right and two cavlry divisions on their left.  Seleucis has heavy his phalanx on his left, cavalry on his right and elephansts with supports in the centre.
 Both side advanced except for the Seleucid elephant force which blundered backwards.  The phalanxes made the first contact with one Seleucis unit broken and one Pontic unit pushed back
The Seleucid elephants have finally attacked in the centre to plug the hole in the Seleucid line.  The infantry fight has turned into a stalemate.  The cavalry fight on the left  is full on.
The elephants have held their own, but despite some local success, the Seleucid cavalry been broken.  Seleucis has decided the day is lost and has begun a retreat.
The elephant has delayed the Pontic cavalry pursuit and allowed the phalanx division to leave the field un-broken.  The elephant division also managed to break off and retreat without actually breaking.  So although defeated, the Seleucid army has withdrawn in pretty good order with oly 1 of 3 divisions broken & without failing an Army Break Test.

Seleucis retired to Susa without reinforcing the garrison at Antioch hoping it would hold out anyway.  But he lucked out and the Antochians gave up their city to the Ponts.

Wednesday, April 15, 2015

"Mare Nostrum" Ancient Campaign Kicks Off

After a lot of intense diplomatic manoeuvring, the first turn orders were in and the first battles fought tonight.

The campaign is set around the Mediteranean ca 200 BC.  Peter Collidge is the umpire.  The players are:   In Hobart: Mike = Rome, Mark = Seleucis, Chris = Ptolemy, SteveJ = Macedon, James = Greece, Jim = Gaul.   In Canberra: PeterW = Carthage, SteveD = Spain, Dale = Pontus.   Carthage & Spain have formed a block in the west.  Rome, Gaul and Greece have formed an alliance in the middle.  In the east Ptolemy & Pontus seem to be ganging up on Seleucis, while Macedon is playing a waiting game.

The first moves have generated land battles in the east as Seleucis faces two enemies and combined operations in the west where the Carthaginans and Spanish are invading northern Italy by land and sea.

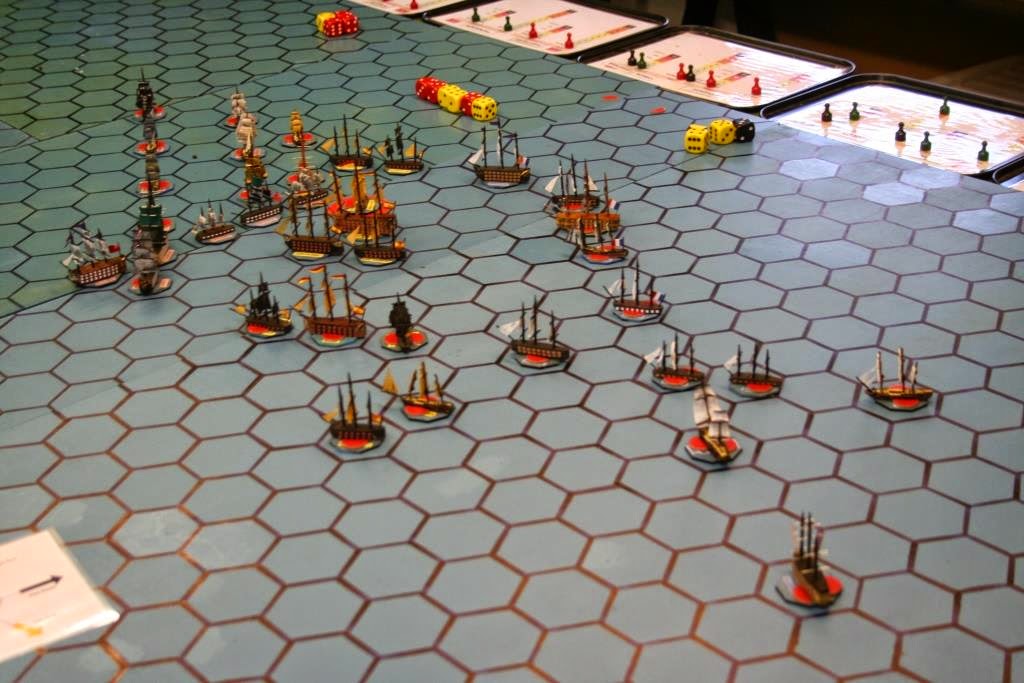
Naval Battle off Parma
While their Spanish allies advance overland, the Carthaginians have sent their fleet from Gades to clear the sea lanes for an army to be transported by sea.  The Roman fleet had moved from Syracuse to intercept the Carthaginian fleet.
The Roman commander on the far side was somewhat at a disadvantage in fighting his first ever ancient naval action while the Carthaginian's stand-in admiral, SteveJ has had a couple of practice matches. A run of hot Punic dice at the start compounded his problem and the Roman fleet was soundly beaten, losing 3 ships to 1 (out of 5 each).  This result both allows the Carthaginian army to land and cuts off sea transport for Roman reinforcements to the Parma force - leaving it significantly outnumbered. 

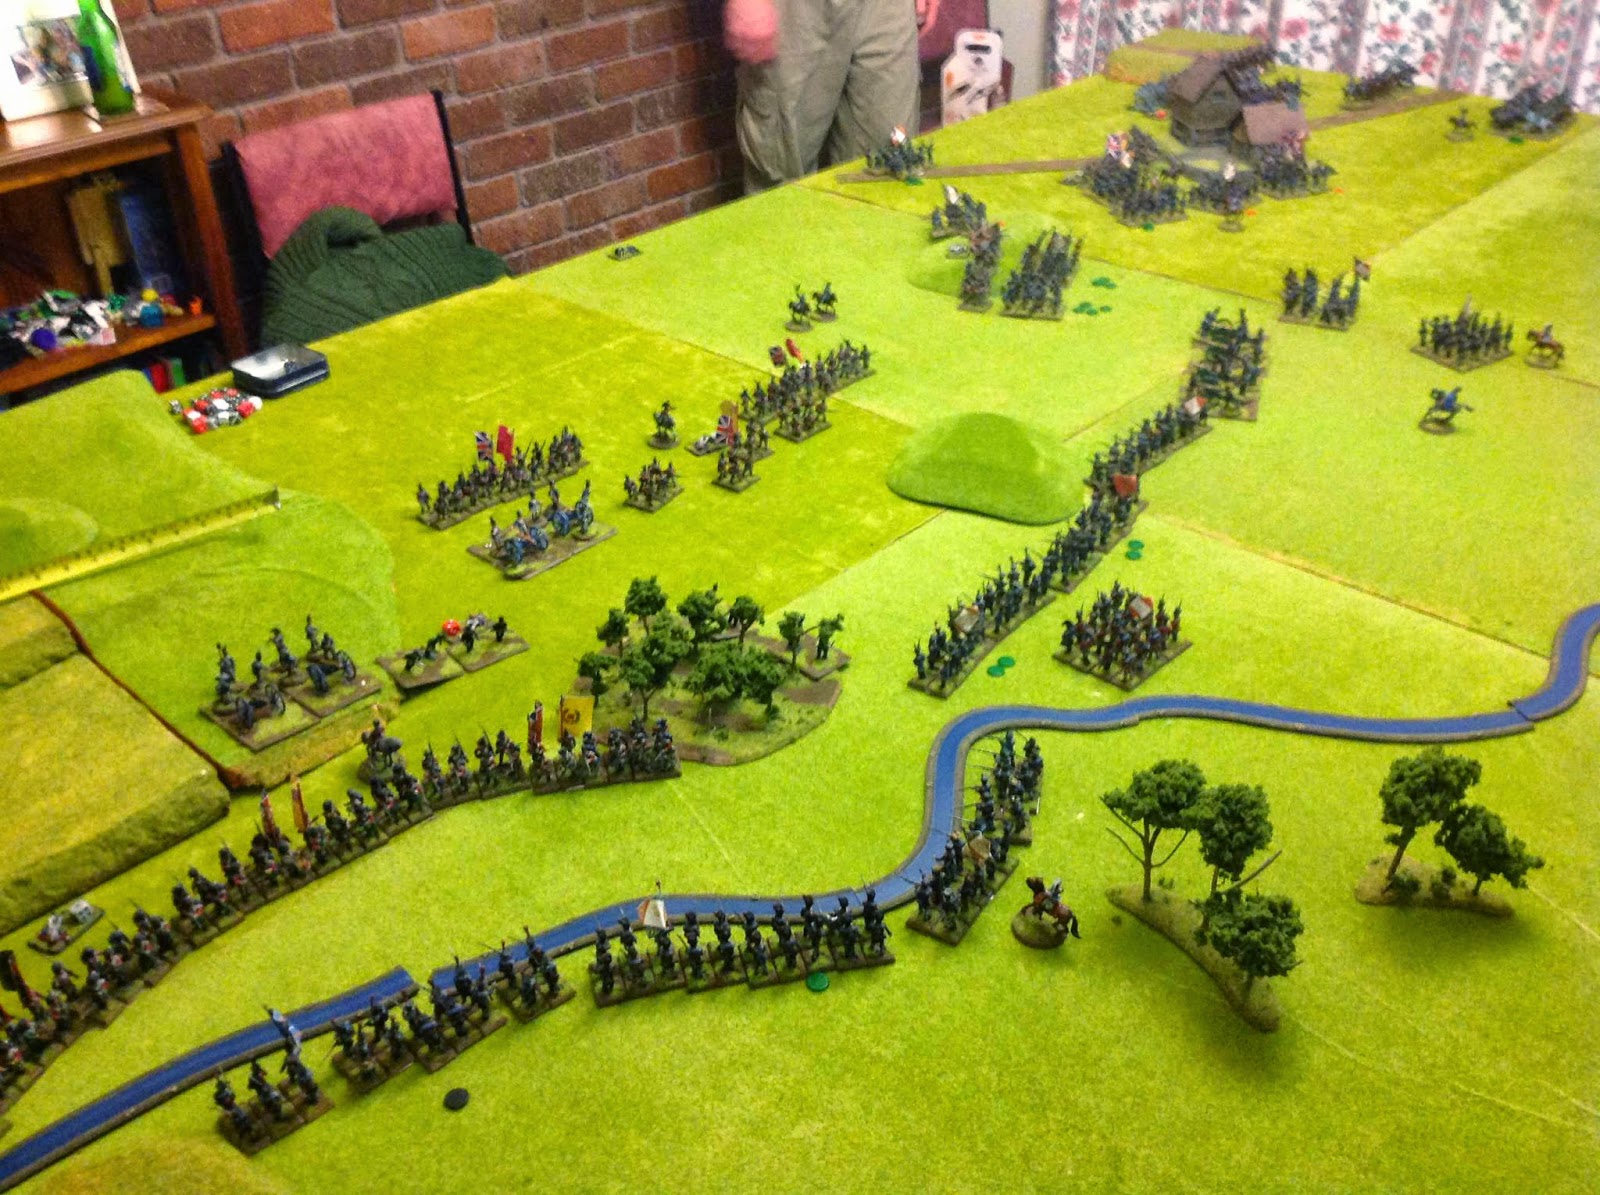
Ptolemy attacks Seleucis
Meanwhile on the big table Jim umpired the battle between Ptolemy & Seleucis.
 Ptolemy is on the left, Seleucis on the right.
Seleucis' phalanx has angled left to attack Ptolemy's centre. On the near flank, Seleucis' cavalry is advancing on Ptolemy's right. On the far flank, Ptolemy's cavalry has refised to move.
Seleucis is concentrating most of his army against Ptolemy's right while Ptolemy's cavalry is taking far to long in their attempt to sweep around the hill into Seleucis's right flank.
Ptolemy's cavalry has finally got moving, but one phalanx has forced it go even wider & it plays no part in the battle while Ptolemy's right & centre crumble to give Seleucis a decisive victory.  His reward is to fight the Pontic army moving down from the north.


Friday, April 10, 2015

Hail Poseidon at Black Hills

Steve & Peter fought another test game for Peter's Hail Poseidon rules he's developing for the Mare Nostrum campaign (which about ready to kick off after a very entertaining 1st diplomacy phase) (with Jim umpiring).

In previous games we struggled with the problem of the non-moving side being sitting ducks in the IGUO system.  Today we tried using a Reaction Test to determine what happened when a ship moved into contact with an enemy (but still IGUO).   The Reaction Test takes account of relative ship size & speed, crew skill and angle of approach to make each contact a fair fight regardless of whose move initiated it. The result of a contact could be a successful ram, an oar rake, or an evade.  It also determines the relative positions of the ships after the contact - which may provide an opportunity to grapple & board.
The black hulled ships are Peter's Athenian triremes.  Steve's fleet has regular crews but has a pentreme flagship.  The counters on the ships record the ship's last move distance (in ship lengths).  Two 0's = immobilised for a turn.  This allows us to limit acceleration & deceleration and to include relative speed in the Reaction Test when ships clash.  Damage and crew stamina is recorded on roster sheets.
The turning template controls movement (the pentreme template has a lesser angle).   There is wreck counter to the left of the template where a ship had gone down.
In the end Peter had used his superior crew's better manoeuvrability to gain a close win.

The Reaction Test seemed to work really well - providing a lot more scope for tactical skill to govern the result rather than luck - QED.  We saw a few opportunities for further refinement & identified a couple of issues not covered.  We think another test game & Hail Poseidon will be ready for real action in the campaign.

Tuesday, April 07, 2015

Napoleonic 6 players

We recycled the 1st Newbury battlefield from last week for a Napoleonic game tonight. 

French: Mark (left flank inf). Mike (centre inf).  Jim ( right flank cav).
Prussian: SteveJ (right flank inf). Austrian: Chris (centre inf). Dave (Left flank cav).
 The Austro-Prussians are on the left.
Mike had advanced boldly in the French centre, but his comrades on the flanks are lagging behind. 
After initial success, the French attack in the centre ran out of steam and found itself in danger of being attacked from both flanks, but Mike managed to withdraw from the pocket.  The French flanking forces continue to have rotten command rolls.
Mike had redeployed into a firing line and is getting some support from Mark on the near flank.  Steve's Prussians have gone onto the offensive and are putting pressure on Mark.   On the far flank the French cavalry finally got moving and the classic swirling cavalry melee is in progress.  The numbers are equal, but the Austrians have some cuirassiers while the French have artillery support.  
Things have been looking bad for the French for a long time.  Their cavalry was hard pressed on the far flank, Mike was beaten back in the centre & Mark was being pushed back by the Prussians on the near flank.  But suddenly it turned around.  Both side's cavalry was down to half strength, but the Austrians failed a rally and had all 3 remaining shaken so they broke.  The French cavalry had 2 survivors shaken & one hussar unit one off shaken. At the same time in the centre, some hot shooting by the French put Chris's infantry on half strength & all shaken so they broke too.  Like the cavalry, the French centre had 3 surviving units, 2 shaken & 1 on black. 

As always Hail Frederick gave us a fast, exciting, good looking and close game.  It took less than an hour & a half.

Monday, April 06, 2015

Mare Nostrum Campaign: Naval Practice

We are about to start an Ancient campaign with 8 players in Hobart & Canberra with PeterC umpiring.  The first diplomatic phase is under way at the moment.  The land battles will be fought using Hail Caesar.  The naval rules are still being thrashed out.

Today Mark, James & Jim made a trip to Black Hills for a naval rules playtest.
Mark has 2 squadrons on the left, each 1 pentreme & 4 triremes, all regular crews.  Jim & James have 1 squadron each on the right, each 5 veteran triremes.
Mark got in the first strike.  But Jim & James both fought back ramming a equal number of Marks's ships.  But somehow Mark's ships suffered much less damage than the J's.  And every time one of Mark's ships went down the J's threw more one's and the ships that rammed them went down with them.

At times the rules seemed rather cruel, but it was hard to tell if the problem was the rules, the player's incompetence in unfamiliar territory, or extreme dice rolling (Mark was having one of his hot days).  The usual problem with ancient warfare is how to handle movement up close - both simultaneous & alternate systems have problems. Afterwards we did some experiments with an Bolt Action style system that showed promise.  We intend to test it next time.