Tuesday, December 29, 2009

Maharajah 09 2nd Semi Final 28/12/09

Nick's US Armour v. Mark's Fucilieri
2000 pts Breakthrough, Nick attacking.

Nick adopted the same tactics as against Jim's Bersalglieri in his Quarter Final.  Only his priests & Recon were on the table at the start as he relied on his flanking force to come on in good time.

The first rounds went to the Italians.  The Semos came on from reserve on turn 1 and pounced on the Priests, knocking the platoon out that turn (note burning Priests next to Nick in the pic).  The USAF was intercepted by the Picchiatello for the 1st 3 turns.

But that was the high water mark for the Ities.  When the USAF finally got thru they took out an 88.  Then the 1st Sherman platoon came on with HQ & zapped the other one.   Mark had failed to set up an adequate reception committee for the US reserves.  To save the game he had to blast the Shermans off the objective with artillery & airpower.  They failed to do so & the game ended on turn 6 with light casualties to both sides.

The Grand Final will be between Nick's Panzers & Leigh's Death or Glory Boys.
(As both SF winners were Allied, they diced off to see who would change sides.)

Thursday, December 17, 2009

Nick & Jim in Launceston


Jim was up in Launceston for work, and amazingly enough he just happened to be up there for games night.


There we 45 people at the club. Three games of FOW, plus as many players just chatting. And the usual heaps of fantasy / sci-fi games.


Game 1 - Nick (US infantry) vs Darren(German tanks). Darrens tanks were advancing mercilessly -- but then an AT gun ambush knocked out all but one of his tanks. Victory to Nick.


Game 2 - Nick R (British infantry) vs Jim (Italian parachutists). Jim had to attack, but had nothing to take out the British Churchills. And he rolled an inordinant number of '1's. Victory to Nick R


Game 3 - A beautifull big push. When we left the tanks had broken through the Russian infantry. But there was a lot left to go.

Friday, December 11, 2009

Maharajah 2009 1st Semi Final

Leigh's Death or Glory Boys v. Byron's Panzerspah
2,000pts Encounter Mission on 8x6 table


Byron deployed Pioneers on his right, 3MkIIIs right of centre, 6 Neblewerfers in the centre, 3/75mm ACs & 3 Pak40s on the left.
Leight put his 25pdrs on his left, with infantry in front in the woods on his flank, AA in centre & his Lees on his right centre & his Grant HQ on the far right.

Leigh began with an advance on his right. He got rid of the Paks - mostly with artillery fire, but the Lees were destroyed by the Paks & Panzers. The Grants were advancing on the undefended objective on the mountain plateau on the German left, but 4 Pak40s arrived in the right place to defend the mountain top & the Grants promptly fell back.

The British reserevs came on faster than the Germans. The Brit left was strengthened by bren carriers & Valentines while more Valentines & bren carriers plus Crusaders advanced in the centre. In the centre there was a fair bit of actuon between Neblewerfers, carriers, armoured cars & tanks, but the battle was decided on the German right. The Germans attacked thru the scrub with 2 Pioneer platoons, but somehow the single Brit rifle platoon beat one, then died destroying the other. German armoured cars slowly advanced on the objective through the woods & were destroyed while the Panzers tried to cross the river to take on the Valentines before the tanks on the Brit right could intervene. 2MkIIIs bogged & stayed that way while Valentines moved up into close range from both sides & destroyed them. The Germasn struggled on for a little longer, but the battle was lost with the MkIIIs.

Byron had a pretty sound plan - to attack though the scrub with 2 infantry v. 1, but a minor tactical error compounded by bad dice let the Brits win that fight against the odds. The MkIII's could have saved the day, but bad bogging rolls hung them out to dry.

Nick & Mark with fight the other Semi Final between Xmas & New Year to decide who fights Leigh in the Grand Final.

Saturday, December 05, 2009

Maharajah 09 4th Quarter Final

Jim's Fucilieri v. Nick's US Armour


2000 pts Breakthrough Mission in Tunisia, US attacking.
Fought at Nick's with Joe & Leigh umpiring (Byron did the map).

With both sides having armour Attacker/Defender had to be diced for.  Both sides wanted to attack because the defender can only have 1 motorised platoon on the table at the start.  Nick was very relieved to win the roll as defending would have hurt him the most as his army was entirely motorised whereas the Ities had 4 non-motorised platoons.

The Ities deployed Bersaliglieri in the centre, 90mm AA on their right (in the cover of a light wood with a geat field of fire over the US deployment zone),  100mm howitzers on the left, Semos behind the Beraglieri & their 75mm artillery as an anti-tank screen on the other quarter of the table.

It looked a good deployment, but Nick rather trumped it by only putting his Priests & recon on the table & putting his 2 Sherman (x4) platoons, Honeys (5), SP mortars & command (2 Sherms) in flank attack.  He ran a risk of then not showing up in time, but the odds were on his side.

In the early turns not a lot happened as both side's reserve platoons were a bit slow showing up.  The Bersaglieri& Semos moved up to a position to defend the objectives.  The USAF showed up a lot but didn't do much.  The Priests & planes tried to nail the 90mm AA, but just couldn't.  Nick tried to sneak his Recon around the right flank, but the 75's popped the jeeps and an M14 platoon came on at the right time & place to fnish them off.

On turn 5 both Sherman platoons came on together with command - 10 Shermans & suddenly it looked awfully bleak for the Ities as their tin cans started to melt away.  But they struck back.  The 75's dropped smoke to keep the Shermans on the move & reduce their firepower, as well as to draw them forward into AA range.  One 90mm AA got in one volley thru the gap in the olive groves & popped 3 Shermans before the Priests & planes finally got it, the M14s & Semos converging from 2 directions got some side shots & the 100mm howitzers pounded them.  Half the Shermans were destroyed in one turn.

The Honeys came on & destroyed an M14 platoon but a vicious 100mm howiter bombardment scared the survivors away.  The Armoured Mortars came on, tried to hide behind the monastary, but were immediately destroyed by the L6's of doom. 


The Honeys attacked the 75s, but were beaten off, then both platoons sides failed morale. 

Both sides lost more tanks in the shirtfight in the corner & were teetering on the verge of army morale tests.  The 3 surviving Shermans were cowering in the corner of the table among the burning tanks but they were still the most powerful pieces on the table.  The Ities just needed to get another bail to force a platoon morale check & automatic army morale failure (no hq left).  But they just couldn't get it.  Meanwhile, while the Shermans ground the Ities down.  The Itie CIC still lived having transferred to the last L6 (now hiding behind the monastary saying Hail Marys).  He passed one army morale test, but failed the next to give Nick a hard fought victory.


This was a ripper of a wargame between two well matched veterans.  The game balance swung from one side to the other several times - the sort of game that makes us love FOW warts & all.  In the end the Ities just couldn't quite nail it. 

Nick's US Armour  now meets Mark's Fucilieri in one Semi Final while Byron's Spahpanzers meet Leigh's Death or Glory Boys in the other one.

Pic 1 is from behind the Itie left.  The objectives are in the open ground on the left.  The Priests are in the far RH corner.  The US Recon are on the far table edge.  The M14's bushwacked them as they slipped around the ridge on the left table edge.  The US flanking force cames in on the LH corner. The other Ities reserves come on in the closest corner.

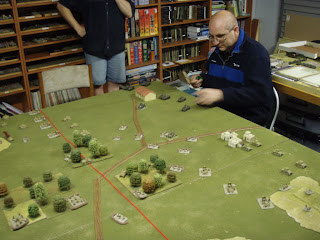
In Pic 2 Nick is so carefully deploying his 10 Shermans.

In Pic 3, half the Shermans are under smoke while the rest have copped a pounding.  The Honeys have just come on & are about to smash the M14s on the table edge, but they make a nice target for the howitzers & run away along the table edge before taking on the 75s.

Pic 4 is at the end - just 3 Shermans & 1 L6 have survived the armoured carnage.

Friday, December 04, 2009

Nick in Launceston


Club meet was packed -- possibly due to rain. Or maybe a pre-Christmas rush. Only two historical games -- Nick R umpired a game for two younger players, and Nick B played Aggro.

Flames of War -- Nick B (US Infantry) vs Aggro (German Panzers), 1500 pts, fighting withdrawal.

Aggro charged foward. Nick B dropped M10 tank destroyers and they lived up to their name -- scratch one platoon. Then next turn Nick dropped a 57mm AT gun ambush and they destroyed the other panzer platoon. Aggro was left with one tiger and some artillery. But the tiger proved indestructible. It slowly moved foward, crushing the artillery observer and the lone infantry with a bazooka that threatened it, and also destroying the M10's. But in the end, at the end of turn 8 (end of the game), while the tiger had got to the objective it was still contested by US infantry. So a win to Nick

Tuesday, December 01, 2009

Camp Cromwell 01/12/09

Joe's Scotts v. Jim English
Medieval battle using Camp Cromwell Rules


Joe put his horse on his right, highlanders in the centre, billmen with bow skirmishers in the big gap between, then spearmen & men at arms on his left.  He generally deployed his troops in double rank in 8 stand units.

Jim deployed archers on the ridge on his left, knights on their right, men at arms behind the knights, bills behind the men at arms & 2 small knight units behind the archers left flank.  All the English units were in a single rank of stands.

Both sides had only one 3 dice general to reflect poor Medieval command.  It didn't affect Joe though, all his units activated on the first turn.  The English in contrast threw 3 scorpions in the first turn & 2 in the second.  Thus the Scots took the battle to the English.  The pic is taken behind the English right as the armies clash.

On the left the English did well from the start.  The bowmen blew the skirmishers away in 2 volleys leaving the bills outnumbered, exposed & doomed.  The front unit of the Scott's cavalry was beaten by a one-two punch from the English knights and routed back through the second unit which immediately joined it in flight.

In the centre, the highlanders did well to hold the knights for a long time.  Their second line shuffled sideways then charged the bows that came off the hill to meet them.  Hot shooting weakened the highlanders & they lost the ensuing combat.  The unit fighting the knights then broke as well.

On their left the Scotts did better.  Late activation prevented the English knights choosing their target & they hit both the spears & men at arms at once.  Fighting 2 big units at once was too much & they broke.  The Scott's pusuit took out some men at arms & bills, but it wasn't enough to make up for the losses elsewhere.

Joe put up a brave fight, charging forward in true Scottish fashion, but the English general had too much experience & exploited his mistakes ruthlessly despite bad activation dice.

Sunday, November 29, 2009

Slitherine Computer Games Review

Field of Glory Digital

The Field of Glory computer game is turn based with a hex grid so it feels like an old fashioned board game.  You can play v. the computer or v. people on the net.  Many historical ancient battles are provided as scenarios & there's an editor so you can set up our own.  I believe more scenarios will become availbale by download from the website.

I'm no fan of Field or Glory as a tabletop game, but the computer version I quite like.  The computer does all the calcs & remembers all the arcane rules for you, which helps, but also the game has been changed to a degree to suit the computer environment.   The changes seem to be for the better - for example there are much greater differences in move rates between infantry & cavalry than in the table top game.  I found I am able to use maneouvre to gain advantage to a much greater degree than with the tabletop version.  You can zap thru a game in about half an hour, so it's a nice little time filler.

Commander - War in Europe

This is a much larger scale game covering the Atlantic to the Urals from 1939 to 1945.  Again it's a turn & hex based computerised boardgame.   You have some control over production so you can built up your forces with a different mix to the historical.  It covers land, sea & air.  The game can be started in any year so you can start off in Poland, France, Russia or D-day.  You can fight the computer AI as either side, or play on the net v. people. 

The full game from 1939 on would take dedication and a far bit of time, but I think the game's exciting enough to maintain the interest (at least as long as you were winning, or are a maschocist) & you can save & take a rest anytime.  

The game seems to hit the spot between enough & too much detail & rocks along pretty well.  It's hard for Bad Guys to win (as it should be).  The Germans just can't afford to make mistakes - it can all go very wrong very quickly.   It also makes one realise how small the western front was compared with the Russian front.

The game is easy to pick up and play - the printed manual is only about 20 pages, but there are a lot of subtleties you need to master to do beat the AI.  I recommend playing some short scenarios to learn the game well before launching into the whole event.  The game doesn't have separate scenarios but you make a shorter game in a number of ways, eg:
- Start with D-day & see if you can get to Berlin faster than par (or hang on for longer).
- Start with Barabrossa & see if you can get to Moskow before winter stops you (or stop them sooner).
- Start in 1940 & see if you can get to Paris faster than par (or hang on for longer).

Slitherine Games

You can download the games from http://www.slitherine.com/  They cost about 20 pounds (A$37) for the download.  On my not so fast broadband it takes about 15 minutes to download.  They run fine on my 2.2gH/4gB system with Win 7.   They also have Commander - Napoleon, a Napoleonic version of War in Europe.  I haven't got that one - I have enough to learn with the others right now.

Saturday, November 28, 2009

Nick's Garage 25/11/09

Carl's Lancastrians v. Jim & Joe's Yorkists


FoG Wars of the Roses using Carl's 28mm figs.
Leigh officiating, Nick hanging about.
The York line had cavalry, bows & men at arms on the left, billmen in the centre centre & bowmen right.the
The Lanc line had cavaly & bows on the right, bows in the centre & bills & artillery on the left.
The Lancs advanced their whole line, their left dropping back because of their guns.
Pic 1 is taken behind the York left soon after the start.
Pic 2 near the end.

The Yorks advanced in echelon, left forward.  The plan being that the cavalry would ride down the bows in front then pursue into the cavalry behind while the supprting bows & MAAs would overlap the the enemy bows to support the bills in the centre.  The plan fell apart when cavalry failed every morale test caused by bowfire.  One unit routed quickly without even charging home & then distrupted the line behind.  The other cavalry unit did break through but the victorious bowmen wheeled about & disposed of them too.
In the centre, the Lancs bows beat the Yorks bills, while on the right the Lancs bills beat the York bows.
It just wasn't a good night for the house of York.
The game was a typical FOG line them up and throw dice contest.  Having Leigh assisting with the rules helped the game flow, but still slowly.  They really are a pretty ordinary set of rules, but worth putting up with to play with Carl's figures.

Tuesday, November 24, 2009

Maharajah 2009 3rd Quarter Final


James' Grenadiers v. Byron's US Infantry

Cauldron, US attacking.
James deployed 2 infantry around the objectives with his Pak 40s in immediate ambush.  He had another infantry, 2 Tigers, 105s & 4 Werfers in delayed reserve.
Byron put down mortars, heavy mortars, infantry & Shermans on his right, engineers, cannon & the 2IC platoon on the left.
James' put down the Pak 40 ambush on his right.  It mauled the engineers, killed 2 cannon HTs & a Sherman but the 2IC platoon (2ic & 2 bazookas) & engineers attacked it in flank & front & wiped it out.
James got his Tigers on turn 3 & attacked the US infantry in rear.
The Shermans attacked the German infantry with fire support from the M10s as recon & infantry came up from reserve.  The Shermans were destroyed but they took a grenadier platoon with them & the other platoon had to leave their trenches to dispute the objective against US inf, engineers & recon.  They destoyed both the engineers and the infantry before they died, but the objective was left undefended. 
The German reserves were slow to come on after the Tigers, but the 3rd grenadiers had finally got withing rifle range of the objective, the 105swere finally able to fire & the Tigers had finished off the US inf & were coming up.
To stay in the game James had to blast the US off the objective.  The 105's missed, the Tigers got 2 jeeps & the grenadiers got the 2IC platoon, but one recon armoured car survived 95mm from the objective to win the game for Byron.
A good game this one.  I think James got distracted & wasted his Tigers mowing down GIs when they should have been moving up to the objective.  He was also desperately unlucky with reserve rolls - his 105s got in just 1 shot before the game was over & the Nebles were still setting up. 

Byron qualifies for the Semi Finals.  This makes 3 out 3 wins for the Allies in the Quarter Finals - the Axis' honour is now in the hands of the Italians!

Matches to come:
4th Quarter Final: Jim's Carri v. Nick's US Armour
1st Semi Final: Leigh's Death or Glory Boys v. Byron's Panzerspahkompanie.
2nd Semi Final: winner of 4th QF v. Mark (US Rifles v. Jim or Fucilieri v. Nick).
Grand Final: Winners of Semis fight it out.

Saturday, November 21, 2009

MTG Event at Area 52 -- By Nick


I rocked up to the area 52 Magic Tournament. Its been a long time since I played Magic -- my official player registration is dated 94!


The tournament was a well run event. There were over 40 players -- a good show from a small city! There were even a couple of players from Melbourne!.
You got 6 boosters (90 cards), with which to make a 40 card deck. There was a whole process where you wrote down the cards you got and then passed them over to another player. I found this difficult -- the list to fill in was in small print that middle aged eyes had a hard time with!!!! Once you have the cards given to you, there is 30 minutes to choose the cards in your deck. Cards not used were a sideboard, i.e. cards that could be swapped in later. In the end, I misscalculated. The rules of the tournment were that the deck you designed was the deck you had to use in the first game against every opponent. So a bad decision in the initial deck construction could not easily be adjusted as the tournament went on. And I made plenty of bad decisions as I was new to the card set used for the tournament.


In the end, I finished with 3 wins and 3 losses. 4 of the games were quick wipeouts (2 wins and 2 losses). But 2 games were long drawn out knuckle biting affairs -- the sort of games that make magic great!

Friday, November 20, 2009

Maharajah 2009 2nd Quarter Final


Steve's Panzers v. Leigh's Death or Glory Boys

 2000 pts Encounter Mission on 8x6 table (Tunisia).
The table featured an unusual number of ridges with large open areas between.  Jim umpiring, Barrie & Joe also present.

Steve chose to deploy on the left side of the table as photographed. He put infantry with attached anti tank guns on the LHS objective.  The other objective was in a large orchard, the front of which is just visible on the left forground of the pic.  Here he deployed his 105s and a Panzer platoon (mixed MkIVs & MkIIIs).

Leigh put his double battery behind the ridges on his right with his HQ Grants & AA.  He put his US Lees behind the ridge on his left.

Leigh began agresively, advancing his Lees & Grants.   The 3 Grants had big bogging problems crossing the ridge & 2 of them spent much of the battle boged down there.  The Lees put their heads over the ridge to try & pick off the small Panzer platoon before the German reserves arrived.  But another Panzer platoon arrived quickly & with the help of the Luftwaffe the Lees were promtly dispatched.  The rest of Steve's reserves also came quickly - MkIIs on his left, & Pak 40s on his right.  The British still had no reserves on at this stage & with Panzers rushing towards an undefended objective, it looked all over for them.

But while Leigh's reserves were late, they did all arrive in the right place - on his left & centre.  The Panzers halted on the ridge among the burning Lees to engage Valentines & Crusaders but the Germans seemed to just run out of luck.  The 105's got pinned by artillery fire & just would not unpin, when the Luftwaffe hit the Brits were saving, and with the help of the 25pdrs, the Brit armour won the tank fight on the ridge.

Now the Brits advanced on the German right which had precious little left to defend it with.  The 25pdrs popped one Pak & the Bugs swarmed the other.  The German artillery beat off the first infantry attack, but with a swarm of armour coming up their position was hopeless & Steve conceeded.

Leigh joins Mark in Semi Final round.
James & Byron are to fight next Tuesday at Camp Cromwell.
Jim & Nick are trying to find a spare spot in Nick's busy life.

Tuesday, November 17, 2009

Maharajah 2009 1st Quarter Final


Mark's US Rifles v. Barrie's Panzerpioneers (Tunisia).
2000 pts Cauldron on 8x6 table, US defending.
Jim umpiring, also present Byron & Joe.

Mark had a perponderance of numbers, both men and tubes.  Barrie tied to weaken the defence with artillery & Stukas while collecting up his reserves.  But the Luftwaffe was pretty useless and the US were too spread out for the 155's to do too much damage.  Barrie attacked on his left with Stugs & Panzergrenadiers mounted in half tracks.   The Stugs were destroyed mainly by heavy artillery, but the Panzergrenadiers charged in their half tracks and captured the objective.    However, their success was short lived - a storm of artillery & HMG fire folowed up by an infantry counterattack destroyed them to secure the position & win the battle.  The pic is taken from the German left as the Panzergrenadiers start their attack.

Barrie is eliminated, Mark goes on to a Semi Final.
2nd Semi Final: Leigh's DOGBs v. Steve's Panzers in an Encounter - this Thursday at Barrie's.
3rd Semi Final: James' Grenadiers v. Byron's US Rifles in a Cauldron - next Tuesday at Camp Cromwell.
4th Semi Final: Jim's carri v. Nick's US Armour - at Nick's, date TBA.

Thursday, November 12, 2009

Launceston Gaming Club


Nick (US) vs Aggro (German) -- Flames of War, 1500pts mid war. A massacre, as the Germans lost one tank and rolled through the Sherman horde!


Nick R (British) vs Unknown (unknown) -- Flames of War. If someone sends a report I will post it. All I can say is there were lots of Churchills, big guns, etc.


Doug (Roman) vs Unknown (Barbarians) -- DBA using beautifull 28mm figs from Warlord. A spectacular game!


And the usual set of fantasy games!


Wednesday, November 11, 2009

Chris's Place


Nick vs Chris, in a Roadblock. (Flames of War, 1500 pts, mid war. Nick as US, Chris as Germans)


The US were ambushed, and forced to deploy their M10's. But, as luck would have it, managed to deploy them where they couldnt be ambushed. But the escorting M5 stuarts were in the open, and subject to a nasty attack from the German AT guns. The ambush didnt really come off, and the remaining Stuarts and the M10's went on the offensive, seeking to wipe out those nasty AT guns. But the counter attack failed, and whats more it distracted the US away from the objectives. Eventually a unit of German infantry was able to march onto an objective and end the game. Highlights included a tiger running from a tank hunting platoon of bazooka armed infantry, and a US airforce that proved totally ineffective!!!


Tuesday, November 10, 2009

Maharajah 2009 Elimination Match 10/11/09


Joe's Falshirmjager v. Byron's US Rifles

2000 pts Encounter on 8x6 table.

Joe deployed his Neblewerfers on the mountaintop on his right, artillery in the scrub behind the LH objective, FJs on the RH objective & his 3 MkIVs in the centre.  A/cars # more infantry in reserve.

Byron had Rifles on the LH objective supported by SP75's and Pioneers on the RH objective supported by 3 Shermans.  There were Heavy Mortars on his mountain & his Heavy Platoon in the centre.  Lots more infantry, recon, TD's etc. in reserve.

Byron attacked on his right engaging the Panzers with his Shermans as the infantry Truscot trotted forwards and the SPguns moved thru the centre to join in.  The Panzers died taking only 1 Sherman with them as the Pioneers assaulted the artillery to reach the objective.  It looked all over, but the Germans stayed in the game because the artillery command was 95mm from the objective & the surviving gunners passed morale.  The Neblewerfers kept bailing the Shermans & the heavy platoon while the German A/cars & 1 FJ platoon came on near the disputed objective and the FJs on the other objective rushed over to help.

There was a furious fight over the objective for a while, but the Yanks had too much firepower available & the Germans ran out of troops - losing the objective and failing army morale at the same time.

The pic is taken behind the German left as the US begin their advance.  Joe did not have a lot of luck, but Byron did have a better plan.  He had clearly learned a lot from his loss v. Barrie - both in army selection & US tactics.

Joe is eliminated from the Maharajah 2009 tournament.  The Quarter Final draw is:

James' Grenadiers v. Byron's US Rifles.
Steve's Panzers v. Leigh's Death or Glory Boys.
Mark's US Rifles v. Barrie's Panzerpioneers.
Jim's Carri v. Nick's US Armour.

Tuesday, November 03, 2009

Maharajah Trophy Battle Byron v. Barrie


Byron's US Infantry v. Barrie's Panzerpioneers in Free for All.

On the German right & in the centre there was a good bit of fart arsing about, but the battle was decided elsewhere.   Barrie pushed forward on his left with the Armoured Panzerpioneer platoon while his Stugs stood in the centre to hold off the US armour.  Byron's defence left a lot to be desired - his infantry were deployed in cover but not actually on the objective.  He tried to defend it with the firepower of Bazookas & his heavy platoon, but it just wasn't enough to stop the armoured half tracks.  Barrie qualifies for the Quarter Final round.

The pic is taken behind the German left.  Note the column of half tracks heading for the objective.

Next Tuesday:
Joe's Falshirmjagers will fight Byron's US Infantry in an elimination match for the last place in the Quarter Finals.

Draw for Maharajah Quarter Finals:
Jim's Carri v. Nick's US Armour
Steve's Panzers v. Leigh's Death or Glory Boys
Mark's US Infantry v. Barrie's Panzerpioneers
James' Grenadiers v. winner of Joe v. Byron

Sunday, November 01, 2009

Sinking the Bismark 01/11/09


We dusted off the Dreadnought rules for something completely different.
Bismark + Prinz Eugen v. Hood + POW.

Game 1: Nick = British v. Jim = Germans.
Nick concentrated both his ships' guns on the Bismark.  The Bismark enagaged the Hood, Prinz Eugen engaged the POW.  The Bismark copped some engine damage early on slowing her down & forcing a fight to the death.  She hurt the Hood badly, knocking out her fire control, but not quite sinking her.  The Prinze Eugen did nothing to the POW which steadly bashed the Bismark into a hulk.  A British victory this time.

Game 2: Joe = British v. Jim = Germans.
In tjis game the Germans used their greater experience to advantage.  Crossing the british T, the Bismark concentrated on the POW while the Prinz distracted the Hood.  The POW was hit hard and often & sunk while only causing minor damage to Bismark.  The  Prinz was all but sunk by the Hood before the Hood was forced to deal with the Bismark.  But she was totally outclassed and in a close range duel was smashed in quick time.  A German victory with both British ships sunk & the Bismark not significantly damaged.

It's interesting how this scenario can produce overwhelming victories for either side. There's a lot of luck in small scenarios, but there's some skill too.  And they are great fun - we must do more of the ships & planes. 

The rules are on the blog, though I noticed that the ships log there were not the same as the ones we used from the printed copy I had archived.  I then found the same applied to Men o'War.  I have found the latest (2003) computer files & added the 2003 versions of both sets to the box.net files on the sidebar.

Tuesday, October 27, 2009

Camp Cromwell 27/10/09


Jim's Royalists v. Joe's Parliamentarians

English Civil War using Camp Cromwell Rules. Both sides had 6 Pike & Shot, 2 Musketeer & 4 Cavalry.  The Royalists also had a FV Cavalier unit while Parliament had 2 Dragoons.  The Parliamentary troops were generally better equiped, but the Royalists were better troops. Deployment was by alternately placing pairs of units.  Both sides protected one flank on the river & split their cavalry - some on the far flank, some in the centre - see pic 1 (taken from behind Royalist left).


The Royalists attacked with their cavalry while holding back their foot.  Parliament sent their dragoons on a flanking manoeuvre on their left & advanced their foot on their left.


On Parliament's right & both sides had fluctuating & mixed fortunes, but the battle was won & lost elsewhere.  One unit of Royalist cavalry was initially deployed in front of the Royalist foot on the right threatening the musketeers on the Parliamentary left.  It was just a feint, but it caused some disorganisation in the Parliamentry ranks which gave the Royalist foot a small advantage when they closed.  Those cavalry then moved to the left to exploit the gap made when the cavaliers won - the Royalist right counterattacked and broke the Parliamentarian line just before the dragoon's flank attack arrived through the wood.


(We were supposed to be completing the Bryon v. Barrie Maharajah battle tonight, but Bryon had a last minute problem). 


Wednesday, October 21, 2009

Nick in Launceston

Nick vs Chris -- another practice game for the tournament. No pics -- the armies are classified!!! A win to Nick, but he was favoured by the terrain.

Tuesday, October 20, 2009

Maharajah Trophy Match at Camp Cromwell 20/10/09


Byron's US Rifles v. Barrie's Panzerpioneers

2000 pts Free for All on 8x6 Tunisia table.  Umpires:  Jim, Joe & Steve.
Byron fielded an unconventional US Rifle Coy - without the massed batteries but a heaps of infnatry.  It took a long time for the troops to deploy & they only got 2 moves in before Byron got the call & had to leave to go home to Geeveston.  

Pic taken behind German right.  (The Stukas are just warming up - they haven't appeared on the field yet). 


To be continued next Tuesday.

Friday, October 16, 2009

Maharajah Trophy Match at Barrie's 15/10/09


Joe's Falshirmjager v. Leigh's Death or Glory Boys

2000 pts Breakthrough on 8x6 table - Tunisia
The table is Meditereanian terrain - all the hills are DG plus a couple of mountains.

Joe made a big mistake at the start deploying his MkIVs too far forward on his left flank. Leigh deployed most of his armour within 40cm of them and blew 4 of them away on turn 1. The other one survived the morale test but was soon hunted down by the pack. Then Leigh got his 1st lot of reserves (2 platoons of bugs) on turn 3, soon followed by his infantry platoon. The bugs took the nearest objective & with infantry coming on in support, it looked like it was just a matter of waiting for turn 6 to win. But the FJ's had other ideas. The 1st platoon drove the bugs off the objective. They were in turn destroyed by Brit fire but the 2nd FJ platoon wiped out the Brit inf and the surviving bugs to retake the objective again.

Meanwhile on the other flank the masses of Brit armour having destroyed the MkIV's were bottled up by a mix of terrain & Pak40 paranoia. But the need to retake the other objective had left the central one undefended. Leigh's Lees ran the guauntlet of Pak fire to take that objective & win the battle.

The pic has the objectives in the closer LH quarter. The LH one in the wood is in dispute between FJ's v. bugs & inf. The Paks are on the hill on the right of the village, German artillery on the mountain behind it. The Brit armour is milling around in the distance, their Art in far right.

Leigh qualifies for a Semi Final berth, Joe has to fight a repercharge against the loser of Barrie & Byron - that match scheduled for next Tuesday.

Thursday, October 15, 2009

Nick in Launceston


A very quiet night at the club -- must have been the first burst of sun for some weeks! Only one FOW game -- Nick B vs Nick R and Agrro. We were practicing for the tournament, and hence did a blue on blue -- Yanks vs Brits in a breakthrough. Much as I dont like blue on blue, it was a good game, with each side having chances to win. In the end Nick B did enough damage with his AT guns that Nick R's attack peterred out. But not before Nick R and Aggro spend a couple of turns sitting on the objective with Nick B having to feed troops in to contest the objective and keep the game going.

Tuesday, October 13, 2009

FOW at Camp Cromwell 13/10/09


Byron & Jim's US Rifles v. Joe & Steve's Falschirmjager

Barrie had a work crisis & couldn't front for his scheduled Maharajah battle with Byron.  Instead Byron & Joe had a practice battle with Jim & Steve assisting - 2000 pts Trenchfight, Germans attacking.


Byron's deployment of lots of infantry gave him a lot of wire & entrenchments.  The objectives were in vineyards - one up front & one in the right rear.  Bunkers protected the centre of the US line.  The US survived the preliminary bombardment very well, but the dice gods evened up by feeding reinforcements on a drip feed.

The Germans avoided the bunkers by advancing on both flanks.  FJs & A/cars on the right, Pioneers, FJ's A/cars & Marders on the left. 105s & Neblewerfers gave support fire.  In the pic you can see the Germans advancing on the flanks.  Their artillery is off camera to the left.  US inf is deployed in the vineyards, 2 more platoons still in ambush.

The Germans gapped the wire on both flanks with little interferance while the US waited for their reserves.  The then US dropped  infantry out of ambush on both flanks to slow their advance.  In both cases the FJ's with fire support from the A/cars cleared them away.  Shermans and M10s deployed on the right and took on the Marders.

Armoured Recon, Cannon, Heavy Mortars & a Heavy Platoon eventually arrived & deployed on the US left, advancing to assist the centre.  But they were a bit late, the FJs on the US left used a wadi to cover their advance and took the objective from a platoon weakened by artillery.   The Armoured Recon rushed forward to dispute it, but were beaten off leaving the objective in German hands.


Next battle: Joe's FJ's v. Leigh's Death or Glory Boys on Thursday at Barrie's.


Friday, October 09, 2009

Successor Battle in Launceston 08/10/09


Jim's Pergumenes v. Nick as Antigonus
 
I took advantage of a work trip to Launceston to visit the Launceston Gaming Club - taking 2 Successor armies for a Camp Cromwell Rules battle.  Although it was Show Day and a supposedly quiet night there was still nearly 30 attendees, mostly fighting fantasy & sci-fi.
 
Antigonus' army was the usual argaraspids, phalanx, peltasts, elephants, light infantry, heavy cavaly & horse archers - mostly Reluctant Veteran mercenaries.  The Pergumene army had a core of Confident Conscript levy phalanx & cataphracts supported by Cappodician Confident Warrior infantry & cavalry and a lot of light infantry & cavalry.  Antigonus had a wing commander in his son Dimetrius, giving him an advantage in command.  The core units for both sides were the phalanxes - the army morale test was lose your phalanx and you lose.
 
The Pergumenes marked their deployed on a map, then Antigonus deployed on the table before the Pergumenes were put down in accordance with the map.  Both sides put most of their cavalry on their right. 
 
Antigonus siezed the initiative, advancing in echelon, right forward - exploiting his advantage in command dice. Pic 1 is taken when the skirmishers first meet  the heavy troops have not made contact.
 
The Pergumene's held their main body back in the centre & left while sending their light troops forward to try & weaken the enemy as they advanced.  Their cataphracts were to advance on the right then wheel left, but were slow to start due to poor command dice.
 
The Cappadocians on the Pegumene left were outclassed by their opponents and were soon defeated.  The cataphracts on the right did defeat Antigonus' left, but they took far too long to do so.  By the time they were ready to attack the enemy's flank it was protected by redeployed reserves.  The Pegumene light troops failed dismally in their task of weakening the enemy as they advanced & the citizen phalanx was beaten by a combination of phalangites & elephants.
 
The Pergumene's mismanaged their light troops, mismanaged their attack on the right and got muddled in the centre  Antigonus on the other hand did better with deployment, had a sound plan & countered every Pergumene move to give him a well deserved decisive victory.
 
Pic 1 is taken when the skirmishers first made contact.
Pic 2 is taken as things really hotted up. 
 

Tuesday, October 06, 2009

7 Years War Hold the Line


Barrie's Austrians defending v. Byron & Joe's Prussians using Camp Cromwell Rules.

The scenario had the Austrian line infantry & artillery on the field at the start with their cavalry & grenadiers in delayed reserve.  The Austians had a line of woods, hedged fields, village & ridge to defend.  The Prussians to win by taking the village or the road at the centre of the Austrians rear.  The Austirans to win by preventing that.  Either side could lose by army morale test.

The Prussian had a pretty bad time with their activation dice and their attack became somewhat disjointed.  They still enjoyed some success, but the Austrians held the line long enough for their reserves to come up and plug the gaps.

The pic is taken from the Austrian right, Prussian left, just after the Austrian reserves started to come on.  The Prussian attack on their right petered out against a wall of grenadiers.  On their left, the reserve dragoons arrived in time to meet the Hussars after they found the ford & crossed the river.  In the centre, the Prussians just didn't have enough left in them to attack the village.


It was an interesting change to apply a Hold the Line scenario to 7 Years War.  It worked pretty well - the defending Austrians won tonight, but in play-testing solo the Prussians won, so I think it's a fair deal.

Sunday, October 04, 2009

Camp Cromwell Wargames Rules


I have posted the Camp Cromwell Wargames Rules on the right hand side bar. These comprise:

Marathon to Marne:
Rules for land warfare before the machine gun.  These have just had a major revision.  While play testing of the revised systems has only extended up to the Napoleonic Wars and the details for large 19th century battles using 6mm are still being worked on, the rules are ready to use for earlier periods .  Areas still under development are in italics.  The rules are designed primarily for 15mm figures, but can be used for other scales.  They will be updated from time to time as we continue to tweek them in the light of battlefield experience.


Dreadnoughts:
Rules for naval warfare from around 1900 until airpower became dominant.  They can be used for the Russo-Japanese war, WWI & the early part of WWII.  (We never got around to adding rules for airpower).   We use ship models about 50mm long on a 75mm hex grid.

Men o' War:
Rules for naval warfare in the age of sail - from Drake to Nelson.  We use old Airfix ship models about 100mm long on a 75mm hex grid.

Modder Fokkers:
Rules for WWI air war.  We use 1/72nd scale plastic models on stands made of wooden dowels on a 75mm hex grid.

WWII Campaigns:
Rules for WWII campaigns designed for use with Flames of War tactical rules.  The Camp Cromwell system was developed because the Battlefront "Axis of Attack" campaign system was so inadequate.  Battlefront have since published their "Firestorm" campaign rules.  These are much easier to use than the Camp Cromwell system and may well better hit the spot between realism and playability for most players.  The Camp Cromwell system is a much more complex system with more emphasis on the campaign rather than the battles and I expect would only be of interest to hardcore gamers.  

Comment:
I have no illusions that anyone actually takes up and uses free-to-air wargames rules.  But these rules have provided us at Camp Cromwell with a lot of good wargaming over the years and they may of interest to some.  I'd be pleased to hear any feedback or answer any questions by email (address in blog heading above).

Friday, October 02, 2009

Kingston 01/10/09


The Kingston guys finished turn 1 of their Firestorm campaign tonight with two battles.

SteveP's Strelk beat Munt's Grenadiers in an Encounter & Simon's Straff beat Griggsy's Sturmtroop in a Not One Step back.

It seems this was a pretty typical result for the campaign because the Germans have taken a pounding in the first campaign turn. Three of the front line cities have fallen & the Russians have thrust way forward in the north. A very different situation from the Camp Cromwell campaign earlier in the year.

Nick in Launceston


two FOW games and multiple 40K games at the club.


Nick B vs Les -- 1500 pts late war -- US Armour vs German SS grenadiers in a withdrawal. The US armour charged on one flank, and sheer weight and good dice overcame the 88's, PAK40's, and Barkmann.


Nick R vs Agrro - -1500 pts mid war. British Infantry (Nick R) vs German Panzers (Aggro). The British had an amazing array of AT guns -- I think they had minimum infantry and maximum AT guns. But the Germans managed to overcome by getting some Panzer IIs onto the objective at the rear.


Elsewhere there were some amazing fantasy and 40K games. Some fantasy figs are pictured.

Wednesday, September 30, 2009

Nick & Chris


Another FOW tournament practice game. US Infantry vs German Fallschirmjagers. Nick attacking in a breakout.


The dice gods did not like Nick. On turn 1 he failed to dig in, failed to range in, failed to get aircraft, and lost 1/2 his infantry. Chris quickly moved to guard the objectives, as Nicks main attack just disintegrated. Then Nick's reinforcements failed to arrive till the last possible moment. However, when they did arrive, they arrived together and Nick managed to position 4x M10 behind hedges on one side of the field containing the objective, while 5x Stuarts massacred one platoon of fallshirmjagers. The Stuarts eventually fell to the German Tiger -- but the the Tiger wasnt going to advance and risk the M10's. The M10's on the other hand werent going to advance and risk bogging on the hedge, turning the fight against the Tiger in the Tigers favor. A stalemate developped, with Nick shelling the Germans while Chris pushed his AT guns foward to take on the US artillery. Eventually both sides agreed to a draw, as it was getting late, and a competition game would have called time.

Saturday, September 26, 2009

Nick's on Friday 25/09/09


Jetstar, bless them, robbed us of Carl & his 28mm Wars of the Roses figs, we can only hope he ejoyed his wait at Tullamarine. But Steve stepped up with his e-bay 7 Years War 15's to fill the gap.

Field of Glory battle:
Nick's Byzantines v. Leigh's Arabs

It was Leigh's 2nd FOG & Nick's 3rd & it was slow going with endless searching through the rule book for that rule cunningly placed where you would least expect it. There is obvious advantage in learning a commercially successful set of rules & for some perhaps the mastering of an arcane set of rules is a satisfying, if machocistic, end in itself, but it's a pity FOG are so ordinary in every way except presentation. Nevertheless, hard core as they are, Leigh & Nick enjoyed their battle. Leigh gained some advantage in the deployment as Nick's best infantry was left hanging out on a flank a long way from the action. But in the end it was Leigh's better dice winning a 50/50 cavalry fight in the centre that won the battle.

Koenig Krieg 7 Years War battle:
Steve's Prussians v. Joe & Jim's Austrians

Steve's 15mm e-bay troops look magnificent & the Koenig Krieg rules are a beautifully printed set of rules (out of Queensland I think). Unfortunately, Steve had not done enough homework before the battle and things went terribly slowly as he struggled with rules. Things sped up a bit after we downloaded the summary sheets Steve had forgotten to bring, but there was no way the battle was going to get anywhere in the night. The battle didn't go far enough to make a fair assessment of the rules.

Comment from Nick: To be fair on Koenig Krieg, Steve put the battle together with only an hours notice, so he had no time to really read the rules or otherwise prepare. The game played on after Jim left and the two remaining participants seemed to think the system showed a lot of promise as they got more familiar and discovered some misinterpetations they had used earlier. So we will see how the rules really work at some future battle!

Thursday, September 24, 2009

Nick in Launceston


Nick vs Darren, Flames of War mid war US Infantry vs German Panzers. Hold the line.


Nick defended, and set up M10's in quasi ambush and AT guns in ambush. On turn 1 both ambushes were sprung, but they didnt damage that much. The AT guns were destroyed. The M10's struck back and killed a panzer platoon -- but then the panzer II's killed the M10's. Nick's reinforcements hadnt arrived, his CinC wasnt on the table, and hence Nick failed morale.