Tuesday, March 29, 2016

Hail Caesar: Adrianople 378AD scenario

The scenario is based on Adrianople 378AD.  The Huns & Goths start with their 2 infantry divisions  on a big hill and their 2 cavalry divisions off table.  The Romans have all their army on the table at the start.  Their 2 infantry divisions are much stronger than the enemy's, but the cavalry though as good in quality as the Barbarians is outnumbered.  Each Hun cavalry division throws 1 dice turn 3, 2 on turn 4 & comes on if a 5 is thrown, or on turn 5.   One comes on one flank and one on the other, their exact point fo entry being 2-3' from the corner along the back edge on a 1, 2-3' from the corner of the side edge on a  6 and proportionally in between otherwise.
Dale, Mike & Dylan commanded the Romans and Jim, Chris & Mark the Barbarians.
The Romans are on the left in traditional deployment with cavalry on the wings.  The Barbarian foot is on the hill.
Mike's foot on the Roman left blunder back at the start and got rather left behind.  His cavalry charged the infantry anyway, but bounced off.  Dale's foot has just failed to charge home on the second turn, with his cavalry covering his flank.
 The Barbarians have lost a unit on their left, but still have a reserve to fill the gap.
 Mark's cavalry has arrived on the far flank (on turn 4).  The Barbarian foot is still holding the line.
Mike scrambles to form a front facing Mark's cavalry on the far flank while Dale pulls his cavalry back to face the imminent arrival of Jim's cavalry on the left.  The Barbarian foot is giving ground, but still holding on.
Jim's cavalry has arrived but has only moved 1 move on while Mark's cavalry has failed to press on.  The left end of the Barbarian foot has counterattacked the Roman's flank left hanging by the cavalry, but Romans are tough & it's not going well.
On the far flank Mark's cavalry is doing bugger all while the centre fights for its life.
The Roman cavalry on the near flank has withstood the first charge,  but Mark's cavalry still has not attacked and the Barbarian centre has finally cracked.  With half their divisions broken out of 4 while the Romans have lost none, the Barbarians fail their Army Break & the Romans have won.
The hairy Barbarians dream of what might have been.  It was a close run thing.  The Roman cavalry on the left was down to half strength & would surely have broken if Mark had only got the command dice to charge it.   With a Roman division broken, the Barbarians would not have failed their Army Break Test with exactly half their divisions lost.  The Barbarian cavalry on the other wing would have soon cleaned up Dale's cavalry, then the Roman infantry would have been surrounded by a horde of heavy & light bow armed cavalry, and that scenario seldom ends well for the infantry.


Tuesday, March 22, 2016

Hail Caesar! Greeks v. Persians

Greeks: Jim & Chris: 2 Hoplite divs of 4 hoplites + 1 skirmisher, 1 div of 2 hoplites, 2 peltasts & 2 skirmishers, 1 div of 4 small medium cavalry, generals all CR 9.

Persians: Mike & SteveJ: 2 infantry divs of 4 sparabara & 2 skirms, 2 cav divs of 4 heavy cav & 2 horse archers, generals all CR 8.

The Persians (on the left) did a traditional deployment with cavalry on each flank.   The Greeks put their hoplite divs in extended lines on the flanks and cavalry in the centre.   Their initial advance has turned into an echeloned attack due to bad command dice on the right.

The Persians hung back to maximise their advantage in archery.  The action started with a Greek attack with cavalry & hoplites on the left hand Persian infantry div.

A furious melee developed in the centre with the Greeks getting the upper hand.  The hoplites on the left are trying to attack the enemy cavalry but the Persians are firing and retiring and only one hoplite unit has charged home.

The Persian infantry div left of centre has broken, but the Greek cavalry is also about to break. The hoplites on the near flank are getting the upper hand over the Persian cavalry.  But on the far flank the hoplites are not doing so well.    The Greek's mixed infantry div in the centre is still fighting but has heavy casualties.
The Persian cavalry on this flank is about to break, but the Greek push on the far flank is running out of steam under storms of arrows.
The hoplites on the near flank have broken the Persian cavalry, but both divisions on the far flank have been reduced to two shaken units and now break giving the day to the Persians.

It was a interesting battle between two very different armies.  The Greeks knew they had to get in close while the Persians did all they could to turn the fight into a firefight they couldn't lose.  The first charge of the Greek cavalry may have been critical.  2 small units charged a sparabara unit and came within 1 pip of breaking it straight up.  A win there would have lead to the rapid demise LH Persian infantry div.  It was still broken by the attack of 1 & 1/2 divs but it took valuable time and cost the Greeks serious casualties.  For once we had a lot of cases of infantry attacking cavalry.  But Hail Caesar handled it well with the hoplite's long spears making it a fair fight - as shown by the Greeks winning one flank and the Persians the other.  In the end the Persian arrows won day.

Monday, March 21, 2016

Muskets & Tomahawks at Barrie's

After a convivial lunch celebrating Jake's birthday Jake set up a largish game of Muskets & Tomahawks with 500 pts & 4 players a side.
It was great looking battle but as is often the case with M&T the scenario was indecisive with neither side able to gain victory.

Thursday, March 17, 2016

Flames of War refresher

Mark & I fought an afternoon Flames of War battle to refresh our skills for future tournaments, (though as it happened neither of us can go to the one in Launceston this weekend).

Free For All Mission, 1750 pts North Afrika book
Captain Ghandi's Indian Rifles v. Mark's Afrika Korps Schurtzen (both Tunisia)

The Indians are on the near side of the table.
While nothing much happened on the left of the table for the entire battle, the Indians immediately attacked on the right.  The bugs destroyed the Schutzen on the ridge, but the MkII's had doubled across from the centre to counterattack. 
The MkII's have destroyed the bugs, but the Indians& Churchills are still coming
Having destroyed the bugs the MkIII's failed their stormtrooper test after machine gunning the oncoming Indians.  While the 25pdrs smoked the Pak40's in the centre, the Churchills destroyed the Panzers in one turn.  The werfers did great execution on the Indian infantry, but they were Fearless & didn't break.  The Churchills breasted the ridge and with a bit of help from the infantry soon wiped out the werfers to gain complete control of the objective and victory.

Not having played FOW for some months we were a bit rusty woth the rules at first, but getting there firstest with the mostest always works even if you can't remember the rules. 

Tuesday, March 15, 2016

Man o' War

After a bit of Sails of Glory at Barrie's I thought it time to do some more of our home grown Man o' War Rules. I've picked up some new Airfix Victories to add to the old 60's models (they are still making the same model after all these years)  so could put 13 ships on the table.
British: Mike & James each with 3 ships, 1 2nd rate & 2 3rd rate all with elite crews.
French: Mark with 1 1st rate & 2 3rd rates with regular crews.
             Jim with 1 2nd rate & 3 rd rates with regular crews.
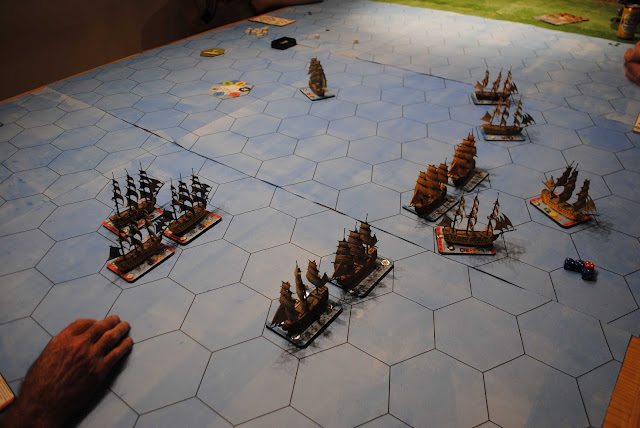
The wind is coming from the left.  The Brits are at the far end, James upwind on the left.Mark has the French windward column on the left.
James is sailing close hauled while Mike is charging ahead on a beam reach.  Mark intially turned to windward, but seeing what the Brits are doing turned back onto a reach as Jim tacked up to combine the 2 French squadrons.

Jim's & Mike's squadrons sail past each other exchanging broadsides while a wimnd shift as cause chaos in Mark's squadron.  But James is too far away to take advantage.

Mike's squadron has passed down to windward as James' squadron sails into an unequal melee with both French squadrons. 
Mike is struggling to turn round and beat back upwind as the French pound James' squadron. 
Two of the French ships have peeled off with serious damage, but all 3 of James' ships are critically damaged  & surrounded.  One by one by one they have to strike while Mike is still beating back to windward.
Five French ships remain in fighting shape & turn to take on Mike as the other ships get out of the way and round up the prisoners.
Mike's 3 ships are the ones in the centre with 5 French ships on this side of them.  The lead British ship has just struck its colour.  That makes 4 ships sunk or struck out of 6 so the Brits fail their fleet morale test & have to concede the battle.

It was a good battle for the Frog.  The Brits made a mistake at the start and the French took full advantage.  In this battle we put the damage logs on the ship's bases instead of on separate boards.  It's a moot point which is best. 

Meanwhile in Suffolk:
My friend in England is currently fighting Trafalgar using these rules.
This is the start of the battle set up ready to go.  Only the heads of the British columns are on the table.  They use some local variations including separate damage logs.


Sunday, March 13, 2016

Sails of Glory at Barries

Six players six ships.
FrenchL Jim, Steve & JohnW
British: Barrie,  Ed & JohnM.
The French started on the near side.  The wind is down the table from the left.  Far right Steve & JohnM are engaging in mutually assured destruction.  Far left JohnW & Ed are dancing around each other.  In the foreground Barrie & Jim have already passed each other with an exchange of fire that heavily favoured the French when Barrie tried to be cunning and hold his fire for a better shot that didn't happen.

Subsequently Barrie agains misjudged distances and sailed into the mouths of Jim's guns & was sunk.  JohnM eventually sunk Steve's ship, but was so badly damaged himself he sank anyway.    Ed & JohnW's put a lot of damage on each other, but Ed ran for home when Jim's almost intact ship turned towards him.

Thursday, March 10, 2016

Modder Fokkers

We missed two Tuesdays due to unfortunate circumstances, but NickB was in town this week & I was pleased to be able to put on a Thursday game of Modder Fokkers for him, SteveJ & Ed.

SteveJ: Albatros + Rolland.
Ed: 2 Albatrii 

Jim: Sopwith Tripe + Sopwith 1 1/2 Strutter
NickB: Neuport 11 + Sopwith Pup

The two seaters of each side had to fly the length of the table 4 hexes on their side of the centreline on a recon mission (in opposite directions).  Each side had 3 fighters coming on theoposite side of the table.  VPs were gained by:
2 VPs if your 2 seater completed the photo run & got off the other short table edge.
2 VPs for each enemy plane shot down.
1 VP for each enemy fighter that ran for home.

The 2 sides had planes with very different characteristics.  The British planes were more manoeuvreable than the Albatrii, but the Albatrii were tougher and outgunned them with twin machine guns. 
Both sides chose the same strategy and immediately crossed the table to form an escort for their own 2 seater.  The Brits are in the foreground forming up behind the Strutter, the Germans in the background are doing the same behind the Rolland. 
Both flocks of fighters turned towards each other and the dogfight began as the 2 seaters both cruised on unmolested taking their photos. 

The dogfight was pretty confused, but the Brits did much better at the vital business of getting on tails while SteveJ had rotten luck with special damage, managing to get himself wounded, his engine damaged and his airframe damaged while no one else got any special damage at all.  One of Ed's Albatrii was chased from the table by the Tripe while Nick's Pup pounced on the tail of Steve's stricken plane.
 Steve tried to run for home, but the Pup got him first.
The remaining Albatros (off shot above the pic) then used its height advantage to run for home before the pack of Allied fighters could get up to it.

VPs: Germans: 2 for successful recon.
         Brits: 2 for successful recon, 2 for shooting down an Albatros, 2 for 2 Albatrii running away.

Since the last game I painted the sticks in coloured bands.  This made height differentials much easier to see and was a significant improvement.