Wednesday, November 30, 2011

Hail Caesar 30/11/11

Jim's Republican Romans v. SteveJ's Seleucids

The Romans had 2 legionary divisions each 4 hast/princ, 2 velite, 1 triari, all small units & 2 allied divisions each 1 small med cav, 1 small light cav, 1 med inf, 1 light inf.   The Seleucids had an infantry div of 4 phalanxes, 1 med inf, 2 elephants & 2 skimishers & 2 cav divs, each of 2 cats or heavies & 2 small light cav.

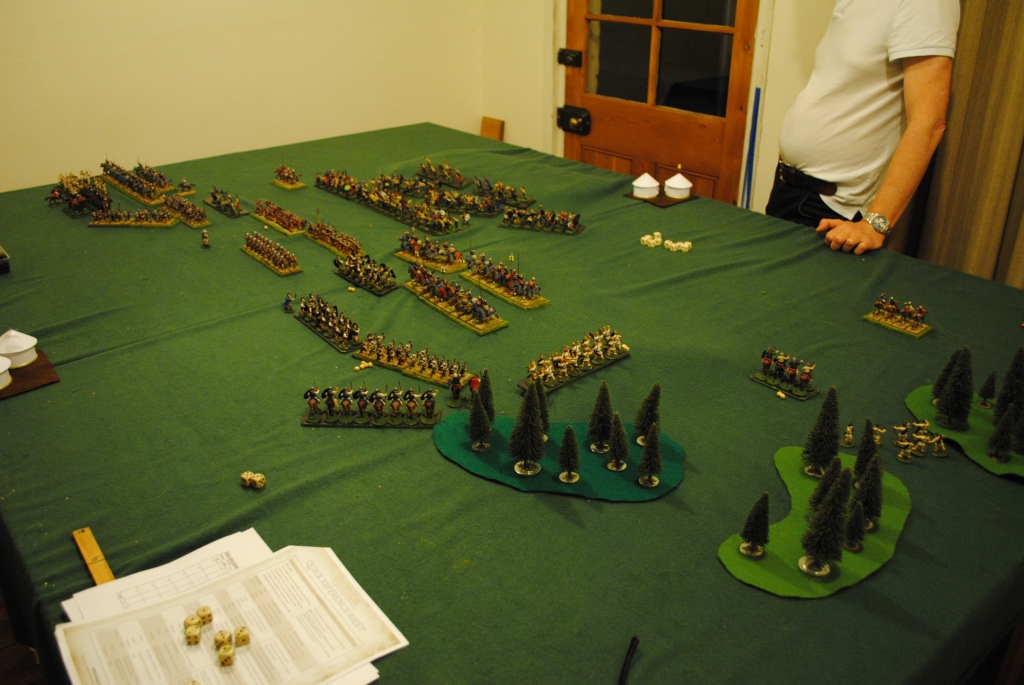
The Romans deployed with allies on each flank.  The Seleucids put all their cav on their right with the left of the phalanx protected by elephants & light troops.

The mission rules were: Map deployment.  Army morale failure if 1) camp lost, 2) more than half divs lost, or, 3) all of inf divs lost.  Pics all taken from Roman side.

The Seleucids got first turn and generally advanced, except their right flank cavalry dithered.

The Romans tried to advance their right, but poor command dice made it slow going.  The first clash was on the Roman left where the cataphracts smashed through the weak Roman cavalry.  The left looked bleak for the Romans, but the Seleucid cavalry dithered and the allied medium infantry on the hill stood firm before the light cavalry and protected the Legion's left while it took on the phalanx.

On the other flank the Romans tried to send their cavalry over to bolster their left, but their div commander just didn't get it and they sat behind the wood for the duration.  But the infantry did better - charging the elephants and driving them back to secure the Legion's right flank.

In the centre the phalanx and the legion met head on.  The legions got the better of it on the right and broke the phalanx line.  The flexibility of the small units then allowed them to exploit the gap and the Seleucid infantry division broke giving the Romans victory before the Seleucid cavalry could make an impact.

The Seleucids considered themselves unlucky in the infantry fight, but it could be said that they made a strategic error in advancing the phalanx.  If they had held it back, the Roman infantry would have exposed their flank in attacking them.  As it was the Romans had the opportunity to counterattack with their strength before the Seleucid cavalry could be brought to bear. 

Tuesday, November 29, 2011

Nick in Launceston

Nick vs Rob -- FOW, 1500pts, Mid war -- Afrika Korps (Nick) vs US (Rob).

Nick's first attempt at Afrika Korps turned to disaster when his combined assault on a unit of US engineers went wrong and the engineers steamrolled the Afrika Korps infantry and CinC.  Then it was just a waiting game until the US took down another platoon.  Rob got a well deserved 4-3 win. 

On the other table it was Dennis vs Shane.  Dennis used his strelkovy with flamethrowers to eat through the Panzer IV's and Panthers opposing him.

Sunday, November 27, 2011

Sunday School 27/11/11

There were two Cancon practice matches:

Munt's Fins v. Mark's Bersaglieri (Jim's list) in a Cauldron Mission

Munt was the attacker.  He got a good deployment (all on one side)and mounted a sound attack on one end of Mark's line.  He took an objective and Mark's cavalry (2 platoons of M14's) failed to arrive in time to take it back.


Rich & Thomas' Tankovy v. Jim's Hungarian Light Infantry in a Breakthrough Mission

Rich & Thomas had KV1's, T34's, T60.s, ZIZ's & infantry, plus tanko's on the heavier tanks.  It was designed to fight Jim's Bersaglieri list that Mark was using, but was just as nasty for his alternative Hungarian list - 2 infantry, heavy platoon, Pak38's, 105,s, 38T's & Nimrod AA.

The Hungarian infantry quickly dug in on the two objectives. 

The Pak38's were no match for the KV's which rolled over them and pushed on to attack the centra objective.

On the Hungarian right, the ZIZ's moved up into close range of the heavy platoon before they fired.  The Hungarians won the exchange of fire, destroying the 4 ZIZ's.

On the Hungarian far left, the 38T's came on from reserve and engaged the T60's.  After a long slog they won out and destroyed them.

In the centre the KV's rolled forward seemingly unstoppable.  The infantry gave ground hoping the artillery could save them, but the T34's came on and joined the KV's assault.  A spirited defence by the infnatry pushed the T34's back, but the KV's rear mg saved them from the panzerknackers and they destroyed the infantry to take the objective.

The Nimrods disputed the objective while the heavy platoon counterattacked and captured a KV bailed by the 105's.   But the Hungarians only hope of victory was for the 38T's to destroy the Soviet infantry and force an army morale test.  But Thomas was smart enough to dig them in in a convenient forest and the objective fell before the infantry were reduced below half.

Conclusions:  The Hungarian list put up a stiff fight against the worst possible opposition - certainly they did better than the Ities last Friday.  So the Hungarians may well be going to Canberra. 


Friday, November 25, 2011

Cancon Practice 25/11/11

Leigh's Soviet Armour v. Jim's Bersaliglieri

1500 pts Free for All:  Leigh's army is this Bergagalieri list's worst nightmare - 11 T70, 10 T34's, 10 Stuarts & 4 SU85's - made worse by losing the Attacker/Defender roll and being put on the open side of the table.

The Stuarts defended the Soviet left and the rest lined up to smother the Paks & infantry on the other flank.

The Ities charged forward on the right with tanks & infantry.  The Carri all but destroyed the Stuarts, forcing the Soviets to bring their T34's over to defend the objective.  But they had already taken out the Paks and they plenty of tanks left on their right to deal with the Ities there. 


The Carri couldn't hope to take on the T34's so they moved left, but they were too little too late to save the Bersaliglieri.  They were overwhelmed by the T70's and survived the fire of the artillery & Carri to hold the objective.

This was a reality check for the Ities.  There are going to be combinations of army, mission & terrain that make them dead meat.  The same may well be true for Leigh's all tank force.

Wednesday, November 23, 2011

Hail Caesar 23/11/11

Steve's Dacians v. Jim's Imperial Romans

We decided to give Steve's beautiful Sarmatian Cataphracts a run.  We didn't have the right troops for a full Samartan army, so we went Dacian with Samartan allies.  The armies are from the HC Book of Lists.  The Dacians don't quite conform having more cavalry than is kosher, but we weren't going to leave them in the box on that account.

All pics are taken from behind the Roman left.  The Romans depoyed 2 Legionary divisions in the centre (3 or 4 legionary + 1 aux bow each) and a light div on each flank (1 med cav, 1 small light cav, 1 light inf & 1 small archer each).  The Dacians had infantry in the centre (6 warbands + 3 skirmishers) and cavalry on each flank (3 cats & 1 small horse archer).

Through chance or design both sides advanced first on the near side of the table.  The first contact was some skirmishing round the woods, then the cats charged over the ridge at the RH legion.

The Roman line held on grimly as the Roman right wrapped around the Samartan flank and counterattacked. 

On the other flank, the Roman light troops could only play for time against the Samartans.  Left of centre, the 2nd legion advanced as the Dacians dithered.

When the Dacians and Romans met, there was a mix of results, but critically the Romans gained an overlap on the Samartan left and threw a reserve unit into their flank.  Attacked from both flanks and the front, the Samartan left broke.


The Roman left had also broken & their LH legion was now in danger of being outflanked and rolled up, but the Roman cavalry on the right were able to ride unobstucted into the Dacian camp to win the battle. 

Having taking the camp a victory condition made a good finish - I think much better than slugging away to the last division.


For some reason I've taken a liking to this figure from the Wargames factory German cavalry box.  He did well tonight as commander of the Romans.

Saturday, November 19, 2011

Cancon Practice 19/11/11

Jim's Bersaglieri v. Rich's Tankovy

After last weeks masacre of the Strelk, Rich tried a Tankovy force this time:  Sappers, 2 Sherman platoons, anti-tank guns & Sturmovics.  The Mission rolled was Hasty Assault - the Ities defending.  Both sides waited for all their reserves to arrive before doing much.  The Itie defence used the ridge on their left with infantry on the crest and artillery & tanks behind.   The LH objective was defended by infantry, Pak 40's and tanks.

The Russians used the cornfields to get their infantry forward.  One tank platoon advanced beside them and began whittling away at the infnatry on the ridge.  The other went round the right of the wood to counter an Itie counterattack thru the wood and to avoid the Pak's zone of death waiting for the Sturmovics to deal with them. 

When the infantry on the ridge had been weakened the tanks and infantry attacked it.  They drove the Bersaglieri back off the ridge, but the Carrri counterattacked (both platoons as the LH one had been brought over).


The counterattack destroyed the infnatry and the Shermans leaving the Russians with just 2 platoons left out of 4 and no CIC (that tank was sniped by a Pak) and running out of time.  

They finally disposed of the Paks by Sturmovik & tank fire and the Shermans came forward to try and save the day.  But in doing so they had to get close to the Carri which rushed forward around the flanks & destroyed them to finish off the battle.

Another win for the Ities, but much more harder fought than last week.

Friday, November 18, 2011

Hail Caesar 18/11/11

Jim's Carthaginians v. Mike's Gauls.

We used the new book to make up two three division armies.  All pics are taken from behind the Pune's right.  The Gauls have cavalry on their right (4 medium & 1 small light), and infantry left and centre (4 warbands & 1 or 2 small slingers).  The Punes have Spanish on their left (3 Scutari in captured Roman gear + 1 Ligurian light inf & 2 small slinger skirmishers), African infantry in the centre (2 long spear phalanxes, 2 Numidian light infantry & 2 small bow skirmisher) and cavalry on the right (4 medium & 2 light all small units).

Both sides initially advanced on each other, but the Punes allowed their centre to get ahead to meet the opposing warbands head on.  This did not quite go according to plan.  The right hand phalanx pushed their opponents back and followed up expecting victory, but a sudden dice turnaround saw them rout instead.  At the same time Gallic cavalry threw hot command dice and slammed into the left hand phalanx's flank before their supports could get up to cover it.  But the phalanx held and a counterattack by it's supports forced the cavalry to retreat. 

On the Punic left the Spanish weakened the cavalry with javelins & slings while the cavalry sorted themselves out again.

On the Punic right, the cavalry pinned the Gauls down while shifting part of their force left to help the centre.

After a period of reorganising, the Punes resumed the attack in the centre this time with cavalry and phalanx while the Gallic cavalry had their hands full with the Spanish, and the warbands on the other flank were tied up by the rest of the Punic cavalry.  The Gauls put up a good fight, but the coordinated attack was too much for them.  Both the cavalry and centre divisions broke to give the Punes victory.

Yet another very enjoyable Hail Caesar battle.  There were the usual wild swings of fortune, but the more experienced Punic command had a sound plan that prevailed.  This was fairly small battle, with just 3 divisions, each with at least 4 non-skirmisher units, totalling about 380 pts each, but it was enough for 2 players to have a good game in about 2 hours after set up. 

Nick in Launceston

The Launceston Gaming Club was unusually quiet -- only 4 table playing games.  In fact, it looked like only 1/2 the usual crowd rocked up.

Rob Snr vs Rob Jnr -- Flames of War -- 1750 pts late war -- Hasty Assault -- US infantry vs German Panzers.  The game was still going when I left, so all I can say is that Rob won.

Dennis vs Nick -- Fields of Glory -- Carthaginian Starter army vs Gallic sstarter army.  An inconveniently placed steep hill split the battlefield into two components.  One one flank, two units of Gallic cavalry faced off against two units of Numidian light cavalry and some mercenary Gauls hired by the carthaginians.  Nick's attack here was an unmitigated disaster, with both units of Gallic cavalry being routed.  One did come back for a bit, but was chased down by Numidians after they had looted the camp.  On the other hand, Denni's attack in the center was a disaster, with the Carthaginian Elephants being destroyed by Gallic bravery, and the Spanish mecenaries and African veterans being worn down to nothing by sheer numbers of Gauls.  The Carthaginian infantry was destroyed -- but the victorious Gauls tied themselves into knots, and couldnt establish some sort of battle line.  Meanwhile, on the flank of the infantry, Hannibal and the Carthaginian heavy cavalry overwhelmed the Gallic heavy cavalry.  The Carthaginian cavalry managed to maneuver to crush the end warband in the Gallic line, and Dennis got a hard fought victory -- if the warband had managed to hold out the Carthaginian camp would have gone, and it would have been a Gallic victory.

Tuesday, November 15, 2011

Nick in Launceston -- Firestom Bagration Final Battle

The last firestorm bagration battle was held a couple of weeks ago.  Pictures are here: http://www.projectrb.com/?page_id=70

The Russians failed in their assault on Minsk, so the Germans won the campaign.  It was a great campaign, with many battles that were close, and a strategic situation that swung wildly.

Saturday, November 12, 2011

Armistice Day at Camp Cromwell

We marked Armistice Day with 2 wargames (played with the priviso that we had to finish by 11).

Cancon practice match for Jim:
Jim's Bersaglieri v. Rich's Strelkovy.
MW, 1500 pt,s Fighting Withdrawal Mission, 6x4 table.

Against the sound advice of his son Thomas, Rich's list was all infantry & guns - no tanks.  He soon found out that this wasn't a good mix against the Besaglieri.  The 2 Carri platoons of 5 M14's each ran amok.  One outflanked and slaughtered the Gods & HQ.  The other, supported by a Bersaglieri platoon and artillery destroyed the Strelk attacks.  It was a crushing victory with the Ities losing just 3 teams while the Russians only had 3/4 of a Strelk left when they failed army morale.


Hail Caesar
Steve's Romans v. Mikes' Gauls.

Steve deployed his legion in the centre with cavalry on their right and a mix of legionaries & auxilia on their left.  Mike put his chariots on his left, then warbands, cavalry and more warbands.

When the Roman left bludered and left the legions left exposed, the Gauls counterattacked the legion front and flank with warbands.  It put up a stiff fight but was eventually destroyed. 

But the chariots were defeated by the Roman cavalry, the Gallic cavalry was wasted in a frontal attack on the Roman left and the Romans fought back to salvage a costly win.

Friday, November 11, 2011

Nick in Launceston

Vietnam -- Nick and Nick (NVA) vs Rob and Rob (US).

The US airmobile troops landed in a clearing, charged with destroying a supply center.  No sooner had they landed than a horde of NVA burst from the trees.  The NVA didnt do any significant damage, and wave after wave of US troops were bought in by helicopter.  Suddenly, NVA AA openned up on the helicopters, forcing two to return to base, and a short while later, forcing another to return to base.  Then a second horde of NVA burst from the undergrowth and attacked the US infantry.  A US platoon was almost overrun, with several teams destroyed in hand to hand combat.  But the US troops retreated, regrouped, and let fly with their M16's, leaving a pile of NVA bodies.  The 'Hog' gunships flew close to the first horde of NVA, and peppered them with machine gun fire.  However, lots of AK 47's shooting back saw both gunships shot down.

The game was called for time, but the NVA had won, getting victory points for each helicopter shot down / forced to return to base, and losing no victory points in terms of companies destroyed.

Sunday, November 06, 2011

Operation Cromwell II: FOW Doubles Tournament

Operation Cromwell II, a FOW doubles tournament was held at St Georges Church Hall (over the road from Camp Cromwell) over the weekend.  9 teams took part, 4 from the Kingston Bunker Rats, 2 from the Launceston Gaming Club & 3 from Camp Cromwell.   There were four 3 hour rounds fought on five 8'x6' tables (2 provided by the KBR).  Each team had two Coys totalling 2,500 pts

Round 1: Free For All
Steve & Nick (CC) tied with Nick & Declan (LGC)
Leigh & Mark (CC) d. Griggsy & Gaz (KBR)
Rich & Byron (Jim subbing for Byron) (CC) tied with John & Rusty (KBR)
Rob & Shane (LGC) ties with Smithy & Patrick (KBR)

Round 2: Hold The Line
John & Rusty d. Steve & Nick
Leigh & Mark d. Munt & Twisty
Smithy & Patrick d. Nick & Declan
Rob & Shane d. Griggsy & Gaz

Round 3: Dust Up
Steve & Nick d. Smithy & Patrick
John & Rusty d. Leigh & Mark
Griggsy & Gaz tied with Rich & Byron
Munt & Twisty ties with Rob & Shane

Round 4: Hasty Assault
Munt & Twisty d. Steve & Nick
Leigh & Mark d. Smithy & Patrick
Rich & Byron d. Nick & Declan
Rob & Shane d. John & Rusty

Overall Results:
1:  Leigh & Mark, Brit Inf + US Paras (CC) picture below (not a pretty sight).
2:  John & Rusty, Soviet Strahff + Heavy Armour (KBR)
3:  Rob & Shane, US Arm + Inf (LGC)
4:  Rich & Byron Hungarian Inf + Assault Guns(CC)
5:  Munt & Twisty, Finnish Inf + Panzer (KBR)
6:  Smithy & Patrick, Soviet Naval Inf + Heavy SP Art (KBR)
7:  Nick & Declan, Brit Arm + Inf(LGC)
8:  Steve & Nick, US Stug + Gren (CC)
9:  Griggsy & Gaz, Germ Arm + Inf (KBR)

Patton Award for killing the most enemy:  Smithy & Patrick
White Feather Award for killing the least enemy: Griggsy & Gaz
Banzai Award for having the highest casualties: Steve & Nick
Gordon Bennett Award for losing the least casualties: Rich & Byron

Our thanks to Area 52 for providing the 1st prize - 2 vouchers for Burning Empires.

Launceston's Finest Hour - the massacre of the dreaded Strahf...

Hail Caesar at Operation Cromwell II

We took advantage of having the hall to put on a Hail Caesar on a 16'x6' table on the Saturday night.  We fudged together a Successor army to fight a combined Roman/Sassanid force.  Mike & Jim commnaded the Successors, Steve & Chris commanded the Romans.  Perversely we only used 12' of the table, but it was quite a spectacle.

The Roman divisional deployments from the left were cavalry, Sassanid infnatry, cataphracts, elephants, Legion & Auxilia.

The Successor deployment from their right was heavy cavalry with medium behind, Galacian warbands, phalanx, elephants with mercenary hoplites behind.

The battle started with the Successors advancing on their right while holding their centre & left back while sending their elephants across their front.

The Roman heavy cavalry defeated the Succssors, but were badly enough hurt to think twice about taking on the medium cavalry division behind.  The Galacians occupied the scrubby hill.

A fight developed in the centre between the opposing elephants supported by Galacians on one side and Legionaries on the other.  The phalanx waited for the elephants to get out of the way and charged forward at the legion.  The cataphracts advanced on the Galacians to support their elephants.

The Successor elephants won the fight in the centre and one unit wheeled left to attack the flank of the legion while it had it's hands full with the phalanx and hoplites.  The legion broke leaving a gaping hole in the Roman line.

The Galacians, helped greatly by the rough ground held their own v. the catphracts while the Successor right gave ground they could afford to lose.

The Roman auxilia had  poor command dice and took too long to get involved.  By the time it had cleared up the Successor's delaying force, the hoplites and phalanx had beaten the legion & were able to turn & face them.

By this stage it was nearing midnight and combat fatique was setting in.  So we agreed to a pull up stumps.  But the Successors were in the box seat - the auxilia were about to be stepped on, the Roman camp was undefended, and their cavalry and allies were too far away to help.

Operation Cromwell Practice 3/11/11

Rich & Jim gave the OCII Hungarians a run v. a Russian army of Strelk and heavy armour commanded by Steve.  The Mission was Dust Up.

The pic is taken from the Russian left.  The Russians made an atttack on their right, but a wood full of Infantry, Paks & 88's slowed them down enough for the Hungarian reserves to swarm over the Russian left. 

Friday, November 04, 2011

Nick in Launceston -- Pass the smoke

A doubles practice match for the Operation Cromwell tournament.  Nick and Dennis (German), vs Rob and Shane (US).

Military censorship prevents a description, but there were a fair few dead tanks.  As epitomised by the headline -- 'Pass the smoke'.

Notable was a unit of 4 shermans that took out 5 Stugs, surviving direct fire, Hummels, and Nebelwerfers for about 8 turns as part of the long range gun duel.

Tuesday, November 01, 2011

Hail Caesar

Mike took command of the Gauls against the might of SteveJ's Romans.  The scenario was basically an FOW FFA, with camps replacing objectives.  The loss of your camp was to count as an extra division lost.

The Romans had their heavy cavalry on their left,  auxilary spearmen left centre & auxilary bowmen right centre and legionaries on their right.

The Gauls had cavlry on the right, 2 divisions of warbands in the centre and chariots on their left.

For once the Romans advanced.  On their left, the Roman cavalry was initially driven back by missile fire, but they rallied, came back and smashed the Gallic cavalry.

Left of centre the auxilary spearmen and Gauls advanced on each other and started a slogging match.

Right of centre, the auxilary bowmen were fortunate that their opponents dilly dallied (throwing bad command 2 turns in a row despite having the CIC re-roll).  By the time the Gauls charged, a legionary cohort had been placed on the Gaul's flank helping the bowmen to hang on.

On the Roman right the chariots skirmished indecisively with the legionaries.


The auxilary spearmen finally broke, and the auxilary bowmen were on their last legs,  but the Roman cavalry then hit the Gauls in flank.  The first division broke and the follow-up charge broke the second one.

Yet another Roman victory.