Wednesday, January 30, 2019

Cruel Seas & Modder Fokkers

Cruel Seas:

Steve's 3 S-boots attacking a British convoy of two merchant ships escorted by an armed trawler & 2 Fairmiles (Jim, Mark & Nick).
British hopes took a beating when the 1st German torpedo fired took out the armed trawler escort.  Concentrated gunfire from the S-boots then put down the Fairmiles one after the other leaving the merchantmen helpless.

Modder Fokkers:
With the sea battle done quickly, we got out the old planes.
Jim's Pfalz & Steve's Albatros
v.
Mark's Bristol Fighter & Nick's Pup
It was a complex dogfight  with the Huns very wary of the twin mg's in the Bristol's tail.  
The Pfalz went for the Pup.
 The Albatros repeatedly flew thru the action & out again taking few risks.
The Pup started accumulating critical damage & found it impossible to out-maneuvre the Pfalz with a hieght advantage.
The Pup went down & the Huns coverged on the Bristol.
The Bristol made a run for Blighty & made it.

Wednesday, January 23, 2019

Musket Action & Cruel Seas

Tonight I set up the room with two small tables. 
I introduced Simon to Musket Action on one while Steve & Mark did Cruel Seas on the other.

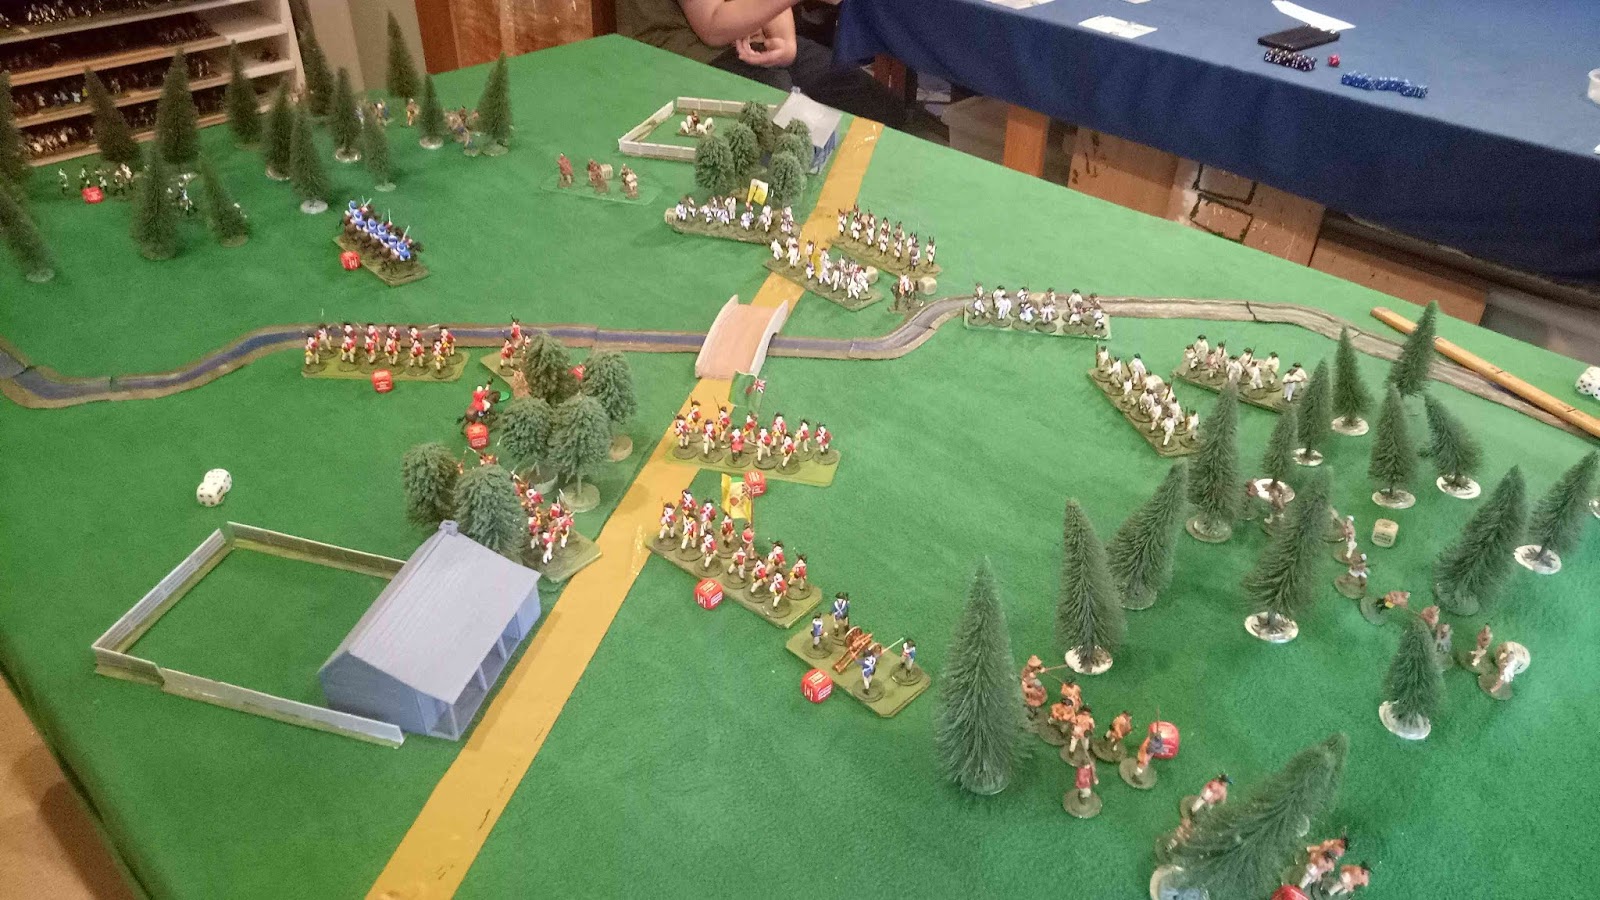
Musket Action: French & Indian War
Jim's Brits: British line battalions (4 line coys, 1 grenadier coy, 1 light coy) supported by 2 coys of woodsmen, 1 light gun & a troop of light dragoons.
Simon's French: French line battalion of 5 line 1 grenadier coy supported by 6 bands of Indians.
The objectives are the two farmhouses & the bridge. 
Both sides put their regulars in the centre with light troops on the flanks.
The Brits advance boldly & sieze the bridge while their dragoons drive the Indians away from the far farmhouse & their light troops defend the woods on each flank.
The dragoons have dismounted & taken the far farmhouse.  French grenadiers have driven the Brits off the bridge.  Both British flanks are under pressure from Indians.
The British grenadiers re-took the bridge only to be blasted off it by French musketry.  The Indians have cleared the British light infantry & woodsmen out of the woods on both flanks.
Outflanked on both sides, the Brits on the bridge are about to break.  Indians have over-run the British gun.  In the 6th turn the French re-take the bridge & their Indians take the near farm to give the French a decisive victory.

Cruel Seas:
Steve had 4 S-boots & a Flakship to escort 2 merchantmen across the table.
Mark had 4 Vospers & 2 Fairmile's to intercept them.
 The S-boots charged forward to attack the MTB's
A collision between 2 S-boots was a big own goal for the Germans.  2 MTBs got through to launch torpedoes at the merchant men & one is sunk, but the rest of the Brits are sunk.  The remaining S-boot & the Flakship were more than enough to encourage the remaining 2 MTB's to break it off & 1 of the merchant survived intact.  So a drawn battle.
I found the maneouvre ruler supplied with the game awkward to use & devised this alternative.
Above, the ruler is in place ready to make a 13cm move step with a turn to starboard.
Below the boat has been moved & made a maximum turn to starboard.
The other side of the ruler is a mirror image & is used for starboard turns.
The red side is for 45 deg turns, the yellow side for 30 deg turns. 

Wednesday, January 16, 2019

Cruel Seas

We had some new boats painted, so had to have another go at Cruel Seas.

Game 1:
3 S-boots are escorting a disabled U-boot back to base.  (The U=boot can't submerge).
6 MTB's are trying to finish off the U-boat.
The U-boot is a 3-printed model made for me by Stewart.  It came up well. 
The Germans made a mistake splitting their force.  The 3 MTBs on the left took out an S-boot & closed in on the U-boot.  The leading boat's torps missed.  The 3rd boat shot their off to close to work, then ran into the U-boot & sunk. 
The torps failed, but a hail of gun fire from 5 boats sunk the U-boot while the other 2 escorts took out an MTB, but were too far off to help much.

Game 2:
Steve had made up a Minesweeper & a Flak-boot, so we had to use them, giving them an escort of 2 S-boots.  7 MTBs attacked them.  We used our hex blue hex sheets to give us a bigger area.
The germans sight a swarm of MTBs coming for them.

The S-boots go right through the swarm of MTBs with no serious damage either way.
Although the S-boots are now circling around & out of the action the MTBs are learning that they shouldn't get too close to bigger boats.  If they get too close & they can't use their torps effectively  & the bigger boats many guns are deadly up close.
The Minsweeper has taken one torp hit, but survived & th germans sail on through the wreakage of most of the MTBs.  The Germans win this time.


Wednesday, January 09, 2019

Napoleonic Naval

British: 2 squadrons of 4 ships commanded by Renfrey & Mike.
French 3 squadrons of 3 ships commanded by Chris, Mike & Steve.
Rules: Our own Men o' War rules.
The Brits are in the foreground with yellow hulled ships, Mark on the left, Renfrey on the right.
The French are downwind with Chris on the right (in the van), Mike in the centre, Steve on the left.
The Brits have the weather guage 
The French turn to port & start forming a battle line.  The Brits split their force.
The lines converge
Renfrey's flagship truns away, but he sends his squadron straight at the French line.
Most of Renfrey's squadron passes through the French line coming under heavy fire as Mark's squadron is left largely out of the action. 
Renfrey's squadron has two ships badly damaged & forced to break off (on the far side).  The French having passed thru the British line are tying to turn back into the action. Mark's squadron is milling about in the centre.  
Mark turned upwind towards the camera & passed Chris' squadron going the other way.  Both are now turning.   Mike's squadron has a damaged ship breaking off to the right.  Seve's squadron is seeing Renfrey's off the far table edge.

We were out of time & adjudicated at this stage.  Both sides have had 4 ships critically damaged & forced to break off.   But Renfrey's fleet is a mess with 3 ships critically damaged (including 1 dismasted) & the other verging on critical damage.  The French are in hot pursuit & Mark's relatively intact ships way behind them.  It is judged a French victory.  The critical factor being Mark's ships being left out of the action too long.  Renfrey was actually very lucky to get thru the French fleet without much worse damage than he got as the French blew some opportunities to really hurt him with showers of bad dice. 

We made one rule change on the way thru adopting the Bolt Action system to determining order of fire of the ships instead of simultaneous fire.  It made it much easier to keep track of things.  The movement is still simultaneous in accordance with pre-set orders.

Sunday, January 06, 2019

Cruel Seas

Dave & Stewart made the journey from Molesworth to try out Cruel Seas. 

Game 1:
Germans (Stewart): 2 A tug towing a disabled U-boat is escorted by 2 E-boats.
Brits: 7 Vespers have to take out the U-boat.
The Vespers split into two to flank the Germans.
The right flank Vespers destroy an E-boat & go in for the kill. 
The 3" guns on the tug & U-boat are singularly ineffective.  Gunfire sinks the tug & 2 of the 4 torps launched hit the sub & explode sending it to the bottom.

Game 2:
2 E-boats v. 4 Vespers.
The Brits used the islands to get in close with their shorter ranged guns. That & a rudder hit on an E-boat got the Brits on top.
The crippled E-boat goes down as the other circles an island.
The 2nd E-boat returns & sinks a Vesper, but there too many Vepers & it too goes down.

Two good games were had.  The islands made things interesting by providing more tactical options.  We used the rule (removed in the errata) allowing torps to hit small boats but at -2.  We liked it.  The chance of a ht was small, but it gave the torps some point even if it was just phsycological.

The tug & U-boat models were made with Stewart's 3-d printer & looked as good as bought ones.

Wednesday, January 02, 2019

Action on the iNyezone: Zulus

To celebrate my 71st birthday we played a slightly modified version of the Action on the iNyezone scenario in the Black Powder 2nd Ed book, using our Hail Queen Victoria variant of Hail Caesar.
Zulus: 3 Impis of 6 warbands (Renfrey, Maike & Jim).
British: 2 brigades of 2 British infantry & 1 mounted inf
             1 brigade of 2 batve inf & 1 Natal volunteer mounted inf
             1 brigade of 2 British infantry
             1 gatling gun, 1 rifled cannon & a wagon train.
All units command 9.
The british column is moving out of their camp over the ford in the iNyezone River.  The smaller brigade is still breaking camp.  They know there are Zulus about. There two ridges along the near side of the table & a wood in front of the column that could be hiding them. The Brits have to get theri column & baggage down the road & off the table.
After 3 turns the last brigade has broken camp & formed up.  Still no sign of the Zulus.
Suddenly there were Zulus everywhere.  The commander of the left horn was so excited he forgot to take a Photo in the turn his Impi burst out of the woods just off the bottom of the pic as Mike's swarmed over the ridge through the village & Renfrys showed up on the far ridge.  The native infantry & volunteer cavalry at the head of the column were overwhelmed & destroyed in one turn.  Only the lead British mounted infantry stood firm against the onslaught.
The infnatry of teh lead British brigade counterattacked & Zulu centre was pushed back while the left Impi seemed more interested & finishing off the wounded than continuing the attack.   The right Impi is swarming forward in the background.
The Brits form a defensive box as their last mounted inf delay the right Impi, the  Zulu centre renews their attack & the left Impi still dithers.

Half the British rearguard has broken but most of the right Impi are for now busy pillaging the baggage.   The centre Impi has been pushed back again.  The left Impi has finally renewed their attack.  
On the British right 1 infantry unit has formed square. The other has been pinned frontally, attacked din rear & broken.  The British force is below half strength (counting only British inf & cav), so the Zulus have won according to the rules, but we were having so much fun we agreed to institute a the or glory rule & fight to a finish.
The last 4 British units are hanging on grimly. It looks hopeless, but the Zulus are still dying like flies & running out of un-shaken units.
The group of shaken units has beaten off another attack & the isolated square hangs on.
The square has finally broken & the yet another swarm of Zulus charge the last survivors breaking the square (the last un-shaken Brit unit) the finally overwhelming the last stand.