Tuesday, July 29, 2014

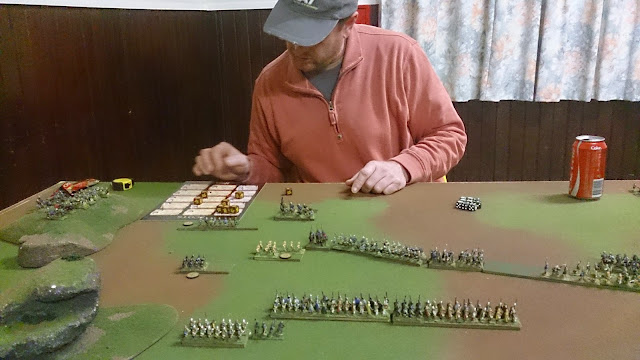
Hail Caesar: Rome v. Carthage

Jim's Romans v. Mike & Steve's Carthaginians

The Romans are on the left.  They have 2 legions in the centre with Spanish Allies on both flanks.  The Carthaginians have Punic & Numidian cavalry on the far flank, then Spanish allies, Gallic allies and Punic infantry on their left.
The Roman plan of a steady advance was confounded by their allies.  The Spags on the right blundered backwards, while on the left, the Spanish cavalry blundered forward to charge the superior Punic cavalry.
The Spanish cavalry on the left was speedily dispatched by the Punic horse.  The rest of the Carthaginian army stood back and waited for the Romans to be rolled up from the flank.  The Romans felt they had no alternative but to attack before that could happen.  Unfortunately, the left hand legion charged but the right hand one didn't.  Poor combat dice compounded the Roman problems and the advanced legion was soon in trouble.
Too late the right hand legion charged, but again their allies on the right refused to advance.  The attack pushed back some Punic spearmen, but didn't break them while a second Gallic wave broke through.  
The Spanish on the left are still holding off the Punic cavalry which are playing safe, having no need to take risks.  Their comrades on the right have clearly seen the writing on the wall and have blundered backwards.  The Romans are being destroyed in the centre.

This turned into a very easy victory for Carthage.  The Romans had consistently bad luck with command and the Carthaginians did all the right things to make them pay big time.
 

Monday, July 28, 2014

Muskets & Tomahawks at Barrie's

The M&T campaign day planned was postponed due to ill-ness of too many people.  Jim & John fought a friendly to test one of the up-coming campaign missons.
Jim's French Canadians are deployed to stop a British convoy from crossing the table from right to left.  The French have 2 militia units in the centre & an Indian unit on each flank.  The British have regulars on the road, light infantry on tier right & Indians on their left.  The convoy of pack mules & civilians is still off table,
After French lose both their Indian units in 1 on 1 fights, their militia is outflanked on both flanks and doomed.

Sunday, July 27, 2014

Nick in Launceston

Another Thursday evening, another fun game!

Nick vs Rob, in 1500 points Flames of War.

It was supposed to be a Vietnam game, but I couldn't get my Vietnamese ready in time!. So we fell back to good old WWII. I bought an army made from the Open Fire set with three tigers added. Rob had all the fancy Sherman's from one of the new US books.

Now, Rob should have won this. His deployment was better. His planned attack was better, using the terrain the shield his attack. But his dice were worse. Much worse. I cant remember seeing such bad dice. As an example, when launching an assault to take the central objective, Rob just needed to survive defensive fire from six pinned infantry -- but they got 5 hits. When the German StuGs were left in the open in front of some Sherman 76's, Rob just needed a hit or two -- and got 5 misses. When Nick needed reserves they arrived straight away. The tiger ace skill was Rapid Fire. The tigers shooting at Sherman 76's in woods couldn't miss, whereas the Sherman's shooting at tigers couldn't hit.

Tuesday, July 22, 2014

Napoleonic River Crossing

Jim's Austrians defending a bridge v. Mike's French

A quiet night at Camp Cromwell this week with only 2 punters available.  We decided to test how easy it is to defend a bridge across an un-crossable river.

Initial deployment.  The French (on the right) outnumber the Austrians by about 50%.

The French move infantry up to fire across the river on both sides of the road while they bombard the defenders of the bridge.  Columns are formed up ready to charge the bridge when the time is right.

As it happened, the Austrians threw bad dice on every break test under the French fire and their firce melted away.  The French didn't even have to charge the bridge.

This little exercise wasn't very exciting, but it was instructive.   It showed that deploying right up at the river is not the way to defend a crossing.  A superior enemy can then force the crossing by fire power alone.  Last week the Austrian deployed back from the river and counterattacked after some of the French had crossed.  They did much better, but arguably deployed too far back, allowing too many French over before they attacked. 

Monday, July 21, 2014

Sunday Bolt Action at Rich's

Jim's Panzergrenadiers v. Rich's Soviets
Scenario 4: Hold until relieved, German's defending.

This scenario has one objective on the centreline, in this case a road junction in a village.  The defender ahs 2 units on the table to defend it with half the rest coming on their e table edge on turn 1 & the rest as reserves from turn 2.  The attackers deploy all at the start, but not closer than 18" to objective, or 2 enemy units on the table.

There is no picture of the battlefield because the low winter sun halfway across the table gave too much contrast for the camera to cope with.

The Germans may have been handed too much of an advantage by have the objective in a village, so their 2 defenders were in hard cover from the start.  Rich then erred by putting his T34 & sniper too close to the German table edge.  The German first wave rushed the sniper and pinned down the T34 with bazooka fire.  The T34 never recovered, the Germans kept it pinned down for the duration with fire from their Luchs and howitzer.  They couldn't kill it, but eventually broke the crew's morale with accumulated pins.  The German infantry went past the pinned tank to stop the Soviet infantry adavance on one side of the village with firepower.  Soviet infantry attacks form the other side of the village took one house in a bloody assault where both sides were wiped out, but the other defender one held out and by turn 5 the entire Soviet force had been destroyed.

Wednesday, July 16, 2014

Elchingen 1805

Mike & Steve's French v. Jim & Mark's Austrians

This is the battle where Ney with his Corps crossed the Danube and defeated von Reisch's Austrian Corps to open the road to Ulm.  Most of the information I used to design the scenario is from Jeff Berry's excellent blog post at http://obscurebattles.blogspot.com.au/2013/12/elchingen-1805.html

Both sides have about 15,000 men, but the French were better troops and better commanded.  I modelled this by making the Austrians 5 dice in combat and command 8 to the French 6 and 9.  I made Ney 10 & Reisch 7.    While the numbers are pretty even, the French have more points (906 to 727).  I fudged the OOB's a bit to make them simpler.  I scaled the battlefield at about 40" = 1km to fit all salient features on, which made the battalions a bit out of scale so it's a bit more crowded than it should be - a price to pay for using 28mm figs.
The Austrians start in their historical deployment in and around the villages of Unter- & Ober-Elchingen with a small advanced force defending a damaged bridge. This pic is taken behind Unter-Elchingen.

This pic is taken from behind Ober-Elchingen looking towards the bridge. The river on the table is a branch of the Danube, the Danube & its bridge is off table  The Austrians have some Grenz, grenadiers and artillery on the flood plain to dispute the crossing.

Reich pulled his grenadiers & artillery back to the village leaving the grenz to make  a nuisance of themselves.
The French deploy their 1st division in from of Ober-Elchingen and march the 2nd to its right.  The escarpment hides the troops on the plateau from those on the flood plain.

The French 1st division attacks Ober -Elchingen. Their 2nd division is mostly deployed.  Their cavalry is also on the field.  The Austrians make a masterly show of inaction.

As both French infantry divisions attack, the Austrian left suddenly comes to life and advances.  The infantry advance is as slow as usual, but the cavalry gallop ahead.

The French 1st division is trying to blast the enemy out fo the village with musket and shot, but only make slow progress.  Their 2nd division breaks one Austrian battalion, but reinforcements but the Austrian counter attack on their flank turns the tide.  The Austrian cuirassiers are pushing the French dragoons back on the left
The French cavalry have been beaten, but they retired behind their infantry before they were broken.   The French 2nd division has broken under the Austrian counterattack.

At this point the lines have broken apart and there is a lull in the action.  As it was 10 o'clock real time, time was called.    We estimate that we got through about 15 turns, but the real battle started at 8am, so there's way to go before dark at around 6pm.

The Austrian cavalry is too blown to attack fresh infantry.  The right flank Austrian infantry division is also badly mauled.  Their small advance guard & their artillery have broken.  They have 2 relatively fresh divisions and still hold Ober-Elchingen, but their counterattack has stalled due to the slow advance of their rear echelon. 

The 1st French division is on half strength and verging on breaking, their 2nd division is broken, their cavalry is on half strength and blown.  They have 2 fresh divisions, one deployed & the other in the process of doing so.  The 2 spent divisions are being withdrawn behind the fresh ones. 

The Austrians came very close to breaking 3 French divisions and gaining a great victory, but their command problems have, as usual, resulted in a disorganised attack which though successful requires reorganising before it can go on. 

The prospect of attacking 2 fresh French divisions with plenty of artillery support is not attractive to the Austrians.  Nor is the prospect of renewing the attack with just 2 divisions attractive to the French. 

So the battle appears to be a draw.  But the Austrian wargamers are claiming victory on the grounds that they did much better than in the original battle.

In the real battle Ney's advance guard forced the crossing then charged up the hill & took half of Ober-Elchingen while the main body crossed over and deployed.   The Austrians broke when the French attacked in force.  Ney only used his first 2 infantry divisions and his cavalry.  His 2 smaller infantry divisions weren't needed.

It's a good question why von Reisch didn't defend the bridgehead more strongly.  In our wargame, the Austrian players decided to let the French cross, putting up only token resistance at the bridgehead, intending to counterattack them in the hope that a great victory could be gained by defeating the French with their backs to a river.  It very nearly worked - if the Austrian cavalry had broken the French cavalry quickly (and the French saved a couple of break tests at bad odds to prevent it) the French position would have been fatally compromised.  Maybe this was also Reisch's plan but he wasn't up to executing it.

Sunday, July 13, 2014

Bolt Action at Rich's

Jim's Panzergrenadiers v. Rich's Soviets

I introduced Rich to Bolt Action with the Demolition Scenario.  In this scenario both sides have one objective & win by having troops adjacent to it at the end of a turn. The Germans are coming on from the left, Soviets from the right.
Rich got a rude introduction to the power of heavy mortars combined with hot dice, losing 3 units to them.  The Germans attacked in two thrusts, one on the far flank and one through the farm with the large field.  On this flank the Soviets got bogged down in a firefight with the Germans and never got near to the German objective.  On the far flank the Germans destroyed the opposition and rushed for the objective with their Luchs & an infantry squad.   Their Luchs got to it only for it to be blown up by a T34.  The infantry squad blundered backwards instead of advancing on the last turn.

As always with Bolt Action an entertaining game, though it ended in a draw.

Friday, July 11, 2014

Saga -- as it should be :)

Nick vs Rob.

"Want to play Saga next week? I said.
"Sure" said Rob.
"What would you like to play?" I asked.
"Scots" said Rob.
"Hmmmm" said I!

The problem was I had Scots, but not single based for Saga. But I did have a big Scottish army I painted up in 1990, using the amazing (and now sadly defunct) Thistle and Rose miniatures. The figures are all based for DBx -- on 40mm wide bases. And I was NOT going to rebase!

But all was not lost. A Saga single based fig is based on a 25mm round base. Multiply by 1.5 and you get 37.5mm -- close enough to a 40 mm base. So instead of using a Saga sized table of 4' x 3', a normal 6' x 4' table works well with 40mm based figures. All that was required was a measuring stick with all ranges increased by a factor of 1.5, and we were off to the races.

And personally, I thought it looked amazing too!!!!

The Scots had 3 x Spearmen, 1x Highlanders (levy), 1x Mounted Hearthguard, and 1x Hearthguard. Opposing them were Vikings, with 1x Beserkers, 2x Hearthguard, 2x Bondi, and 1x Archers (Levy).

I wont give details of the battle, but suffice it to say that at the end of turn 6, all that was left of the Scots army was Rob's warlord. But the Vikings had been severely damaged as well. It was Rob's first game of Saga, and he was still learning the battle board. And he rolled an obscene number of 1's and 2's in some critical battles!


A Scotsman presenting a traditional greeting to the Swedish tourists!

Rob contemplates what to do to the Vikings!


Tuesday, July 08, 2014

Napoleonic 28mm: Heilingen Michael 1809

Jim's Austrians v. Mike & Steve's French

The scenario was adapted from the San Miguel scenario in the Black Powder book, transposed to 1809:  A major battle is brewing and the hilltop town of Heilingen Michael is considered vital to both Napoleon & the Archduke Charles.  They have both sent a reinforced Division to secure it as an anchor to a flank in the big battle expected tomorrow.

The French start with their whole force of 3 brigades deployed on the south side of the Michaelfluss.  The Austrians have their 1st Brigade deployed between Heilinhen Michael and the Michaelfluss.  Their other 2 brigades are in a singe road column with its head at the north table edge. 
 
Pic of the south end of the table after the first turn.  Heilingen Michael is just off shot on the right.  The French got good command dice in the first turn and rushed forward across the stream.

On the left, the French hussars have been swept away by French dragoons and the grenz have fled from the French columns.  On the right grenz are making a stand in the farmhouse.  In the centre the Austrian battery is causing casualties, but is being outflanked.  The Austrian reinforcements look an awfully long way away from the advance guard (perhaps better called a forlorn hope).
 
The camera's been moved to the north end of the table.  The French have taken the town and advanced beyond it intent on really hurting the Austrians before they can properly deploy.  The 2nd Austrian brigade is still not fully on the table.  The 3rd is still down the road.
The Austrian 2nd brigade has used the field and vinyard as a strongpoint and have deployed just in time to meet the French and cover the deployment of the 3rd brigade.
The French have declined to charge the field & vineyard and opted to start a fire fight.  The Austrians deploy their dragoons to cover their right and launch a counterattack on their left.
On the right, the threat of passing fire from the vineyard has made the French cavalry wary of attacking the Austrian dragoons.  They continue to try to blast the Austrians out of the fields with musket & artillery fire.  The Austrian counterattack is having mixed success with the dice gods, but is making progress.
On the left the Austrians have now cleared the French flank but bad command dice is slowing any exploitation of the advantage.  The front line troops in the fields have broken, but the 2nd line is holding on.
The Austrian attack on the left has finally got moving and broken the French brigade on that flank.   They have also driven the French infantry back from the fields.  But with Austrian dragoons now without infantry support, the French horse have finally attacked.  The 2nd brigade's dragoons have broken and that loss broke the brigade.  That meant the Austrians had lost 2 of 3 brigades and thus failed their army break test.

So the battle was a French victory on 2 grounds:  They broke the enemy and they took the objective.  But it was a very entertaining battle and the Austrians took some solace in having inflicted pretty significant casualties on the French, breaking one division and mauling another.

We tried out a few tweaks to our "Hail Frederick" variation of Hail Caesar.  We tried reducing musket range to 12" as 18" is grossly out of scale with the ground scale if it's worked out from either battalion frontage or artillery range.   It made little difference to the combat as long range fire wasn't that effective anyway, but it did give us more room to manoeuvre - it effectively makes the table bigger by reducing no mans land.  We also tried a simpler Break test table modelled on Black Powder rather than Hail Caesar.   It's so simple we could remember it and didn't have to look up the table, yet it seemed to work just as well.  This battle had a lot of manoeuvre and fighting yet took less than 2 1/2 hours.  We are very pleased with the way Hail Fred's come together, and we are well and truly hooked on 28mm Napoleonics.

Monday, July 07, 2014

Nick in Launceston -- Saga (again)

More Saga, using 15mm figures. Nick (Viking) vs Dennis (Anglo Danes)

The Vikings had a cunning plan -- charge into the Anglo-Danish left with the hearthguard, destroying the Anglo-Danish Levies. Then wheel about and try to take on the regular Anglo-Danish troops. Unfortunately, the Anglo-Danish levy archers destroyed the hearthguard before they could even get into contact. The Viking beserkers killed a unit, but then died themselves. And then the Viking lord found himself tired and alone out in front of his army. He died a horrible death!

The Anglo-Danes then intimidated the remaining Vikings while they moved into position, and launched an overwhelming attack. It was over quickly, and was a bloody disaster for the Vikings!!!!

But they will be back next week, raiding a Scottish village! Who worries about a few casualties when there is plunder to be had!!!!

Sunday, July 06, 2014

FOW at Rich's: Veghel Bottleneck

Veghel Bottleneck Mission from Market Garden Firestorm book
Jim's Kampfgruppe Walther v. Rich's Company B, 501 Para's


This is a different and thus interesting scenario.  The forces are set so you have to fight with stuff you might not otherwise choose to use.  There are 3 objectives & the Germans have to take any 2 to win, one by the bridge, one by the village & the third at a second bridge just off the bottom of the pic.  The Germans start with all their force on the table, but squeezed into one corner (far left).  The US srat with some dug in where they want and some in reserve coming on in the near left hand corner.   Both sides have artillery of table.

The Germans sent 2x3 Panther platoons plus infantry down the road to attack the defenders of the bridge and the rest to attack the village.

The infantry attacking the bridge died due to their total lack of 4+ dice in the assault.  The Panthers were wiped out by the 3 bazooka teams when they tried to take the objective before the US support could arrive.  The Stugs did better in the attack around the back of the village. They disputed and almost took the objective there, but ran out of infantry support.  The game ended when the Germans failed a Coy morale test.

Tuesday, July 01, 2014

Napoleonic 28mm: French v. Austrians

Jim's Austrians v. Mike & Steve's French

My freshly painted Austrians lined up for their first battle.  The Austrians deployed first with 2 infantry divisions of 6 line & 1 grenadier battalion, a heavy cavalry division of 2 cuirassier & 2 dragoon on their left, a light cavalry division of 2 hussars on their right and a battery of 2 guns.

The French put all their cavalry on their right, 2 cuirassiers, 1 dragoon and 2 hussars.  They had 2 infantry divisions each of 6 line and a 2 gun battery.

The French command was rated 9.  The Austrian command was rated 8, but their CIC was rated 7.  The French infantry was rated well drilled so could move up to 3 moves in line.  The Austrian infantry other than the grenadiers was rated poorly trained to  shots so -1 dice in shooting & h-t-h and one 1 move per turn in line.

The French opened the batting with a cavalry attack on the far flank.  Their infantry advanced more slowly with 2 battalions sent to the left to counter the advance of the Austrian hussars.  The Austrian heavy cavalry turned to meet the flanking enemy horse and grenadiers formed square to cover the left flank of the Austrian infantry. 

The cavalry fight swilled round for a bit, but the French numbers told and the Austrian horse looked doomed.  The Austrians deployed another line infantry battalion in square and launched a counterattack in the centre.  Their infantry redeployed into battalion mass and advanced.

The Austrian horse broke as the Austrian centre lumbered forward.

On the far flank, the French cavalry pulled back to rally while infantry came up to keep the pressure on the Austrian flank.  (We only allow rallying if over 18" from the enemy & not under artillery fire).  The Austrian attack caught the French a bit disorganised and the French lost a couple of battalions & fell back.   The Austrian hussars repeatedly refused to advance in support of the attack.

The French right was one bad break test of breaking, but their shaken units stubbornly held on.  Their left flank division counterattacked and pushed the Austrian back.  The hussars still refused to charge.

On the far flank the French cavalry have rallied and again advancing.  In the centre, both sides go into line and exchange volleys.  The Austrian hussars still do nothing.

 The French infantry division on their right has finally broken.   The French cavalry now left unsupported in front of squares and guns is falling back again.   The Austrian hussars finally charged 1 unit in support of the infantry, but failed to break through.   

It was now 10 o'clock and almost every remaining unit on both sides was shaken so nightfall was declared with the battle drawn.  The Austrians had their chances to win with their infantry attack - they got one French infantry division on the verge of breaking, but one shaken battalion gave ground but refused to break for too long.  By the time it broke the Austrians had too many shaken units to finish off the other French infantry division.  Though indecisive, it was an enjoyable battle. 

We had about 20 units a side in this battle - it's probably about the ideal number for a 10x6' table  It's enough units to give lots of tactical options & provide enough dice rolls for the luck to even out, while still finishing in good time.