Wednesday, September 28, 2016

Bolt Action v2 Tank War

Mike set up an assymetrical scenario on the big table with 2000 pts of US v. 1500 pts of Germans.  The Germans (Jim & Steve) deployed first totally hidden with positions marked on a map.  The US (Mark & Chris) then deployed within 12" of their table edge.
The Germans also had most of their force on their right.  But then the US deployed entirely on their right.  This meant two panzerschrek teams hiding behind the house & wood on the far side of the creek faced most of the US army & the rest of the Germans had to re-deploy. The Stug came of the the wood to move to the left, it's commander not seeing the M10 on the road behind the wood - which moved out and popped it first shot.
The Tiger showed itself in the centre, but an 88 is no good if doesn't hit the target.  German infantry has advanced in the centre  (& still out of sight to the enemy so not on the table) behind the house on the right. The panzerschreks on the left eihter missed their targets or failed to penetrate.
The GI's have mopped up the panzerschreks & the Tiger stands alone against the swarm of allied cans. The German infantry is clearing the wood in the centre of bazookas.
The Tiger has finally actually hit something & a M10 is burning, but it still faces 3 Shermans & an M10.  The US left has been cleaned up.
On turn 7 the Shermans got lucky, set the Tiger on fire & the crew failed morale & bailed out.

The US claimed victory on the grounds that they had destroyed half the enemy units. But the Germans felt they had done pretty well in still holding half the table & destroying as many enemy as they lost despite the odds against them and awful dice rolling in their anti-tank shots.  But we all had a good time anyway.

Sunday, September 25, 2016

Bolt Action V2 Doubles Double Envelopment

Jim's Brit Armour + Sean's US inf
v. 
Matt & Steve's Germans
We used a British army list for half of the Allies because we were short of Allied command dice.  They faced off against Matt's infantry force with a distressing (for the Brits) amount of a/tank.
In the Double Envelopment Scenario VPs are gained 1 for each enemy unit destroyed, 2 VPs for getting a unit 12" past the centreline & 3 VPs for getting a unit off the enemy's table edge.
This is the Allied left where 5 Allied units face 10 German.  
On the Allied right the unit numbers are more even, but US have a Sherman 105 & an armoured car while the Germans have no vehicles at all.   
On this flank the Germans got 4VPs for destroying units & Allies 2VPs for destroying untis, but no one got over the line to get VPs for taking ground. The Germans got 1 tank with a P/schreck, 1 with a Pak 38, the HT wit a P/faust & overwhelmed the Paras with firepower from multiple units.  The Brits only saving grace is that they held the line for long enough.  (Though we went 7 turns to make up for teh larger table).
On the other flank, the king was the Jumbo Sherman which couldn't miss with it's medium howitzer & killed more Germans on it's own than the rest of the army.  But no one gained any positional VPs & the US got only 1 more kill in total so this flank was a draw. 

The V2 rule that we think makes the most difference is the -2 to hit for Down troops.  It can make it much harder to finish units off. but it also makes more units go down as it provides so much more benefit - which provides tactical opportunities if you're smart enough & brave enough to take them.  The templates make the HE less variable, but the effect is on average much the same - maybe a bit better for smaller weapons.

Wednesday, September 21, 2016

American Civil War

Union:
Nick, Chris & James.  14 regular inf, 3 rifled cannon.  3 divs + CIC CR 8
Confederates:
Mark & Mck Shevak. 12 vet inf & 3 Napoleons. 3 divs + CIC CR 9.

I had  a busy day & didn't have time to plan anything so we fought a simple encounter battle on teh terrain left over from late weekend's BA.
The forces both deployed to the right leaving each overlapped onthe left.  The Union are on the left.  
As the Union advanced around their left flank, the Rebs took up a defensive L shaped positionwith a house at the corner.
On the far flank the Union left stand back, but get pounded by the Rebel artillery.  On this flank the Union have pounde the house with artillery & have now launched their attack with the infnatry.
The Rebel divisons defending their left came within a couple of bad Break Tests of breaking, but Mark was having one of his good dice nights & held on until Mike sent 2 infantry units across from their right to countattack in the centre.  Then Mark threw a flurry of sixes in one turn and suddenly the battle turned, and the Union too was on the verge of defeat as their attack ran out of unshaken units. 
Nick's division on the Union right broke, then finally the Union artillery broke the Rebel centre.  With almost all the units left on the table now shaken & time running out, the players agreed on a draw. 

Sunday, September 18, 2016

Bolt Action V2 - with the new book now here

Steve probably has the only copy of V2 in Tasmania & we had this in hand today for another v2 practice battle.   
Steve's German vets are on the other side of the table facing Chris' Soviets on this side in a Meeting Engagement.
The open ground gave the Germans a bit of an advantage  with their superior fire power v. the Soviets better close in ability.  Steve took full advantage and inflicted decisive casualties on the advancing Soviets for small loss to himself.

While they were fighting I was studying Steve's V2 rule book.   I was pleased to find that our pre-release intelligence was pretty well on the money & the actual book brought no surprises and has not invalidated any of what we learned in our earlier V2 games.

But time spent on the Warlords forum last night had been a bit disconcerting - actually annoying.  I was reminded why I don't follow forums much - they are full of idiots shooting their mouths off before bothering to gather the facts or to actually think.   Some is the usual Whaaah! The've nerfed my favourite piece of cheese!   Most is seeing problems that either just aren't there or are easily resolved with a little common sense.    For instance, some are having conniptions thinking that the templates won't work because bases aren't standardised.  A quick experiment with infantry on different base sizes soon shows that base size makes bugger all difference.  For guns, it's no big deal to compare bases before starting, & if different agree on say 1" hits 2 crew & 2+" hits all of them for guns on both sides. 


Friday, September 16, 2016

Bolt Action V2 at Good Games

Chris' Japs v. Jim's Ozzies: 1000 pts No Man's Land scenario

While only Steve has actually got his V2 book so far, we did have a V2 QRS to work with this time.
This scenario starts with a deployment turn where units not in reserve are placed in your deployment zone 12" + from the centre line.  The Japanese are on the right.  
 After  couple of turns of long range shooting the Australians are now advancing all along the line.
A Fubar has slowed the Oz advance on the far flank & Japanese fire has stopped the advance on this flank, but they are pushing forward in the centre. 
The Australian attack is gaining momentum now as they close in on pinned down Japanese to finish them off. 
By the end of turn 6 the Japanese have had a win on this flank, but they don't have much else left.  It's a decisive win for the Aussies.

We only just discovered one of the most serious changes - that going Down is -2 to hit.   Some people have expressed the fear that this combined with the greater ease of Rallying would make the game indecisive, but units that are avoiding death by going Down can't be shooting back & this provides you with the chance to get in close to finish them off.  Once the Aussies realised this in this battle the Japanese soon melted away.

Tuesday, September 13, 2016

Salem Church again

Mike & Steve who were the Confederates last week wanted to prove that their victory was the resut of their brilliant tactics & not because the scenario was unbalanced as claimed by a certain Union general.  The Union commanders of last week had other duties this week but I took over the Confederates.
This time the Union came rapidly forwards in columns 
Steve shakes the Union left out into line just outside of rifle range.  Mike is moving the Union right around the empty Rebel left.  Unlike lastw eek the Reble reserves are late.   
The 2nd Confederate division arrived in the nick of time to deploy in the cornfield to face Mike.  On this flank Steve is closing on the enemy.  The Rebs advance in front of the church to put flanking fire on the two Union attacks.
The 4th Union division has arrived on the far side of the table as fierce firefights go on on both flanks.
 Mike's attack on the far flank has bogged down, but Steve is lapping around the Rebel right.
The 3rd Rebel division has turned up and forms a reserve behind & in the church.  The Rebel right is in trouble.
Both side's right flank divisions have broken.  A confederate cavalry unit has turned up behind the Union left flank, has dismounted & is making a nuisance of itself shooting up the gunners from behind& disrupting Steve's preparations for renewal of the attack.  Mike is trying to deploy the 4th division under the fire of the Rebel gun on the other side of the church as the Rebel left is getting reorganised after it's victory.
Steve has seen off the cavalry and has renewed his attack on this flank.  The Rebs are advancing on the far flank.
By now almost every division on both sides is close to half strength.  The Rebs only have to take out the isolated & shaken Union unit in the wood on Mike's right to break his division & win the battle.  But poor Rebel command dice (despite having the CIC there to help) & good Union Break throws are allowing the Union unit to fall back & survive.  Meanwhile Steve is closing in on the Rebel right.
Mike's exposed unti has escaped back to the next wood and now a ring of Union fire has stopped the Rebel advance.  The church is being pounded by artillery fire and the shaken infantry behind it are facing the last fresh unit on the table.
The Rebs behind the church have broken and with them the Rebel army.

So the blokes proved their point, it was indeed possible for the Union to win the scenario, though a spirited Rebel defence made them work hard for it & the casualties on both sides were dire.  Every division not broken is on half strength with few units not shaken.  But it was a ripper little battle with a good plan of attack meeting a good defence that got down to who would throw the next bad Break dice.   

Monday, September 12, 2016

Book Review: Tank Action by David Render


This book is the memoir of a tank commander’s war from Normandy to war’s end written recently by a 90 year old veteran & a ghost writer. Render landed in Normandy on D+1 as a virgin 19 year old officer and commanded a Sherman platoon of 4 tanks (1 a Firefly) all the way to Bremerhaven.  The book provides a particularly interesting perspective for wargamers – much more relevant to our games of FOW & BA than most military history which concentrates on bigger pictures.  A number of items struck me as very relevant to wargames rules.

Render lost two Shermans - one hit a mine, the other got bogged and they bailed out before the German artillery destroyed it.  He also had a lucky escape from a Pak42.  Two shots just missed but in taking evasive action the tanks slid off the elevated road & got bogged on the embankment as a sitting duck.  But before the 88 could reload again, another tank of his platoon plastered the Pak with HE before round 3 could finish them off.  They were later able to tow his tank out.  His lost tanks were immediately replaced – the allies had more machines than men to operate them.  On the other side of the leger, he bagged just one AVF – a Hetzer, but wiped out countless PBI & gunners with HE & MMG.

German small arms were vastly superior to allied issue.  The first thing a sensible new officer did on reaching the front was check out dead & captured German officers for a luger & a machine pistol.  The author’s best mate was killed when his regulation Sten gun accidentally fired inside his tank. 
Hitler’s buzz saw rules are spot on – the allies hated them. 

Panzerfausts were effective and greatly feared: By the time they got to Germany fausts were causing 36% of allied tank losses.  When operating without infantry support (which was often due to lack of manpower relative to machines) the tankies wouldn’t go within 200m of a hedgerow or building without plastering it with HE & MMG fire.  There was always plenty of ammo. 
 
The sound of Nebelwerfers scared the shit out of you, but you heard them coming & had a chance to dive for cover.

The Shermans were indeed disliked as Tommy Cookers/Ronsons – even the Diesels, though the petrol version was much worse.  They disliked the petrol Shermans not only because they burned, but the engines were far less powerful (it was a petrol Sherman that got bogged in Dutch mud & pulverised by 105’s).

The 75mm Sherman gun wasn’t all bad.  Its Pen might have been moderate, but the good HE, high rate of fire, plentiful ammo supply & fast turret traverse often made up for it.  FOW’s Semi-Indirect Fire rule seems quite appropriate as they thought nothing of smothering any potential threat with fire.  There is an anecdote of a comrade’s Sherman coming face to face with a Tiger in a village street.  Before the 88 could be traversed to bear on the Sherman it was copping a steady stream of 75mm shells.  They couldn’t penetrate, but their impacts made operating the Tiger impossible.  Clearly the Tiger crew were Double Bailed then failed their Morale Test – they abandoned the tank which was captured intact.

Friendly fire was an ever present hazard.  The tankies didn’t mind the 25 pdrs so much as buttoned up they were pretty safe, but the flyboys were a big worry.

The Germans he fought were a complete mix of every permutation from Conscript to Veteran & from Reluctant to Fearless.  The Brits seemed to be pretty consistently Reluctant Veterans (other than the Fearless paras).  The Yanks seemed more gung ho but less experienced, so Confident Trained looks right for most of them.

The British had an awful attrition rate for their tank commanders.  While doctrine was to operate buttoned up, they nearly always had their head out so they could spot AT guns or Panzerfausts before they hit them.   They were prime targets for snipers as well as shrapnel & mg bullets.  A near miss AT shell going past their head could also kill or concuss.

The troops had no respect for Monty - they thought he was a complete prat. They didn’t like gung ho divisional commanders either.  They called one Major General Thomas Von Thoma because they thought he was more likely to get them killed than a German general. 

The book shows that problems of command and coordination of arms have a big influence on the battlefield.  These aspects are neglected or given only lip service in many wargames rules.  The BA Command Test is certainly justified. 

To summarise: A good read & very informative.

Sunday, September 11, 2016

Bolt Action V2 Doubles

Darryn's Brit Inf + Chris' US Armour
v.
Frankie's Falshirmjager + Jim's Panzers
Both sides had a 1,000 pts infantry platoon & a 1,000 pts tank platoon.
The Brit inf face the Panzers on this end of the table & the US tanks face the FJ's at the other end.
The scenario is based on the Tank War scenario.  There are objectives on each road junction & 6" in from the roads going off the short ends of the table - so 8 objectives, 4 held by each side at the start.  The side holding the most objectives wins.  If tied on objectives the side with the least units lost wins provided they lost at least 2 less.
Under our doubles system, we use two dice bags, one for each end of the table, but crossing the centreline & targeting enemy of the other platoon was allowed.  The two pairs of players draw command dice at their own pace, but if engaging enemy of the platoon they announce this & other pair pause while this is done.  The pair finishing the turn first wait for the other pair before starting the next turn.  We find this works really well & allows large battles to be finished in good time.  (This 2,000 pt battle took 3 hours including learning time for the two newbies).
Initial deployment was unit by unit as command dice were drawn.  Units being placed within 24" of own baseline without any firing. (A system we ahve been using for a while, but is used in some of the new scenarios in V2). 
We used the V2 rules we have gleaned from advance publicity.
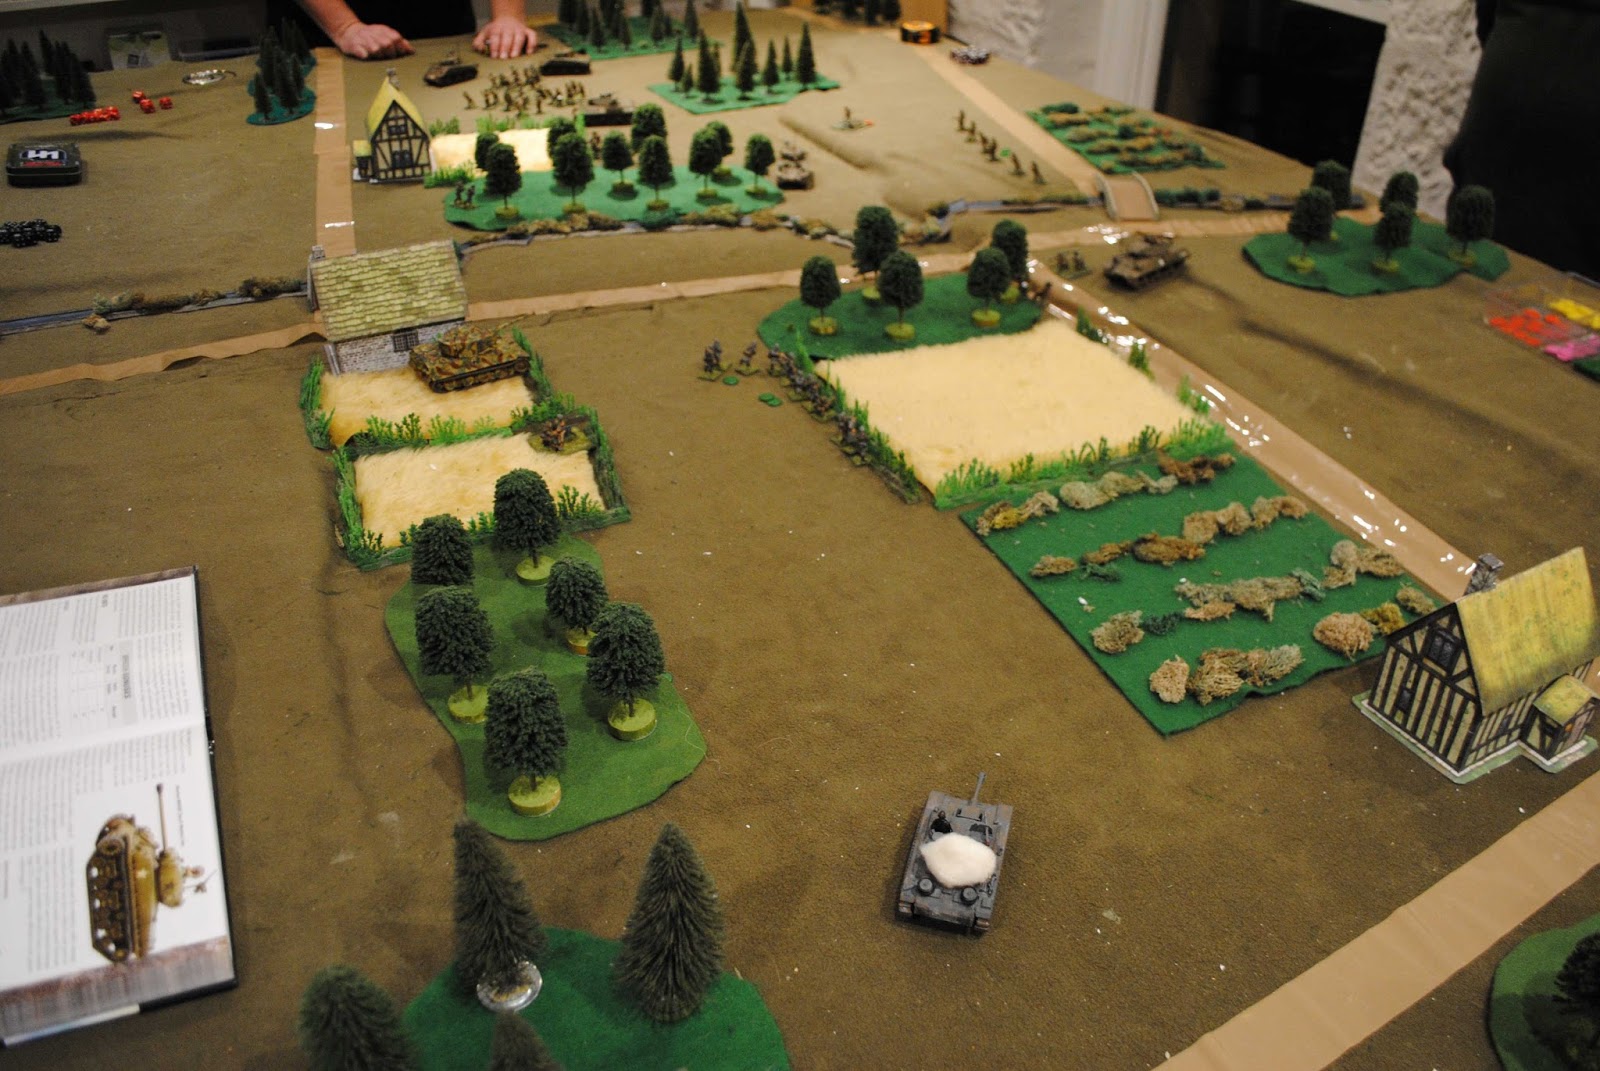
The 3 MkIV's were deployed in the centre face to face with the British Churchill.  Most of the FJ's were also deplyed near the centre with a Hanomag on both flanks & Frankie's Stug on the left.  The US platoon with 3 Shermans, an M5 full of GI's & a jeep with a bazooka team are on the far end.  The Brits are on their left flank.
The battle split into 3 fights.  A tank fight in the centre, an infantry fight right of centre & armoured infantry on far flank.  Apart from the Churchill being immobilised on the first shot, the tank fight was largely indecisive for a while as the Germans mostly failed to hit & the US failed to penetrate.  The British barrage was called down on the MkIV's, but the new Friendly Fire rule spread the effect over both sides.  The Germans eventually lost a MkIV to the bazooka & with the help of the Stug the Shermans were eventually destroyed.
On the far flank the M5 took the objective on the road.  The FJ Hanomag went over to take it back on with support by the Stug.
On this side the Brits generally did best in the fire fight, without gaining a decisive advantage.   
On this side, a MkIV has moved to engage the Humber which has already popped the FJ's Kuberwagon.  On the far flank the Stug popped the M5 forcing the GI's out & down where the FJ's & vehicle MG42's could mow them down.  The FJ's have recaptured that objective.

At the end of turn 6 the Allies conceded defeat & we agreed not to bother with turn 7.  Both sides still held their original 4 objectives with no prospect of taking another, but the Germans were way ahead on the units destroyed count & with the US tank platoon totally destroyed they had no chance of coming back.

Again we had no difficulty using the about 20 V2 changes we know about.  They are incremental improvements that iron out kinks in V1 without really changing the way you play the game.  We only had to use about half of them in this battle anyway.  The most noticeable changes are:
- Friendly Fire is randomised - it was stupidly overdone in v1.
- MGs more effective (they were underpowered before).
- The Rally Command is actually worth using.
- Staying Down into the next turn can now be worth doing.
- Transports have a co-driver to work the MG (makes them worth having).

Tuesday, September 06, 2016

Battle at Salem Church 3rd May 1863

This is a scenario I found on the net based on a small action on the way to Gettysburg.  The Rebs have to hold the church at the vital crossroads against the Union attack.  
The Rebs (Mike & Steve) deploy first with one division of 5 vet inf, 1 cav & a gun.  They can deploy anywhere on their half of the table, but chose to take up a defensive position around the church.  Three Union divisions were then deployed (by Mark & Chris) within 12" of their baseline. 2 have 5 regular inf, the centre one has 2 reg inf & 2 guns.
As the Union advance slowly with the usual delays of a Command Rating of 8, another division of 4 veteran Rebel infantry arrives at the earliest possible time..
On the near flank the Rebel's 2nd div has advanced into rifle range  & driven back the head of the Union column.  On the far flank the Rebel cavalry has popped out from behind the woods.
On their right the Union struggle to deploy under fire.  On their left they have forced the cavalry to retire & resumed their advance.  Both sides have another division of 4 inf coming onto the field by the main road.  The Union 2 move slater than they could have, the Rebels as early as possible.
 The Rebel counterattack continues on this flank while their 3rd division moves to the right.  In the centre, hot Rebel fire is keeping the Union pinned down in the woods.
On this flank the tables have turned as the Rebs over committed and got outflanked.  In the centre the Union 4th division has deployed.
The Rebel left has now broken, but the victorious Union div is in no condition to advance.  In the centre the Union still haven't been able to get an attack organised, though their artillery is causing some serious damage.   Attempts to get the Rebel 3rd div to attack on the far flank have failed due to poor Command dice. 
The Rebel left has broken and the units on this side of the church have been Shaken or Broken by the Union artillery.   Finally the Union have got an attack organised in the centre, but the first charge has been stopped by Rebel fire. 
The attempt to resume the attack on the centre resulted in a blunder - which fortuitously turned into a successful charge back up the hill that broke the remaining Rebel infnatry unit this side of the church, but the pause in the attack was critical as it allowed the Reb's fresh 3rd division to be brought across from the right to cover the flank.  The Union advance ran out of steam with almost all their units now shaken.  The Union conceded.

While the Rebel position looked daunting with a line of veterans on the ridge, the Union came very close to victory.   The rebel counterattack on this flank looked scary, but they got a bit carried away and it ended badly.   The Union never got their left properly organised but the Rebs couldn't organise a counterattack there either.   However, in the end that failure left the Reb 3rd div perfectly placed to reinforce their failing left & save the day.


Sunday, September 04, 2016

Bolt Action V2

Steve's Germans fought Jim's Brits in our second premature go at V2 using the changes we have picked up on off the net, not having the new book yet.  This time we played the Sectors Scenario.  In this scenario the units are deployed in opposing quarters of the table being deployed as command dice are drawn (the same system that we have been using in some of our home made scenarios). VPs are gained for destroying enemy units (1 VP), for having your units in the neutral quarters at the end (1 VP) and for having units in the enemy's deployment zone at the end (3VPs)
The Brits are on the left, the Germans on the right. 
The Brits pushed infantry, a 25pdr & a bug forward on their left and in the centre advanced to take over the hamlet & fields.  The Germans advanced on both flanks while putting firepower pressure on the British centre.
On the British left, the bug was knocked out by a Panzerfaust, but grenadiers were also destroyed leaving the remains of the Brit infantry there unopposed.  The centre was a site of mutual destruction.  On the German left the Brits were being badly cut up by the advancing Germans & mortar fire

At the end of turn 6 both sides had 10 VPs, but the dice gave us a turn 7.  In that turn the Germans finished the destruction of the British right, but couldn't quite reach the British zone for bonus VPs.  On the other flank the surviving Brit inf got over the road into Germans territory & survived the German fire.  In the centre, the Brit HQ used the last move of the game to move over the line into German territory.  The last turn German gains in destruction were neatly balanced by the British gains in position & the VPs remained at 10 each.  The German's sound & well executed plan to gain VPs by destroying the enemy was neatly balanced by the British sound and well executed plan to gain ground.

There could well be more rules changes we don't know about, but what we know about worked fine.   The main issue we thought we needed the new book for was the templates for artillery - not that we think it doesn't work - it just needs more explanation than we have gained so far.   Otherwise our impressions of V2 are all favourable.  The changes are don't change the way you play the game, but remove most of the annoying issues we had with V1.  They certainly make the BoltAction.Net amendments redundant as most of them are included (or near enough). 


Friday, September 02, 2016

Hail Posiden: Ancient Naval

Chris & I ventured to Black Hills to help Peter play test his latest version of ancient naval rule, Hail Posiden.
We each had a fleet of 6 ships of mixed types.  We started line abreast facing each other but the battel started with a some fancy manouevers as both sides jockeyed for advantage before closing.  The game mechanics include putting counters face down by the ships as their orders for the turn, 1 or 2 for most ships, up to 3 for fast ships. These are revealed step by step with turns governed by templates.
Jim's ships are going right to left, Chris's are heading up the pic.  Both sides have some critical decisions to make now.    
It was Jim who made the best choices. His triremes in the centre were fast enough to escape the line of 5's & 7's & scored a side ram on one of Chris's triremes.  His 7's turned into meet Chris's 5's head on while his 5's turned away from Chris' 7's. 
While Chris's 7's unsuccessfully chased Jim's 5's in the background, in the centre one of Jim's 7's boarded and took a 5.  The other 5 got past the 7 inflicting some damage with a glancing ram, but a trireme got it in the side as it turned back into the fray (that trireme sunk 2 ships).  Jim's other trireme got the best of a one-on-one duel & is chasing Chris' the surviving trireme's tail.  With 2 ships sunk & one captured for no gain, Chris's fleet failed morale.

Peter's improvements in the movement cards & chits worked well & we worked out ways to further improve them as we played.