Sunday, January 31, 2016

Sails of Glory at Barrie's

We had six players thus 6 ships to try out Sails of Glory for the first time.
British: Barrie, Rusty & Jake
French: JohnM, Jim & PeterC
For once the French won. Jim gained the weather gauge as John & Peter mixed it up with the enemy, then swooped down on the wind to finish off the damaged British ships.  Only Jake's ship escaped for the Brits.  On the French side Peter's ship was badly damaged, but still afloat.

The system is similar to Wings of Glory.  As most of us had played that, this made it easy to grasp the principles, but we were also lead astray in some aspects which were a bit different.  We used only the Basic rules in this our first game - which turned out to be a good plan as even then we got a few things wrong - only discovering our errors later in the game.  We intend to play the Standard game next time & maybe graduate to the Advanced rules later.   Even with out blundering about it was an enjoyable game & all are keen to play more of it.

Saturday, January 30, 2016

89 Cambridge Rd Regimental Reunion in Canberra

Cancon 2016 also saw a reunion of many of the vets of Jim's wargames room at 89 Cambridge Road in the 70's.  Jim, Chris, Mark & PeterC travelled to Canberra for Cancon where Dale & Steve Daniels and PeterW now live.  In addition to Jim & Chris' Bolt Action at Cancon we played several other games at Steve's place.

PeterC & SteveD were both keen to try Bolt Action so the Camp Cromell Cancon armies were put into after hours service in two demo/practice games.
 
Traditional eating practices were involved.

D'Erlon's attack at Waterloo was played as a what-if Napoleon had given him some extra cavalry and artillery from the reserve.  Scenario by PeterC, rules Hail Napoleon, troops 15mm.
Mark and PeterW took the British side.Dale, Jim & Chris were the French.  Chris took the French cavary and horse guns in flanking manoeuvre around the British left as Dale attacked the ridge & Jim kept the enemy centre busy. The French frotla attack was repulsed, but the cavalry arrived in time to break the British left wing before the Prussians arrived and make a hole for the rest of the French reserves to pass through, outflank Wellington's centre & win the battle.

PeterC also set up a Crusader scenario, played with Hail King Richard rules & 15mm figs.

And finally 28mm English Civil War battle using Hail Cromwell.


 There was also the obligatory trip to the war museum where there were a couple of new things:
The only surviving WWI German tank - souvenired by the Australians.
An Italian tankette - so cute!
 And an old favourite - the ME109.

Monday, January 25, 2016

Camp Cromwell does Cancon 2016: BOLT ACTION


Cancon 2016 became a reunion of much of the old mob from 89 Cambridge Road where we fought in the 70’s.  Jim, Chris, Mark & PeterC travelled up to Canberra, SteveD, Dale & PeterW now live there.  Jim & Chris fought in the Bolt Action tournament, the others just had a good wargaming time – observing how the north islanders fight, shopping, discussing and playing games at Steve’s place.
Bolt Action

The BA tournament had 42 players, including another Tasmanian we hadn’t met before from Devonport.


Game 1: Maximum Attrition:
Jim scored a win v. a Russian partisan force.
Chris fought a draw with Hungarians.

Game 2: Nuts:
Jim won again v. British.
Chris defeated a LW German force.

Game 3: Kittyhawk Down:
Jim lost to Belgians
Chris lost to Italian Paras.
This was the least enjoyable game for both of us.  The scenario is Mickey Mouse and both of us faced gimmicky armies with lots of small units on terrain that gave their small units too many places to hide from our firepower.

Game 4: Heartbreak Ridge:
Jim lost to US.
Chris fought a draw with US paratroopers.
Both of us suffered by the games going to 7 turns.  Jim had a draw at the end of turn 6 & Chris was winning, but neither of us could hold on for the extra turn.

Game 5:  Breakthrough:
Jim defeated an Australian force.
Chris defeated US infantry.

Summary
Jim: 3 wins, 2 losses.
Chris: 2 wins, 2 draws, 1 defeat.
We both finished in the top half, but well short the podium.  We both scored a BA supplement book from the prize pool, but more importantly we both had a great time with 4 really enjoyable games (won, lost or drawn) & just 1 dog each.

Tuesday, January 19, 2016

ACW 28mm: Battle for Whitewash Junction

Confederates: Jim & Mark
Union: Mike & Renfrey

The Union started with a division of 4 regs deployed at the railway junction (2 in the stock yards & 1 each in the station & saloon.  A division of 4 regs + a battery is in camp at the far end of the table.  A third division of 4 inf, 4 cav & a battery is off table. 
The Rebs have 2 divs of 4 regs & a battery coming on in the foreground and right side.  They have another div of 4 inf and 2 cav off table.  The div in the foreground is veteran.
The reserves are to come on using the FOW reserves rule (5+ on 1 dice turn 1, 2 dice turn 2, etc).  The reserves of both sides had 3 possible entry points, Union near the far end, Rebs near near end.  Actual location of reserves was determined by card draw so each side knew where their own reserves were coming from, but not where the enemy's were coming from.
The Rebs have deployed their leading 2 divisions around the station & are firing at it from 2 sides.  The Union reserves came on turn 2 on the left centre of the table.  The Reb reserves came soon after at this end of the table. 
Both sides have command problems but they both sort themselves out into two pretty continuous lines across the battle field.   Mark's div in the centre is forced to pull back as Renfrey's reserve division poured fire into his flank before his own reserves could come up.
Jim's  artillery has blasted the Union troops out of the saloon.  Mark sends troops over to assist as Mike advances along the ridge.  On the far flank Renrey & Mark are sniping at long range.

On this flank the opposing divisions are mutually destructing - it's touch & go who will break first.  Renfrey reoccupied the saloon & fire from the buildings has driven Mark back.  Renfrey launched attack in the centre which was stopped by rifle fire and a counterattack on its flank. 
Renfrey narrowly survived Mark's counterattack in the centre & it was Mark's centre div that broke first.  In the same turn Jim's div broke on the Reb right so the Reb army broke.

The battle was fought using our ACW variation of Hail Caesar, Hail Mr Lincoln.  It was a very entertaining battle and a very close run thing.  The fight on the ridge near the saloon was decisive.  It was a 50/50 who would break first, but the Union won.  If the Union div has broken, the Union centre would have been outflanked and almost certainly been broken in turn. 

The station, water tower, saloon and tents are paper models made from pdfs from Eric Holtz.  I have a whole town of 19th century US buildings downloaded ready to print & assemble. 

Sunday, January 17, 2016

BA practice for Cancon

Jim's Germans v. Dave's Japs: Heartbreak Ridge Scenario

The Japs started in the far left quatrant,  the Germans in the near right quadrant.  There is an objective on the road junction, one for the Germans near the far LH corner & one for the Japs in the near RH corner.  Both start with 2 units on the table, half the rest in 1st wave & the remainder in reserve.
Initially the Germans grabbed the nearest house to lay claim the the central objective.  The Japs let them have it but targetted it with all their mortars.
The Japs blasted the Germans out of the near house, then occupied it themselves. The Germans attacked on the far flank flank with 3 infantry units & their Stug.  After destroying the Jap mortar on the ridge they occupied the second house and tried to return the favour by blasting the Japs out of the other house with their artillery - but their gun fired at the house 5 times without ranging in, so that plan didn't work.  They did however weaken the squad in the house with other fire.

On the far flank a Banzai charge took out one of the German LMG squads, but it was taken out by a counterattack and the Panzer grenadiers got to their objective.  The Jap's moved up 2 small units to disputing it by cheezy suicidal advances.  One was blown away by the infantry, but the StugH missed killing the other leaving that objective still disputed so not actually taken at the end of turn 6.

In the centre, fearful of an attack on their weak garrison in the house by the panzergrenadiers in the other house, the Japs attacked and destroyed the German HQ behind the house intending to bring up the squad in the wood behind to support.  But assault rife fire from the panzergrens destroyed the first squad and the second squad failed command after copping one pin from the German HMG on the rear objective.  This left the Germans in control of the central objective.

The dice decreed no turn 7, so the Germans won as they now held the centre objective (worth 1 VP) while neither of the other objectives (worth 2 VPs if taken, but none to the original holder) had changed hands.

Chris & Jim are off to Cancon to play BA next week end.  Jim with Germans & Chris with Soviets.  There are about 40 entries in the BA comp (with a small majority of Allies).  Mark & PeterC are also going up but not competing.  There will also be some Hail Caesar with our old comrades who are now Canberrans - PeterW, Dale & SteveD.

Wednesday, January 13, 2016

Rome in the Black Forests of Germanica

Rome: Steve & Renfrey
Barbarians: Jim & Mark
Mike set up this scenario where the main Roman army is returning to camp after an abortive attempt to attack the Barbarians & are ambushed.  The Legion left in camp rushes to help them.
Mark's two divisions have charged out of the woods at Steve's left flank.  Jim's are doing likewise on the right.  Renfrey's legion is forming up in their camp at the far end of the table. 
The Roman commander keeps his cool though surrounded by hairy barbarians.  Mark's first attack has been beaten off, but more barbarians are closing in.
Renfrey's column is on the march to the rescue.  Two warbands have been sent to delay them.  Steve's force is winning some & losing some, but still holding on.
Mark's first div has been broken and Renfrey's legion has deployed out of road column, but the barbarian cavalry has finally got moving and joined in the action.  
 The barbarians try to close in on the head of Steve's column before Renfrey's legion arrrives.
Steve's lead legion has broken but his second legion & cavalry are still fighting while the barbarian cavalry has gone back into inactive made.  But Renfrey's attack is a disaster for Rome.   The barbarians counterattacked armed with hot dice and quickly broke his legion. 
Renfrey seems inordinately happy to have retired to the safety of his camp.
With Renfrey disposed of, the barbarians turned their attention back on Steve and his army was soon broken.

Tuesday, January 05, 2016

American Civil War 28mm

It had to happen eventually.  A Warlords ACW army box at discount price was all it took to start an ACW recruitment drive.   A few 20/20 games & a Test Match get the box painted.  The Perry plastics are greta figs, some of the easiest kits to assemble & paint there are.  With some Fred that Mike had we had enough for battle (even if most of the Confederates look a tad like ECW musketeers).  For rules, we already had our Hail Caesar variant, Hail Mr Lincoln, pretty well sorted in our ACW campaign last year - which we fought with 15mm & 6mm figs.

Battle for Smallville Junction:
The Confederacy has a mixed infantry & cavalry division (4 inf & 2 cav) guarding an important railroad junction.  The Federals send a small Corps of 3 infantry divs (of 4 regs), a battery of 2 guns & a cavalry brigade of 4 regs) to take the junction.  The Cofederates get wind of the move and send two infantry divisions to reinforce the garrison (each 5 regs & 1 gun).

The Confederates (Mark, Chris & Dave) deploy their garrison first.
The Union (Jim & Mike) then deploy all their force within 12" of their long table edge.
The Confederates draw chits to determine which 2 of 3 possible roads their reinforcements arrive from on turn 2. They keep this secret from the Feds.

The Feds have taken their first move. Their cavalry is moving to the left to delay any Rebs coming down the road on the left.  The centre inf has advanced directly at the station. Their right inf has advanced slowly on the hill.  Their left inf has had poor command dice and not advanced far. Their guns are bombarding the station, so far with no effect.
Reb forces have showed up on the roads at each end of the table.  At the far end the Zouaves have turned right on the scrubby ridge to face Chris' div. On the near flank Jim's cav have dismounted and are deploying in the orchard.  The 2 Fed inf divs in the centre are trying to attack the station, but progress is slow.
 
View of the Fed right:  The initial Reb charge took out a Zouave reg, but Fed defence has stiffened.
 View of Fed left: The Rebs deploy & start a fire fight with the dismounted cav. 

The attack on the station has finally had some success with one Reb reg broken & the LH div finally getting moving.  One reg was broken by artillery fire from the Reb right, but the second line has broken the Reb dismounted cav behind the station.
The dismounted Fed cav is doing a good job tieing up the Reb left.
On the Fed right poor Reb command dice is keeping the pressure off.  But the station garrison stubbornly hangs on.
The attack around the left of the station petered out, and div attacking frontally has broken, but a renewed frontal push from the LH div finally broke the garrison and the station has been abandoned to the Feds.
The Reb artillery on their left flank finally managed to unlimber.  It opened fire on the victorious Feds in the station yard with instant success.  It's first shot broke the reg and with it the division.  That meant the Feds had lost 2 of 4 including 2 of their largest divs, so their army also broke.  The Rebs have only lost 1 div of 3 so have won. 

The part of the Fed plan of holding off the reinforcements with cavalry on one flank & an inf div on the other worked pretty well, but their attack on the station with 2 divs took too long to succeed - whether it was mismanagement of the attack, bad dice or brilliant Reb defence is a matter of opinion.  But it was a close and very enjoyable battle for all concerned which only increased everyone's enthusiasm for the period.  .I don't think we'll need to use the ECW subs for long.


Friday, January 01, 2016

A New Year's birthday battle in the Sudan

To celebrate my 68th birthday we fought another Sudan 1898 battle:

Fuzzy Wuzzies v. British
Mahdi: Chris
North British column: Mike
South British column: Jim

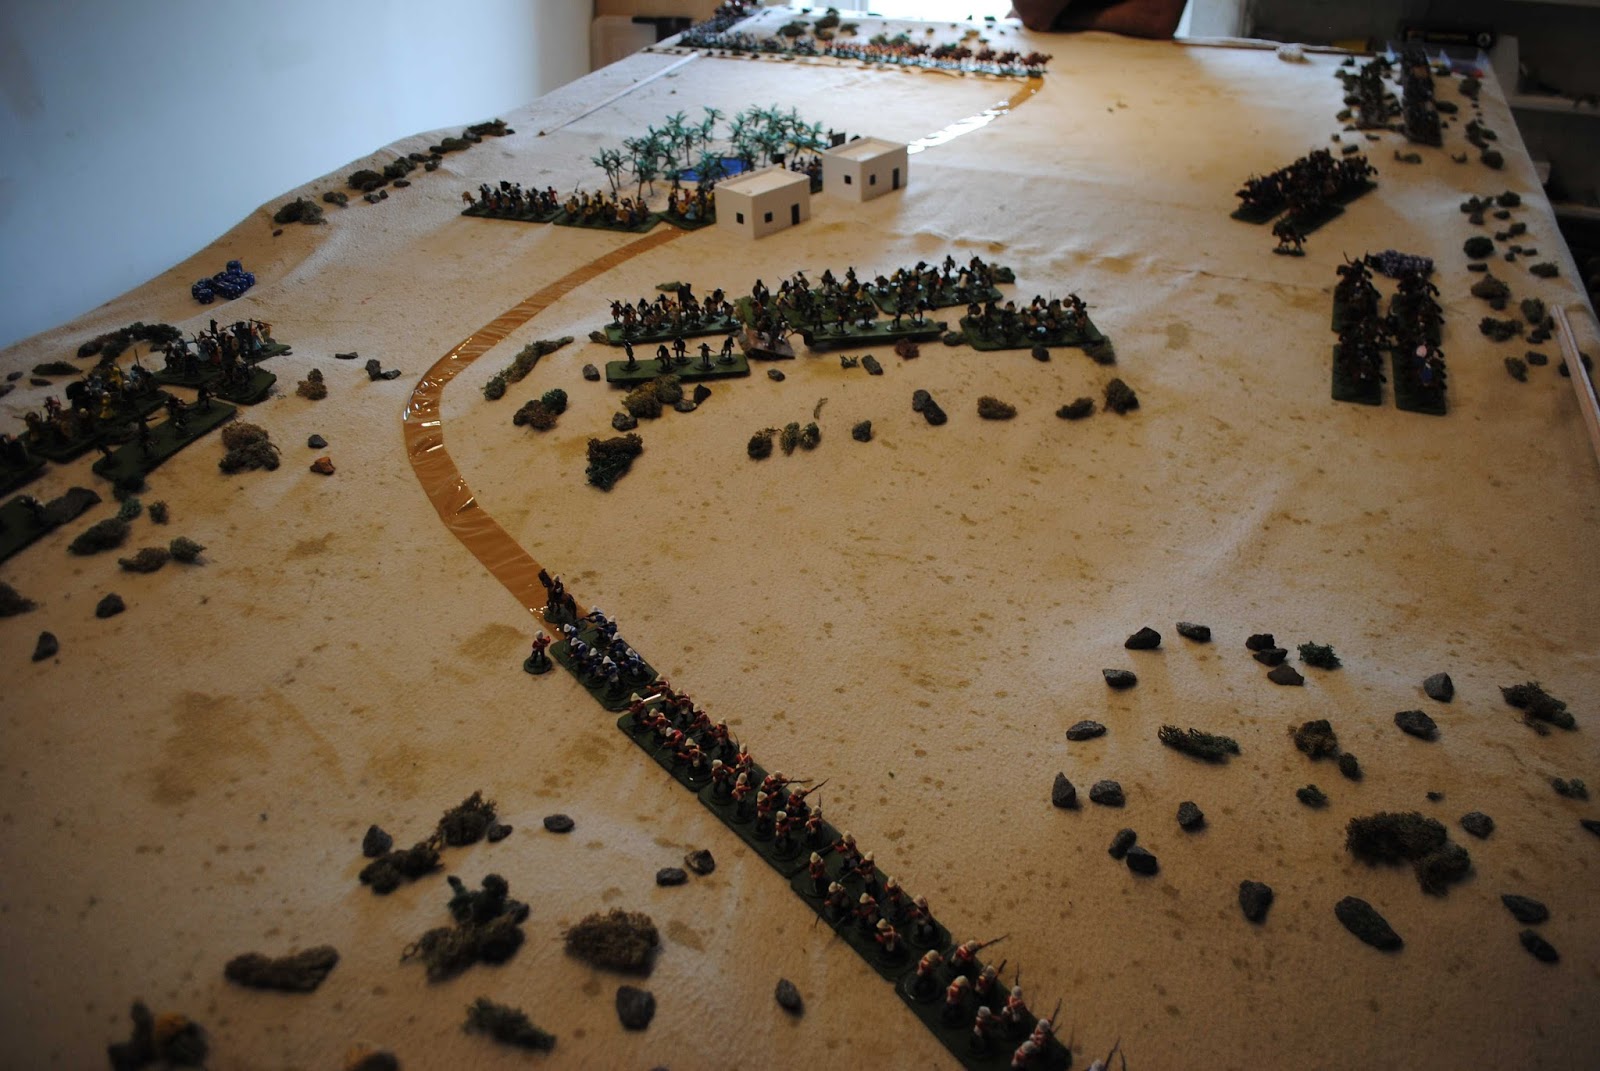
The two British columns came on opposite ends of the table planning to rendevous at the oasis.  But the Mahdists have got their army between them. 
Mike's column has 4 Egyptian & 2 Scots infantry coys, 2 hussar squadrons, a Gatling gun & a cannon. 
Jim's column has 10 British infantry coys.
The Mahdists have 4 infantry divisions of 4 warbands & 2 skirmisher units and 2 cavalry divisions of 4 units.
The Brits deployed in their road columns first, then the Mahdists deployed all their forces anywhere he liked as long it was outside of charge range of the Brits.
The Mahdists will win if they breaks one column, if they breaks two it is a crushing victory.  The Brits win by breaking the Mahdist army by breaking half their 6 divisions. 
Mike's column coming on the north end of the table.
Jim's column coming on the south end of the table.
Mike sends his Egyptians towards the oasis, faces his Brits to the west and covers the space between with his artillery.
The Mahdists advance on Mike's Brits as Egyptian & artillery fire drives the fuzzies near the oasis back into it.
The hussars charge the Mahdi horde as the Mahdist cavalry charges the Scots.
The Scots have fought off the Mahdi cavalry, but not without serious casualties.  The hussars broke one warband and are reorganising off shot to the left.

Meanwhile on the other end of the table a Mahdi division charged the column front and flank.  The corner of the British line cracked and with the consequent sweeping advances 4 of the British coys broke under the onslaught.  But the others managed to reform a line and the fuzzy wuzzies ran out of steam.
The Mahdi's infantry in the south has retreated over the ridges.  The Brits are trying to catch them and finish them off.

Back in the north, the Scots have fallen back to the ridge as the fuzzy wussy infantry advance on them.  The 2nd Mahdi cavalry division has moved behind the infantry & charged the hussars.  The Mahdist infantry in the oasis have finally throw good enough command dice to come out again & put some pressure on the Egyptians.
The infantry from the oasis were mostly stopped, but one warband charged home and broke through the Egyptians.  The Mahdist cavalry have finished off the hussars and are coming to help.
The Mahdi cavalry have got away with charging across the face of the guns to hit the Egyptians in flank.  The Scots are holding off the hordes on the ridge, but the column as a whole has lost too many units and is now broken.  One of the Mahdi's infantry divs on the south front has broken, as has one of the cavalry divs, but while all four of the remaining divs are close to or on half strength, they have not broken - so the Mahdists have won.  The Southern British column has to retire.

As always with these colonial battles it looked great and was rattling good fun.  The result was in doubt right up to the end.  Chris balanced his force beautifully, committing just enough to keep the south column busy while having enough in the north to win.