Tuesday, September 29, 2015

Turks v. Poles on the River Vlad

The Poles have crossed the River Vlad inside a great bend.  The Turks have formed up on a ring of hills around the flood plain to stop their advance into Transylvania.

The Turks (Jim & Mark) have 1 Janissary Div of 4, 2 Medium Levy Inf Divs of 4, 1 Light Levy Inf Div of 4, 2 cavalry Divs of 3 light & 3 heavy & 4 guns.  The Turks deploy first but can hide the Divs that are out of sight behind the ridges & woods. Command Rating 8.

The Poles (Chris & James) have 2 Inf Divs of 3 pike & 3 shot, a Cuirassier Div of 4 and a Polish Hussar Div of 4.  They deploy within 18" of the table edge between the rivers.  Command Rating 9.
The Turks only show Medium Inf & artillery on the centre ridge with Janissaries on their left.  The Poles deploy all their cavalry on their left.
 The Poles advance slowly holding their right back as their cuirassiers scout the ridge at the far end. The Janissaries rush forward and both Turkish cavalry Divs gallop over the ridge on the near side.
The Janissaries & horse archers form a firing line in front of James' Infantry.  Polish cavalry are galloping to the right to assist the Polish right.  The rest of teh Turking infnatry has advanced into view on the far flank.
The Turkish guns cause the Cuirassiers in the centre to recoil back but the Hussars charge hom eon the Janissaries supported by pikes on their right..
My newly painted Janissaries might have looked magnificent but the whole Division was broken in one turn by the Polish charge.   
The Hussars have charged on into the Turkish horse but the circle of horse archers is wearing the Hussars down.  On the far flank the Cuirassiers have pushed back some Turlish foot, but not broken through.
The circle of horse archers had broken the Hussars who were in the middle of it.
The Hussars have now broken.  The Turkish heavy cav have fallen back to rally while the horse archers keep on shooting.  The Cuirassiers have regrouped for another attack on the far flank..  
The Cuirassiers have again made inroads, but not broken through.  Chris had put his pikes on his right to face the Turkish cavalry so charged up the hill at the guns with musketeers.  They failed to break through & were themselves broken leaving their pikes at the mercy of the Turkish guns.  Chris' Infantry Div soon broke.  With that, the Polish Army Broke and the Turks have won.  (The break point was half divs lost including at least 1 infantry).

With two very different armies, it was most interesting battle to fight.  Things looked grim for the Turks when their attack on the left went belly up as their best Div evaporated under the counterattack of hussars & pikes.  But the Turkish advance had disordered the Polish army and given them space to use their fire power to wear the Poles down.

Friday, September 25, 2015

Bolt Action Doubles at Good Games

This game was played with 2 players a side each with 1000 pts on a 8'x6' table.  The scenario was basically Domination or Tank War with 6 objectives with some mods for a big game.
The Germans are on the near side.  SteveJ on the left, Jim on the right.  The Allies are on the far side, Marks' Brits facing Steve, Chris' Soviets facing Jim. We used 2 dice bags simultaneously, one for Mark & Steve and another for Jim & Chris. 
To compensate for the large table we started with a turn 0 where units were deployed by each side in their deployment zones within 24" of their own table edge without firing.
The objectives are placed with one in the mid rear of each side and 4 in a row down the centreline.
 Both sides put their strongest infantry units in the centre with weaker forces on the flanks.
The Allies held the centre but the Germans won both flanks so when the game ended after turn 6 both sides held 3 objectives.  With objective equal the game was decided by units lost.  Both Allies & Jim's Germans had lost heavily, but Steve had lost only one unit so the Germans won comfortably by killing more enemy than they lost.

The doubles system worked well.  Mostly it was Jim v. Chris & Steve v. Mark, but there was some crossover.  If firing at the other enemy, the player declared this & the other pair paused for it to be resolved.  The system worked really well in keeping the game moving fast despite the numbers of units involved (16 German & 22 Allied).

The turn 0 deployment in zones without firing worked perfectly to get the action going quickly and allow a satisfactory resolution within 6 turns. 

The players all enjoyed the game & rated the doubles system a success.  We felt that the bigger table & more units gives more scope for strategy and as well as enjoying the team thing.  

Tuesday, September 22, 2015

Road to Damascus 1148AD

This scenario is based on the Road to Damascus scenario in the Hail Caesar book (tweeked a bit to suit available troops).  Mark & Chris command the Crusaders, Jim & James command the Turks.  Both sides have 21 units. The Crusaders have better troops, but more difficult victory conditions. 
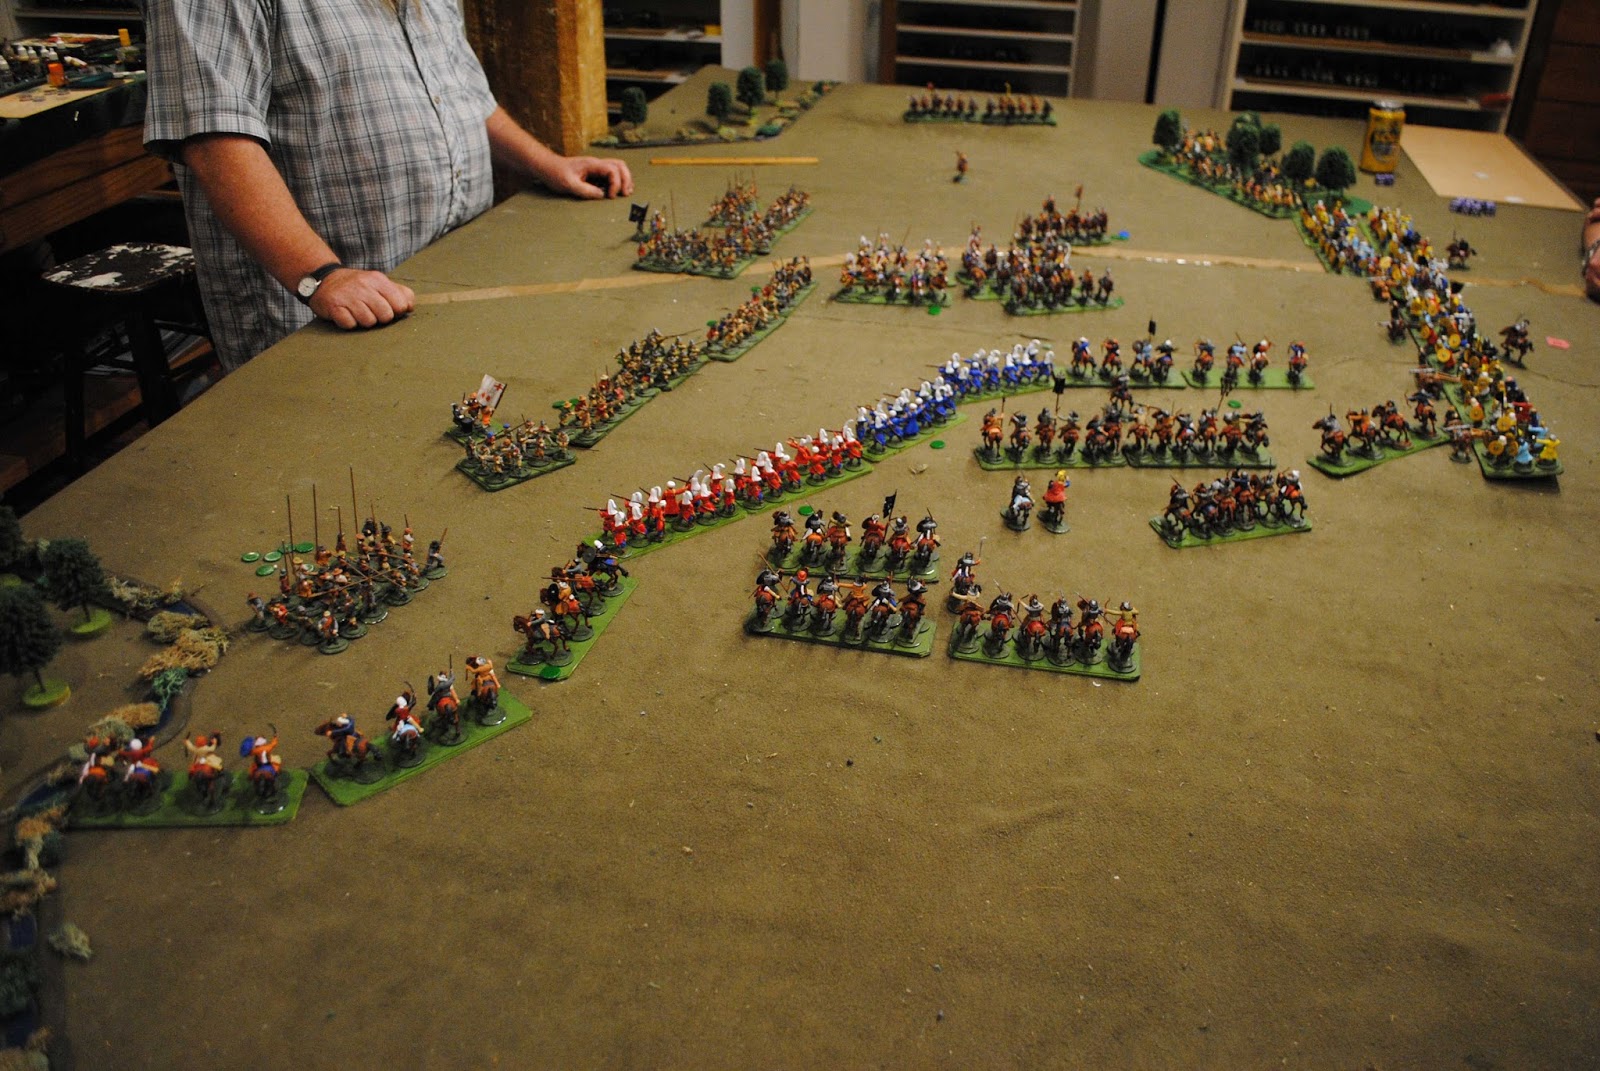
The Crusaders are coming onto the table on the far left in 3 columns lead by 3 kings - Baldwin inthe centre (with the baggage on the road), Louis on his right and Konrad on his left. the armies of Baldwin in the centre, Louis.   Their objective is to get across the table & exit on the road off to the right in the gap between the rivers with at least 75% of their army unbroken.

The Turks have 2 infantry divisions in the village and a relief column comin down the road from the near edge.  The relief column's advance guard of Turomen is already deployed.  4 more divisions of cavalry are coming down the road. 
 Baldwin is marching up the road straight at the village.  Konrad is moving to outflank the defneces on their right.  Louis has turned left to hold off the Turk's relief force.
Konrad is dithering about how to deal the horse archers on the plain.  Baldwin is pushing into the far end of the village.  Louis is fighting through the orchard with hsi foot and marching his horse around it.  The head of the relief column moving up towards the rear of the village. . 
On the near more Turkish cavalry has arrived & is trying to wear Konrad's force down.  Kronrad has sent his sprearmen towards the village.  Baldwin is mopping up the far end of the village & has sent his horse to help Konrad.  Louis has swept around the village  is moving his knights up to the front line.
Konrad's knights have made an uncontrolled charge at the horse archers which have evaded the charges.  Turkish heavy cavalry has charged some archers left exposed by this.  Louis' knights have charged behind the village.  Turliish infnatry still hang on to this end of the village.
The charge of Konrad's knights did not end well & the Turks are now pushing forward on their left.  Louis' knights are getting the upper hand behind the village.
Another uncontrolled charge by Konrad & Baldwin's knights has again caused a mass evade by the Turkopoles.  Louis' knights have cleared the road behind the village but are shaken and unable to advance further.scattered the
Konrad has lost another unit of knights and his force is verging on breaking.  The Turks have been trying to get the Turkopoles on the left to go forward and finish his battered division off. but they refuse to advance.  Baldwins counterattack has pushed the cloud of Turkish cavalry back, but is running out of steam.  The Turks in the village are on their last legs.  Louis' infantry is moving up to cover his shaken cavalry and protect the road to Damascus.
The Turcomen on the left have still not advanced & Konrad's division has survived.  The Crusadrers have secured the road to Damscus for their baggage train and have lost less than 25% of their units so the Turks concede the battle.

Both sides seemed to think the scenario was difficult for them to win.  The Turks felt their units lacked the punch to break enough Crusaders.  The Crusaders felt helpless under the hail of arrows from Turcomen who ran out of reach whenever they were charged.  But it turned out to be close run thing.  If the Turomen on the left had gone forward again they would have had a good chance of breaking Konrad's division & that was all that was required for them to win. 

Sunday, September 20, 2015

Musket & Tomahawks at Barrie's: Refight of Hatchet Creek

After the frogs easily won this scenario last time we fought it, the British players decided the scenario was biased for the attacker.  The French players offered to attack next time, but Barrie instead decided to tweak the scenario to make defence easier.  The afternoon got off to convivial start with a BBQ lunch for the eight participants.
Barrie had set up a magnificent 10'x6' table.  The French objective was to burn at least 5 houses.  The Brit's objective was to stop them.

The Brits started with Mark's coy in the village & James' coy in camp.  They are asleep but will get moving after the alarm is raised & the church bell rung.   JohnW's coy is to come on turn 1 from the left downstream of the waterfall & has to be ferried over the river (that bit is unfordable, the arm to the right is fordable).  Barrie's coy comes on turn 3 from anywhere as nominated secretly before the start.

The frogs have 3 coys which can come on any edge except where the British near the river come on.   Jakes came on the right side just beyond the middle.  JohnM's came on the right side at this end. Jim's came on the near (short) edge.

All went according to plan for the French even though the Brits saw them coming about as soon as was possible.  Jake advanced his Indians on the camp to keep James busy and distract JohnW.  JohnM advanced steadily on the village pausing to fire & reload when targets were presented.  Jim rushed at the left side of the village with fast moving Indians & militia.
At the far end James was not only pinned down by Jake's Indians, but beaten by them.   JohnW's men were moved up towards the village as fast as he could, but they never got into the action.  Mark's defense of the village was disorganised and failed to stop French on-rush.   Barrie's coy came in the French rear (on the right) but was too little too late.  The five houses at this end of the village were over-run and set on fire by giving the Frogs victory by the end of turn 3. 

Friday, September 18, 2015

Afternoon Bolt Action at Good Games

Jims' Brits v. John's Germans
1000 pts Frontal Assault Scenario from wwwpd.net - Germans attacking.

This scenario has an attacker & defender with a 24" strip of no mans land running along a diagonal. There are 3 objectives, two in the defender's deployment area, one on the diagonal centre line.  The defender places 2 objectives & the attacker 1.   Both sides deploy half their forces on table by alternate platoons with teh rest in reserve.
The diagonal runs from left to right in the pic with the Brits on the nears side.  The objectives are in the nearest house, in the wood to the right of it and at the RH corner of the hedge on the far side of the village.  The Brits made a defensive perimeterin an arc through the houses allowing the Germasn to take the far objective.
The British defence went pretty well the aid of some great shooting on the right flank but near the end their plan almost came unstuck when their reserve of commandos blundered back towards the camera giving the Germans a chance to at least dispute the objective in the near house.  The MMG team in the house stopped one attack by a depleted unit by being in ambush.  They were then destroyed by a second attack by the German HQ, but they took them with them so the objective stayed British.  Then a Brit counterattack at the very end retook the far objective to complete a solid win for the Brits.  For once "Toast" the Cromwell survived - though it failed to kill the Marder on the far ridge (it was saved by the 25 pdr pinning the Marder down).

Tuesday, September 15, 2015

Napoleonics: The Brits defend a ridge again

Brits: (Mike & James) 3 divs of 4 battalions, 1 div of 4 hussars plus 3 guns.
French: (Jim) 2 divs of 6 battalions, 1 div of 2 hussars & 2 chasseurs plus 3 guns.
The Brits (on the left) set up first defending a line of hills & farms with a stream in front of part of the line with their cavalry on the far flank.   The French deployed second concentrating on their right.
The French rush forward on their right.  The Brits begin to advance their right as the French set up a battery to defend their left flank
The left of French assault on the far ridge was disrupted by British fire but their right pushed the left of the British line back.  The French cavalry pushed the Brit cav back, but not decisively.  

The French have regrouped and attacked again with foot and horse on the right.  The Brits have supported their left with Scots firing across the creek but still haven't come to grips with the French left.
The British cavalry has broken and their inf on the ridge reduced to half strength.  The French battery is still keeping the British right at bay so the French haven't lost a division.  If they can break one more battalion on the Brit left the Brits will fail army morale (having lost exactly half their divs while the enemy has lost none).  
On the far flank the Brits manage to beat off a cavalry attack and extract their two battalions over the creek to safety behind the men in skirts.  The French left is about to break.
The French chance of victory was lost by failure to finish off the British left and the French general concedes.  Once again the French attacked the Brits with a sound enough plan but just couldn't nail the buggers.
Mike wanted to add a close up of his newest troops.


Friday, September 11, 2015

Bolt Action at Good Games

John & Simon's Soviets v. Jim's Germans
1250 pts Modified Domination Scenario with 5 objectives- 8'x6' table

The objectives are 1 on each of the 2 hills at the far end, 1 on the crossroads, 1 on the hill on the right & 1 in the farmyard on the left.  The Germans are on the left.  The game started with a deployment turn where units were deployed 1 by 1 (in order determined by normal dice draw) within 18" of own baseline (without firing).  (This was to compensate for the big table).
The Soviets got a kickstart by having a scout unit which could be deployed forward which was deployed on the central objective.   The Germans declined to take the risk of rushing a hanomag full of panzergrenadiers up the road in the face of a KV1 to dispute it so at the end of turn 1 the Soviets had 3 of 5 objectives & the pressure was on the Germans to attack.
The Panzergrenadiers dismounted in the village & attacked the objective, but more Soviet infantry came up in time to support their advance guard & the Panzergrens were destroyed.  Nothing else went right for the Huns against a sound Soviet defence.  An attempt to attack on the near flank with their other hanomag full of panzergrenadiers was popped by the Ziz in ambush.  By the end of turn 4 it was clearly impossible for them to even reach a 3rd object so they conceded.

Tuesday, September 08, 2015

More Zulus

Jim's British square moves slowly across the plain escorting its baggage train down the track that fords the river and turns left at the foot of a scrubby hill before reaching the sleepy Zulu Kraal where they intend to bivouac for the night. The scouts have reported Zulus in the hills (commanded by James & Simon) but not where exactly they are.
The Brits deploy to cover the ford before crossing with the wagons.

The wagons have crossed the ford before the first Zulus appear on their right.

Then suddenly there are Zulus everywhere! (20 warbands and 6 skirmisher units).
 It's Martini Henry time.
The thin red line has generally held off the first charges on all fronts.  Only the far right hand unit broke.  Hussars have been sent to cover the flank.
The Zulus have been repulsed along most of the line, but British casualties are mounting & the right has lost another unit. 
The Zulus are regrouping left & centre.  On the right the hussars broke one Zulu unit, but their sweeping advance was stymied by rotten dice & the hussars broke.  The British line is largely shaken now, but the Zulu losses on the right & centre are also serious.
On the left the Zulus have attacked & been beaten off again.  In the centre they have pushed the Brits back to the wagons.  But on the right disaster has struck the British.  Their last unit on the right broke and the sweeping advance struck the hussars in flank after they had recoiled back from Zulu fire from across the river.  The Brits are now surrounded. 
Converging Zulu attacks soon break more British units to finish the battle.

There were times during the battle when I felt that Hail Victoria is too generous with combat factors for the Zulus.  But on reflection, the battle was a very close run thing so maybe not so.  The centre impi was one unit off breaking and if the hussars weren't so unlucky the far impi should have been in trouble too.  The hussars do look good though (they are Perry ACW plastics with the topis saved by making making some infantry Scots).


Friday, September 04, 2015

Kill something Nick!

A team flames of war game up in Launceston.  Ben (Italians) and Matt (Germans) vs Lowell and Nick (Russians)

This was a fantastic game.  Both sides attacked on their right.  Both Matt and Nick duelled on the Russian left / German right -- Matt kept missing Nick's tanks, and Nick kept bailing Matts tanks (which generally, but not always, remounted).  On the other flank Lowell charged into the Italian defenders, causing all sorts of problems for the Italians.

By about turn 4, Lowell observed that Nick had not killed a single thing all game.  This trend continued!  Lowell kept killing the Italian infantry before Nicks slow KV tanks could even get into range!

The final turn saw most of Nicks force destroyed -- with just a few KV tanks on the far objective.  Nick had to pass morale for Nick and Lowell to win the game -- and fearless morale prevailed!  But the game went to the last roll, and could easily have gone the other way!  Nicks KV's finally managed to kill 3 infantry stands in the game -- obviously the important elements that steered Nick and Lowell to victory.


Bolt Action 1800 pts Tank War on big table

Mark's Germans v. Simon & Chris' Brits

We modifed the Tank War scenario to compensate for the big table.  There are 7 objectives, 2 on hiltops on each side and 3 down the centre in the villages & nearest ridge.  The game started with each side alternating putting vehicles within 18" of their table edge.  The Brits had more vehicles so put down three at the start and the last.
The Brits are on the right.  Most of the tanks have been declated to be hull down on the ridges.
The Brits move fast to seize all the central objectives the objectives.  (There is a Piat team in the far village, infantry in the RH house in the near village and the Cromwell has taken the nearest ridge).
It was soon apparent that the Germans erred in their initial deployment.  The 3 Shermans & a Firefly dominated the centre while the Tiger was wasted on the near flank.  It did toast the Cromwell, but was popped in turn by a lucky shot from a Sherman.  The Germans tried an infantry attack in the near village but it was beaten off.