Friday, March 28, 2014

Gaming Garage

Nick vs Patrick.  Practice for the Kingston Kup.

Again, 1555 points.  Patrick had Japanese.  Nick had British.  So we can imagine it was Singapore somewhere.  Except the British had Matildas and French tanks in support.

It was a close, seesawing battle.  In the end, the Japanese Nikihaku teams managed to destroy all of the British tanks, but not without losing one platoon of infantry, another of tanks, and getting close to losing a couple more platoons.  But once the British tanks were gone, the Japanese infantry managed to crush the British infantry on one objective to claim victory.

Nick in Launceston

Flames of War, 1555 points.  Practice for the Kingston Kup.  Nick vs Rob

It was embarrassing.  My British infantry tank company (matildas) vs Rob's German Fallschirmjager Pioneer Company.  It was short, sharp, and bloody (for me).  I have attached a picture of Chris eating to distract from the defeat!


Wednesday, March 26, 2014

Kolin 1757

Mike & Mark's Prussians v. Jim & Chris' Austrians

It was Steve's turn to set up the battle tonight.  He left me the map last week so I could set up the terrain beforehand & he brought along the armies from his 15mm 7 Years War collection.  We used our Hail Napoleon rules - which are Hail Caesar modified for the Black Powder era with house rules.
The Austrians deployed first on the right hand side.  Their front line is, from their left, an Hungarian infantry division, a cavalry division (hussars & dragoons), 3 infantry divisions in the centre, grenz in the wood & hussars on the far flank.  In reserve they have grenadiers in the centre, Saxon cavalry on their right & a cuirassier division on the far flank.  Jim commands the left, Chris the right.

The Prussians are marching down the Kaiserstrasse & deploying to their right.  Mark's advance guard is an hussar division followed by dragoons and infantry.  Mike's main body has a cuirassier division now deploying in the centre, grenadiers deployed on their right between the hamlets and an infantry division still on the road behind them.
 The Prussian attack is being lead by their cuirassiers & grenadiers.
 The Austrian cavalry launch a pre-emptive strike on the Prussian grenadiers & artillery.
The Austrian counterattack has had some success but the grenadiers have stopped them.  The Prussian cuirassiers have broken through the Austrian infantry, but the Austrian grenadiers have been moved up to plug the gap.
The Hungarian infantry have advanced in support of the cavalry.  Mark's infantry has advanced on the flank of the Prussian cuirassiers.  His cavalry has paused on the far flank.
With their left hard pressed, the Austrians launch an attack on their right.  Their cavalry has charged & Chris' infantry & artillery has advanced into the gap in the Prussian line.
Fighting is now happening along the whole front.  In the centre, the Prussian cuirassiers have broken the grenadiers, but have suffered significant casualties & the reserve Saxon cavalry is moving to take them on.
The Hungarians were supposed to make a demonstration on the left to distract the Prussian infantry, instead they blundered into a full scale attack against the superior Prussian infantry - which is not going well.  The Austrian cavalry is badly shaken & has fallen back.  The Saxon cavalry failed to charge home, but have still plugged the line.  Mark's infantry in the centre is under pressure as Austrian infantry lap around their left flank.
On the far flank, both side's hussar divisions are nearly spent, but the Austrian cuirassiers are getting the upper hand against the Prussian dragoons.
On the Austrian left, their Hungarians are badly shaken & about to break.  The cavalry division is also badly shaken & is falling back before the Prussian grenadiers.  The Saxon cavalry are holding their own against the tired cuirassiers.
In the centre, Mark's infantry is outflanked and in trouble.
On the Austrian right, both side's hussars are about to break, but the Prussian dragoons look to be outclassed by the Austrian cuirassiers.
It was now 11 o'clock & time was up with neither army broken.  Out of 9 divisions, the Austrians have lost 3 divisions on their left & centre, their hussars on the right are on the verge of breaking, their left flank cavalry is in no fit state to attack, but has a clear line of retreat to the centre & should escape being broken so there's no easy way for the Prussians to break them.   The Prussians are yet to have any of their 6 divisions broken, but their hussars are about to break, their dragoons are facing a superior force, their infantry centre is being rolled up & their victorious right has heavy casualties.  The players agreed to a draw - pretty much the historical result.

The Prussians had a sound plan of attack & their grenadiers & cuirassiers smashed a hole through the Austrian line as planned, but they erred by overextending their left.  The Austrians had a sound defensive strategy with a neat front line backed with adequate reserves which were able to plug the gaps on their left centre and wear down the Prussian spearpoint while their right counterattacked.  

It was very large battle yet we got though an awful lot of action in 3 hours - which is what Hail Napoleon is designed to do.  It is basically Hail Caesar - but modified - not only to suit the period, but to facilitate large battles.  The only issue we had rules-wise was that it appears that it might be a bit too difficult to break divisions & thus get a decisive result.   Our divisional break test was designed for armies with fewer & smaller divisions -  it's arguable that we should modify the test for this era. 

Steve's troops looked magnificent, both up close and in the big picture.  The players all had a great time & we are all looking forward to more 7 Years War when it's Steve's next turn as gamesmaster.

Sunday, March 23, 2014

Muskets & Tomahawks at Barrie's Sunday School

Barrie, Russ & Mark's British
v.
John, Jim & Chris' French Canadians

All players on each side had a force of 1 officer, 1 Regular, 1 Irregular & 1 Indian unit.
The French-Canadian objective was to burn the village.  They started deployed 8" onto their side of the table.  The British objective was to scout - their victory condition being to get a unit into each of the 6 2x2' squares making up the 6x4' table. They moved onto the table as each unit's first move.

The pics are all taken from behind the French Canadian left.
The first pic is near the end of turn 1, with most troops having had all their moves (most of the cards left in the pile are for the French Indians).  For the French, Chris's men have advanced into the village, Jim's on the left have driven Russ' Rangers back with fire, while John's on the right are engaged with Barrie's wing.
In the centre, Chris's troops have set all the house in the town on fire.   Mark's Regulars have subsequently driven Chris' Militia back from the 2 storey house with a bayonet charge, but Chris' Regulars have in turn all but destroyed Mark's Regulars with volley fire.  On the left Russ's Indians have been driven back thru the wood by Jim's Indians & his Militia have been routed by volley fire. 
On the right Barrie is doing well & has driven John's troops back.

The battle was declared a French Canadian victory at this point.  The British have troops in 4 squares & will probably get into a 5th, but have no chance of getting into the nearest square before the houses, which are all well alight, are destroyed. 

It was an enjoyable little battle with a good time had by all.  The British failure to rush troops forward to get to the 2 storey house first was their fatal mistake.

Friday, March 21, 2014

Lasalle -- The French Implode!

A great Lasalle game against Dennis.

The French had:
- Infantry Division core
- Elite Infantry Brigade
- Cuirassiers Brigade

Denis, as Austrians, had:
- Infantry Division core
- Cavalry Brigade
- Grenadier Brigade

The French were attacking. The Austrians sent their cavalry on a flanking march to disrupt the French advance. The game started well for the French when the Cuirassiers arrived from reserve early in the piece. The Austrian cavalry immediately turned tail and started an 'advance to the rear'!


However, the French advance soon fell apart.  The Austrian cavalry turned around when they reached their table edge.  The Austrian cavalry was expecting to die gloriously.  Instead, they won.  The other cuirassier unit was embroiled with the Austrian lancers -- it won, put pursued into a bad position, where it had to ignominiously retreat from a solid infantry line.

With the Austrian cavalry victorious, and the remaining French Cuirassiers entangled, the French suddenly found that their line was being rolled up.  They advanced on the other flank, but failure their soon lead to the French army breaking.

Tuesday, March 18, 2014

Towton 1461

Jim & Mark's Yorkists v. Steve's Lancastrians

It was Mike's turn to be Gamesmaster tonight & he set up Townton, the next Wars of the Roses battle after St Albans II which we did last week.

The battle started with 3 Lancastrian battles & 2 Yorkist battles on the field.  Neither side was informed of any reinforcements that the other side might get.
The Yorkist army is standing in the foreground waiting for the enemy to advance into a howling gale strong enough to effect bow range.
The Lancastrians have advanced into their bow range without the Yorkist doing much damage with their extra range.
The Lancastrians begin their frontal attack at the same time as their ambush of 2 mounted sergeants come out of the wood on the Yorkist left.   The Yorkists are very pleased they refused their left -  wasn't because they foresaw the ambush though, they had deployed to their right to leave room for their reserves to fit into the line.  Not that there was any sign of them yet.
The Yorkists pull their hanging left flank back.
On the left a counterattack by Edward's retainers has pushed the enemy sergeants back.  Lancastrian men at arms have broken through, but were shaken in the process and bowmen have turned round to shoot at them.  The Yorkist right is an ongoing slogging match.
The Yorkist reserves have finally arrived, though not where the Yorkist generals wanted them.  The Yorkist centre is in dire danger of being rolled up by an attack on the angle by men at arms - only a single bow unit stands in their way.
Remarkably, the heroic Yorkist bowmen have beaten off the men at arms at the critical angle buying the Yorkists time to deploy their reserve battle. The charge of the Yorkist sergeants was stopped by equally heroic Lancastrian men at arms. 
The Lancastrian centre has broken after a desperate fight, leaving the Lancastrian left in trouble.  But the Lancastrian cavalry has beaten Edward's retainers & the Yorkist left flank battle is verging on breaking. 
The Yorkist left battle has broken, but the reserve battle is in place to take over.  Their cavalry has charged again, this time with better luck to break the Lancastrian right.   The Lancastrian left is still holding on but their army has is broken.

The historical battle was one of the bloodiest ever on British soil, and so was our scenario.   The Lancastrians had their chances, but the Yorkists managed to pass the critical tests that would have lost them the battle.

Tuesday, March 11, 2014

2nd St Albans 1461

This week we are starting a new system for Tuesday nights at Camp Cromwell.  We have set up a roster of the regular players who will take their turn to be Gamesmaster Du Jour on Tuesday night.  I've taken 1st slot on the roster to kick it off.  
 
Scenario based on 2nd St Albans, 1461
Details of the real battle & terrain are sketchy, but I've tried to capture the essence of the problems faced by the generals.   The Yorkists are outnumbered, but have a good defensive position.  They start deployed in 3 battles.  One in the town on their left, one on a ridge in the centre & one on a ridge on their right.  The Lancastrians start up to 18" onto the table also in 3 battles.  They must enter on the three flat patches on their right hand side of the table, but may be in road columns.

The Yorkist battles each have 6 standard units.   The Lancastrian battles each have 8 standard units.   The battles must be deployed in the areas described above, but the units may be re-deployed within those areas & both sides are allowed to transfer up to 2 units from any battle to another while deploying.   The Yorkists also have 3 small crossbow units & 2 medium cannon which can be attached to any battle but don't affect break tests.

Movement in the boggy ground in front of the Yorkist centre, the woods, the cornfields & on the scrubby hill on the Lancastrian left is 3" per move for all except open order bows or crossbows.
Shooting at cover is -1 to hit.
Shooting at buildings & barricades is -1 to hit plus -1 save.
Attacks on buildings are infantry only, no charge bonus, no supports (for either side), 5 dice per unit regardless of arms (3 if small), defenders save 4+, defenders ignore fall back result.  
Attacks up the Yorkist ridges lose charge bonus.
Attacks on hedgerows, barricades & woods are no charge bonus, all troops 5 dice (3 if small), defenders ignore fall back results.

Lancastrians get 1st turn.  Command is 8 for all, but our barbarian rule applies unless in road column (that is 9 to charge full steam ahead, 7 otherwise).
 Mike commands the Yorkists on the left.  Steve commands the Lancastrians on the right.
On the far flank Steve has charged the hedgerows beyond the town with cavalry while infantry follows up. His centre division is slow to move.  His left has deployed to face the advance of the Yorkist right.
In the foreground a Yorkist cavalry charge broke an archer unit & the rest of Steve's foot fell back.  Steve then counterattacked with his cavalry.  Steve's centre still refuses to advance.  His cavalry has been repulsed from the hedgerow while his foot is making hard work of the attack on the town.
On the near flank Steve's counterattack has been beaten off.   Mike's bowmen have wandered too far to the right to be much use, but his centre is providing some useful support fire onto Steve's left.  In Steve's centre only his bowmen have advanced, the rest of the foot seem to be in typical WOTR mode of waiting to see who's going to win.  Steve's cavalry have renewed their attack on the hedgerow.
Steve's horse is advancing through the cornfield.  Attacks on the closest cottage & barricades have been repulsed but his foot have taken the church & are attacking the enemy in the street behind it.
Not much is happening on the left as Steve waits for his centre to actually move & Mike tries to get his bowmen down off the hill off camera to the left & dithers with his centre.
Mike's bowmen have finally come up.  Steve's spearmen attacked them but were beaten off.  Steve's left division is now broken.  His centre division, though has finally advanced. 
Steve's cavalry has worked its way through the cornfield and has outflanked Mike's defences.  Mike's left division is on the verge of breaking.
With both sides lefts being broken, the two armies have effectively broken contact.  The Lancastrians have taken the village, but lost their left.   Casualties slightly favour the Yorkists, but they remain outnumbered and have lost the key to their defence, the town.    The Lancastrians now outflank their line of defence along the ridge behind the swamp.   It will take some time to reorganise the forces & get ready for a renewed attack, so after nearly 2 hours of fighting we called it a night with both sides claiming victory.  York did better than the real thing, but chances are will not withstand a renewed attack.
 
Next morning I quickly went through the motions of redeploying the armies to again face each other at right angles to the original line.  It was quite obvious that the Yorkists had no chance against the superior Lancastrian numbers without the defensive advantages of the ridge & town. The centre Lancastrian division that had been so timid in advancing was consequently virtually intact and the Yorkist right had no chance of stopping it while the Lanc's right was still strong enough to pin down the Yorkist left.

Friday, March 07, 2014

Nick in Launceston

T'was the night before Dogs of War,
and all through the house,
not a tank was stirring,
not even a Maus ...


So we played Firefly.

1.  If you haven't watched the TV series, go watch it.  http://en.wikipedia.org/wiki/Firefly_(TV_series)  It is one of the best science fiction shows ever.  Perhaps made better by the fact it was cancelled, and hence didn't get a chance to descend into 'silly'.  Also, don't watch the movie 'Serenity' -- Serenity is to firefly what Episode 1 is to 'Star Wars' -- something that turns gold into lead.


2.  The game is described at boardgame geek:  http://boardgamegeek.com/boardgame/138161/firefly-the-game

3.  I didn't take pics, so I downloaded this pic from boardgamegeek:


The game really captured the spirit of the show.  I was Mal Reynolds on Serenity, with Irena as part of my crew, plus some assorted pilots, medics, and hired guns.  I did find Jayne's Cunning Hat (hence the picture shown above) (watch the show if you don't understand!).  I had a lot of diplomacy and engineering skills, but very little fighting skills.  I did manage to pull off the hospital robbery on Ariel (http://en.wikipedia.org/wiki/Ariel_(Firefly_episode)) and earned a TON of money -- but I had to carefully wait until the 'Aim to Misbehave' deck was stacked in my favour (I had obtained a computer enhancement that let me examine and re-arrange to top three cards on the misbehave deck).

In the end The Other Nick won, managing to buy a cunning replica of the 'shiny hat' from 'Earth That Was', and exchange it for the real one.  He was dogged by reavers, and did loose a few crew, but by concentrating on fighting skills he managed to fight out of most situations.

Tuesday, March 04, 2014

English Civil War

Jim & Mark's Parliamentarians v. Mike & Steve's Royalists

Each player had a cavalry & an infantry division.  The cavalry divisions were all 4 heavy cavalry.  Steve's infantry had 2 pike & 4 shot, Mike's 1 pike, 3 shot & 2 light guns, Mark's had 4 pike & 4 shot.
Pic taken behind Parliament's right.  Mark on the left, Jim on the right.  Steve is facing mark, Mike is facing Jim.  Both sides have strengthened the infantry on the far side intending to use the village of strengthen their weaker infantry division.
 Better command dice allowed the Royalists to advance to the village first.
Mark tried to charge the pikes through the shot, but only got 1 move and the pikes didn't charge home, leaving them vulnerable to the enemy's shot.
On the near flank the infantry engage in a fire fight while the parliamentary cavalry are delayed by poor command dice.
On the far flank the cavalry both wins some & lose some and end up breaking off.  Mark's pikes were disordered by Steve's shot & were withdrawn.   A firefight ensues. 
Jim's shot break an enemy shot and advance.  Mike's foot retires.  The cavalry are slowly coming together.
 Mark renews the attack with his horse as his fott get the worst of the firefight.
Jim's tactic of extending his line to get in a flank attack pays off with 2 enemy units broken, but the other 2 hold on, one even pushing superior numbers back.
The cavalry on the far flank have bounced apart again, but the Royalist horse is getting on top.   Mark's foot is in trouble.
Mike's cavalry has broken, but his foot has got good command dice that allowed them to fall back on their artillery support before Jim could regroup and get at them.  On the far flank, Mark's cavalry has broken leaving his foot in a hopeless position.  It too now breaks.  Parliament still have 2 divisions left out of 4 & have broken an enemy division, so still pass the army break test, but their remaining divisions are clearly not capable of taking on the remaining Royalists so they concede the battle.

Both sides had sound plans.  Parliament came unstuck with their pike & shot tactics on the left.  They deployed shot in front & pikes behind, then tried to charge with the pikes through the shot.  Even with the CIC giving them 2 goes, they only got 1 move when they tried to charge, leaving the pikes in front of the shot, but not charged home.  Royalist shot then disordered most half the pikes so only the other half could charge home the turn after.  This piecemeal attack gave the Royalists an advantage in support & the pikes were easily defeated.  Maybe this wasn't the best way to make an infantry attack with mixed pike & shot. 

Nick in Launceston -- Eclipse

There is ANOTHER place to play games in Launceston -- Messiah Café.  https://www.facebook.com/messiahcoffee

This is a small café on Charles St.  However, it has a LARGE collection of boardgames on the shelves for patrons to play.  It is generally open during the day, but on selected evenings they open for a games night.  Rock up, find some people, pick a game, and play.  The host is extremely friendly, and will gladly teach you games, and introduce you to a game group.

I went with a couple of the guys from work.  The plan was to play eclipse, but when the box was opened, some pieces were missing.  The pieces were at someones house, but he was coming down anyway, so we had to wait till he arrived.  So we started out with a quick game of carcassone.  I was hopeless.  We then launched into eclipse.  Eclipse is a serious, crunchy boardgame -- not for the faint hearted.  And it is long.  We only completed 3 turns before the store closed.  But we were learning, and I think there is a strong desire for a long running game now we know the rules


Monday, March 03, 2014

Nick in Launceston -- Bolt Action

We tried our first action using Bolt Action. As it was our first game, we got a LOT wrong. But the game was fast and fun.

One thing we did differently was to use our 15mm Flames of War figures. If a FOW base had 5 riflemen on it, it was 5 riflemen. I had painted up some singles so that if one trooper was killed, I could break the base down to 4 singles. In the end, I found a dozen singles was more than enough!. We kept the movement rates and ranges as per the rules. I actually prefer this -- it looked far more natural! There was some trouble tracking the NCO figure, but nothing beyond my aged comprehension! Spotting different weapons wasn't that hard -- the German MG's were easy to spot, and the SMGs were relatively easy to spot.

The scenario was 'Top Secret' -- both forces are running for an objective of 'Top Secret' papers in the middle of the battlefield. Rob played US paratroops:

US Infantry

Compulsory Veteran Lieutenant - First Lieutenant (90 pts)
- Extra Men - 2x Additional men (26 pts)

Compulsory Ranger, Airborne, or Veteran Infantry Squad - NCO, 7 men (104 pts)
- SMG - 2x Arm man with SMG (6 pts)
- Anti-tank grenade - 8x Arm man with anti-tank grenade (16 pts)

Compulsory Ranger, Airborne, or Veteran Infantry Squad - NCO, 7 men (104 pts)
- SMG - 2x Arm man with SMG (6 pts)
- Anti-tank grenade - 8x Arm man with anti-tank grenade (16 pts)

Ranger, Airborne, or Veteran Infantry Squad - NCO, 7 men (104 pts)
- SMG - 2x Arm man with SMG (6 pts)
- Anti-tank grenade - 8x Arm man with anti-tank grenade (16 pts)

Ranger, Airborne, or Veteran Infantry Squad - NCO, 7 men (104 pts)
- SMG - 2x Arm man with SMG (6 pts)
- Anti-tank grenade - 8x Arm man with anti-tank grenade (16 pts)

Veteran Forward Observer - Air Forward Observer (90 pts)
- Extra Men - Additional man (13 pts)

.30 cal Machine Gun Team - Veteran Machine Gun Team (65 pts)

.30 cal Machine Gun Team - Veteran Machine Gun Team (65 pts)

Bazooka Team - Veteran Bazooka Team (78 pts)

75mm Howitzer - Veteran 75mm Howitzer (60 pts)


991 Points, 10 Platoons


I played German regular troops.  The idea being this was somewhere in Normandy somewhere soon after D-Day.

German Infantry

Compulsory Regular Lieutenant - Second Lieutenant (50 pts)
- Extra Men - 2x Additional Soldier (20 pts)

Compulsory Wermacht Infantry Squad - NCO, 9 men (100 pts)
- Light Machine Gun - 2x Arm man with Light Machine Gun (another man becomes a loader) (40 pts)

Compulsory Wermacht Infantry Squad - NCO, 9 men (100 pts)
- Light Machine Gun - 2x Arm man with Light Machine Gun (another man becomes a loader) (40 pts)

Regular Forward Observer - Artillery Forward Observer (100 pts)
- Extra Men - Additional man (10 pts)

Machine Gun Team - Regular Machine Gun Team (50 pts)

Medium Mortar Team - Regular Medium Mortar Team (50 pts)

Panzershreck Anti-tank Team - Regular Panzershreck Anti-tank Team (80 pts)

Anti-tank Gun Team - Regular 75mm PaK 40 (110 pts)

Tank - Regular StuG III/IV with MMG (245 pts)


995 Points, 9 Platoons


The battle started badly for me -- it seemed none of my troops wanted to enter the table!!!!!  I only got one infantry squad, my officer, and a panzerschreck.


Next turn was more productive.  I got my remaining troops, including the StuG IIIG, that moved to cover the objective.


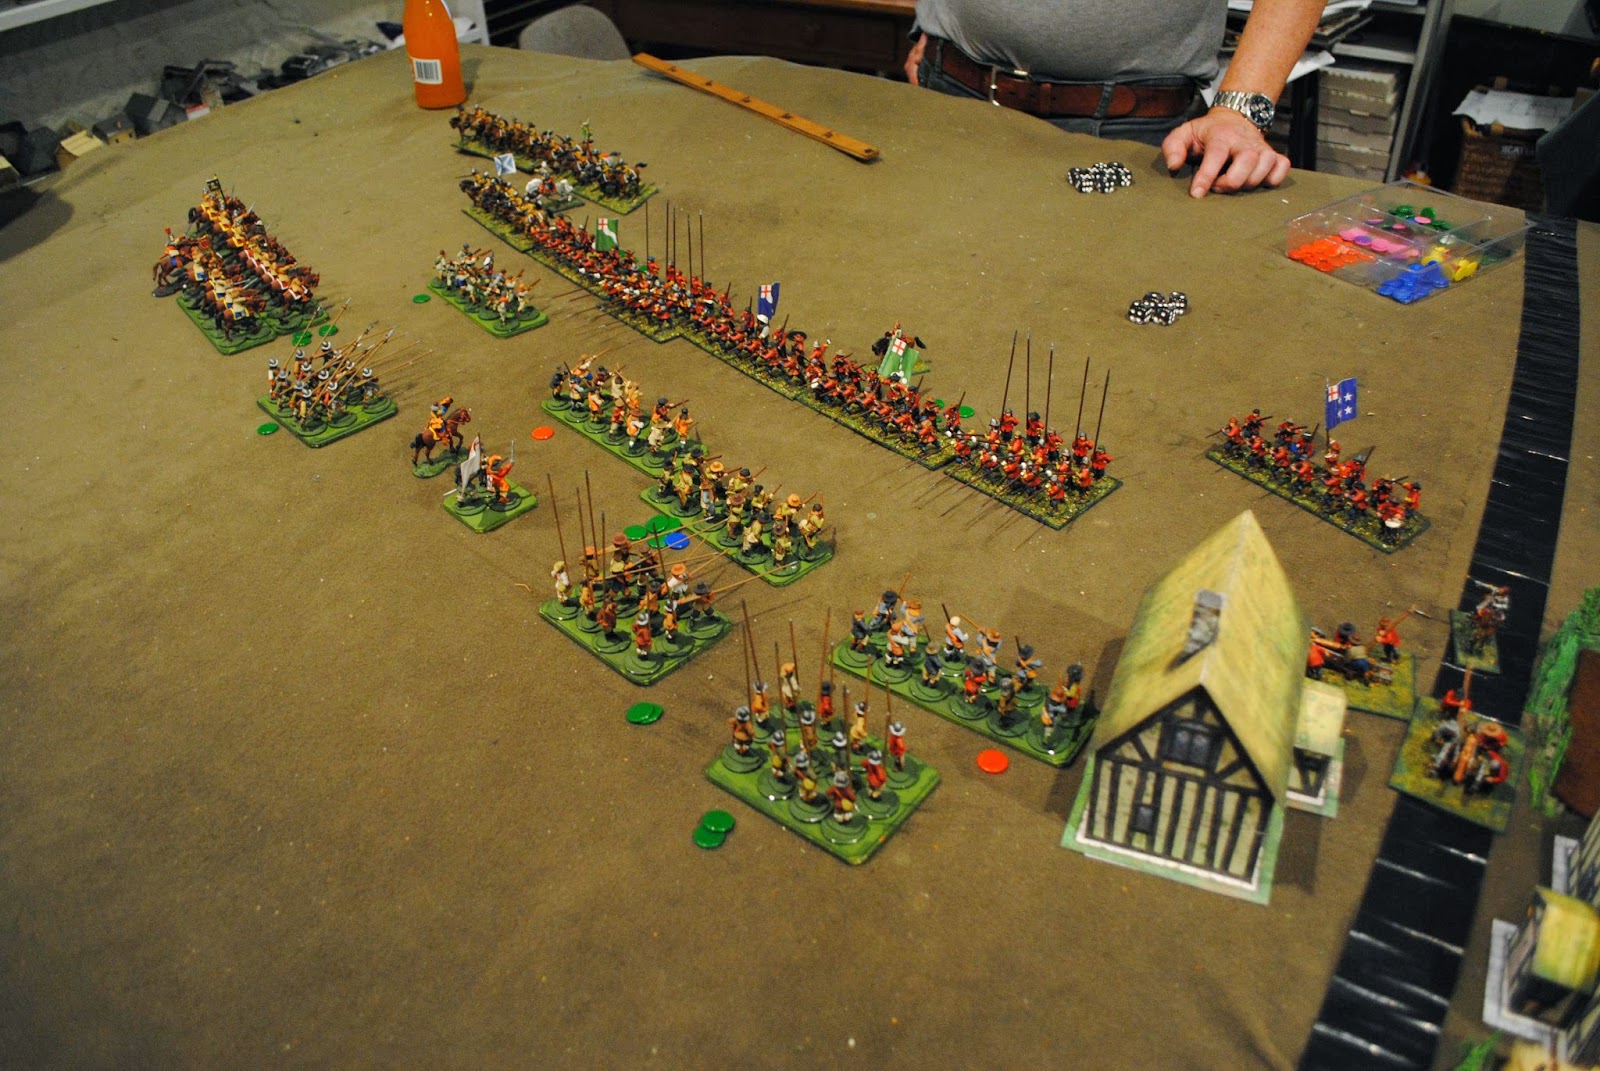
The US Paratroops moved into position behind the houses in the village.  In the far corner you can see the 'Beanie of Doom' that I used as a dice bag.  I need to buy a real dice bag!!!!.


The US bazooka man ran up to a gap between the buildings and took a pot shot at my StuG III G .  It had been performing wonderfully, machine gunning a squad of paratroops into almost nothing.  It now performed wonderfully as a fireworks display!


The next few turns were not happy for the Germans, and I forgot to take pictures.  But the two German infantry squads were destroyed by air power.  Just about everything else was pinned.  And there were a few FUBAR orders that resulted in Germans retreating unexpectedly!  By turn 6 all the Germans had left was the PaK 40 AT gun and a mortar -- not enough to do anything.

So, what are my thoughts?  Well -- it was a GREAT game.  I still think FOW is more 'crunchy', but I can see us doing this more often.  And it was surprisingly easy to adapt a 15mm FOW army to Bolt Action - a dozen singles should suffice!  And I can use ALL of my existing terrain!!!