Wertingen 1805
This is a scenario based on the action at Wertingen
on the 8th October in 1805. My prime reference is Jeff Berry’s
blog Obscurebattles.blogspot.com.au I have modified the historical scenario a bit to suit the available
troops and to make the action fit more conveniently on our 10’x6’ table, but the
problems faced by the opposing generals are basically the same.
In his own inimitable way General Mack has sent Auffenberg’s
Corps, which is predominantly infantry, to reconnoitre towards the Danube and
find Murat’s cavalry Corps. At the start
of this scenario, Auffenberg is experiencing a classic “Oh S%&t!” moment after emerging
from the village of Wertingen at the head of his force. Down the valley before him to the north he
sees a dragoon division coming right at him. Movement in the distance behind the dragoons indicate
that the dragoons are the head of a much larger force. A minute later the officer he sent to reconnoitre
the road north from Blinswagan gallops up to tell him that there are hussars
coming down that road.
Auffenburg immediately realises that he has located
Murat, as required by his orders and that he can get the hell out of there without risking a Court Marshall. On the other hand he could stand his ground, heroically hold on until nightfall and win bulk Brownie Points.
Austrian
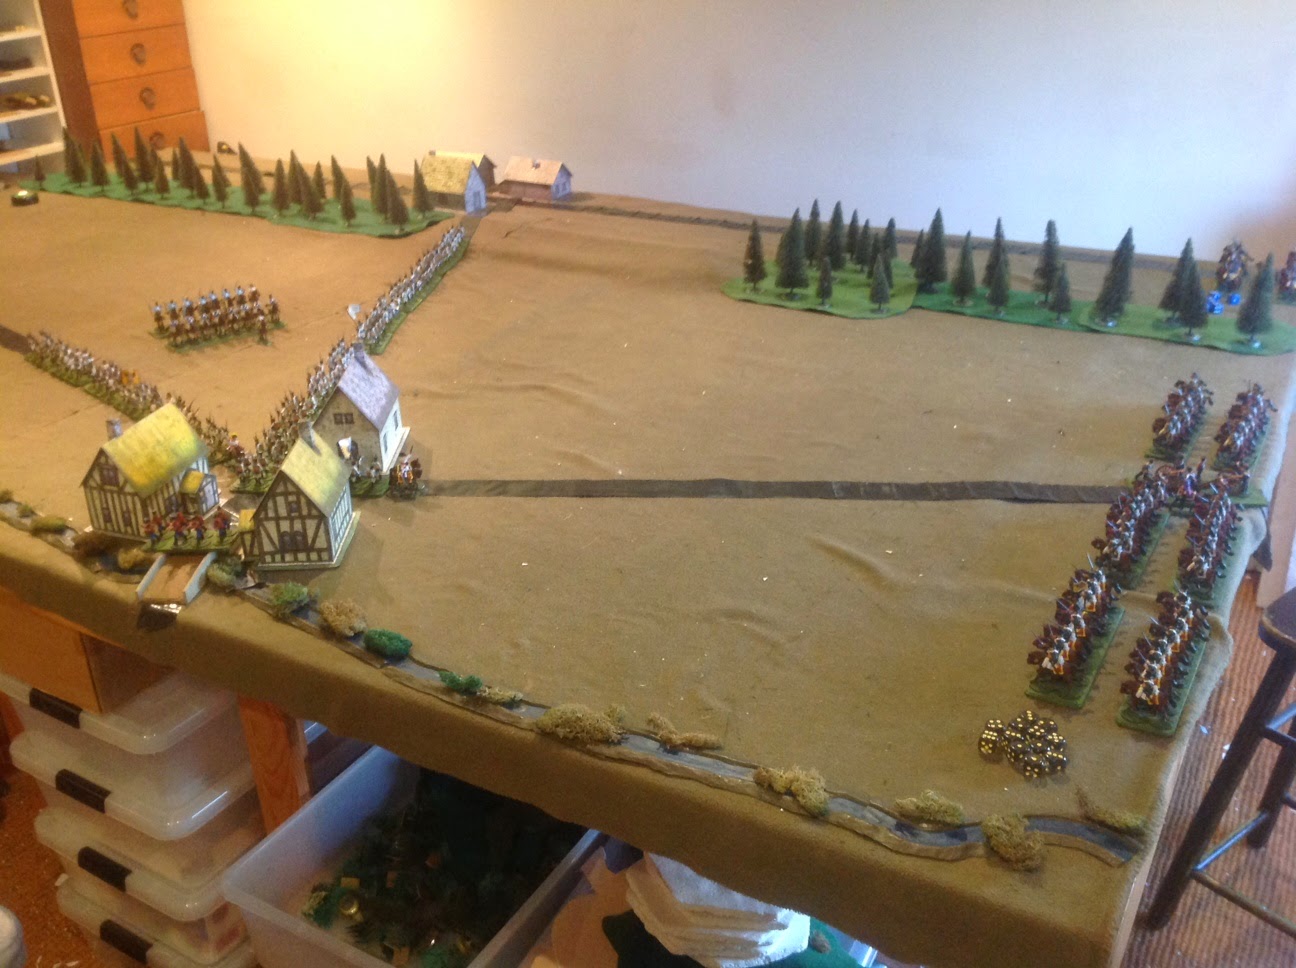
initial deployment
The line infantry division is in road column on
the road between between Blinswagen & Wertingen. The head of the column just about to leave
Wertingen to the north.
The grenadier division is on the road entering Wertingen from the south, waiting for the line column to pass (typical Austrian staff work).
The grenz are on the bridge.
The cavalry are deployed between the 2 infantry columns waiting for a purpose.
The grenadier division is on the road entering Wertingen from the south, waiting for the line column to pass (typical Austrian staff work).
The grenz are on the bridge.
The cavalry are deployed between the 2 infantry columns waiting for a purpose.
Boye’s division is deployed on the north edge of
the table. Fauconnet’s brigade is at the north west corner of the table.
General Auffenburg’s III Armeekorps
Command rating 8
Command rating 8
Baillet’s
division6 grenadier
battalions with attached light art.
Reusse-Greitz Regiment 3 line infantry
battalions with attached light art.
1 small grenz battalion
1 small grenz battalion
Gringen’s
brigade 1 cuirassier regiment
(1 unit)
1 hussar regiment (1 unit)
1 hussar regiment (1 unit)
Parts of Murat & Lannes’ Corps
Command rating 9
Command rating 9
Boye’s division6 dragoon regiments
(6 units)
1 horse battery (2 guns)
1 horse battery (2 guns)
Fauconnet’s
brigade2 hussar regiments
Klein’s division6 dragoon regiments
(6 units)
Oudinot’s
Division
Laplanche-Morthieres brigade4 infantry battalions
Laplanche-Morthieres brigade4 infantry battalions
Dupas’ brigade4 infantry battalions
Ruffin’s brigade2 infantry battalions
Wargame rules specific to the scenario
The Austrians get the first move.
Breaking Divisions & Corps:Broken divisions are not removed unless they are
isolated from the main body (separated by more than 12”). Unless isolated, remaining units in broken
divisions become shaken but stay on the table, though broken divisions cannot
advance. The Austrian Corps will be
broken when all divisions are broken.
Victory conditions:The Austrians have to either hold on with the Corps
unbroken with a line of retreat until dark (10pm real time) or make a fighting
retreat as a coordinated whole and get at least half their units off the south
edge of the table unbroken.
French reinforcements(This information was not disclosed to the Austrian players until the troops were put down).
Klein’s dragoon divisionThis arrives behind Boye’s division deployed for battle on turn 3. The units of the division can test command and measure moves on from the north edge if they pass command.
Lannes CorpsThis arrives at the north table edge on the road north of Blinswagon in a single road column one division after the other with the head of the column moving on on turn 6.
If the Austrians have no troops west of the trees & ridge, if the column remains on the road it need not be put down until the head of the column reaches the road junction in Blinswagon (at which point the Austrians must become aware of it). This will be where the column head is at the end of turn 9 & it must be put down then.
The Wargame
Steve commanded the Austrians. Mike commanded the French with the assistance of James. Jim umpired.
 The Austrians have formed a line of squares. The French hussars have galloped down the road on the left. Boye's dragoons have advanced. Klien's dragoons have just come onto the table.
 The lead dragoons throw a blunder in command and charge the squares head on. They are beaten off. The French horse guns are moving up bombard the squares.
 In the foreground the French hussars have filtered through the wood in the Austrian rear, but the Austrian cavalry have deployed to keep them bottled up in the wood.
 Kleins' dragoons have got lucky and broken the end square of the Austrian line. But the lead regiment lost too many casualties and was unable to make a sweeping advance to immediately exploit the breakthrough. Near the village, another dragoon attack has been beaten off & a dragoon unit broken.
 Though Klein's cavalry failed to exploit it's break though due to poor command dice, the artillery have blown away the next square to widen the gap. In the foreground, the Austrian cuirassiers have turned right to meet the French dragoons and now with the advantage of numbers, the French hussars have come out of the woods. Boye's dragoons have fallen back, galled by the fire of the grenz in the village and of the light guns attached to the infantry. (Note that we have 12" maximum range for muskets, but the Austrian battalions get 1 dice at up to 18" range for their attached artillery).
 On turn 9 Lannes Corps was placed on the road on the left having advanced to the village out of sight of the Austrians. The Austrian cuirassiers are surrounded. Another Austrian square has been blown away by the artillery which is now redeploying forward. Near the village the Austrian infantry has formed line & is advancing on Boye's weakened dragoons.
 The Austrian infantry near the village are giving Boye's a hard time with their musketry. The Austrian cavalry ahs been finished off.
 Boye's dragoons have withdrawn, beaten back by one & a half battalions in line. Part of Klein's division have galloped right to cut off the Austrians. Lannes' infantry is deploying on the left.
 With the arrival of Lannes' infantry at the front it's all over. The Austrians are cut off and destroyed.
The French did rather better than in the real thing where most of the Austrians got away. In this game, the initial success of Klein's dragoons was both fortunate and critical. After that the Austrians looked doomed. Nevertheless, the French did not escape unscathed. Both dragoon regiments were badly hurt & had 2 regiments broken. By the end both dragoon divisions were unfit for further advance, but Lannes was now there to finish it off. If the Austrians had had a bit more luck early on, they may well have stopped the French cavalry & been able to make their escape, so I think the scenario may well be better balanced that this result would indicate.
French reinforcements(This information was not disclosed to the Austrian players until the troops were put down).
Klein’s dragoon divisionThis arrives behind Boye’s division deployed for battle on turn 3. The units of the division can test command and measure moves on from the north edge if they pass command.
Lannes CorpsThis arrives at the north table edge on the road north of Blinswagon in a single road column one division after the other with the head of the column moving on on turn 6.
If the Austrians have no troops west of the trees & ridge, if the column remains on the road it need not be put down until the head of the column reaches the road junction in Blinswagon (at which point the Austrians must become aware of it). This will be where the column head is at the end of turn 9 & it must be put down then.
The Wargame
Steve commanded the Austrians. Mike commanded the French with the assistance of James. Jim umpired.
The French did rather better than in the real thing where most of the Austrians got away. In this game, the initial success of Klein's dragoons was both fortunate and critical. After that the Austrians looked doomed. Nevertheless, the French did not escape unscathed. Both dragoon regiments were badly hurt & had 2 regiments broken. By the end both dragoon divisions were unfit for further advance, but Lannes was now there to finish it off. If the Austrians had had a bit more luck early on, they may well have stopped the French cavalry & been able to make their escape, so I think the scenario may well be better balanced that this result would indicate.
No comments:
Post a Comment