Byron's Fucilieri v. Jim's Australian Rifles
1500 pts Witch's Cauldron, Italians defending
The Ities deployed 2 Fucilieri Posizione platoons & his heavy artillery in the Cauldron with M11/39's in immediate ambush. In delayed reserve they had Fucilieri, mortars, 75's, 65's & tankettes. They also has sporadic Fiat Falcos.
With random deployment the Ossies put HMGs & 25pdrs on their right & 1 infantry in the centre with 2 more infantry and Valentines in reserve.
Byron deployed his M13 ambush close to the Oz rifles in the centre & immediately attacked with them. The Valentines arrived early but the low ridge gave the M13's cover & even doubling the slow Valentines did not arrive in time to save the infantry platoon.
The other 2 Oz rifles platoons arrived and were brought on in the corner behind the 25pdrs and began advancing through the scrub towards the objective. But the Ities got a Fucilieri platoon from reserve to arrive behind them abd the M13's then moved left over the next ridge to support them.
The Italian attack was stopped by the Oz rifles, but one of the rifles and a 25pdr were lost first, and more impoortant, the counterattack prevented the Ozzies from advancing. The Italians won because there were no enemies with 40cm of the objective after turn 6. Byron won the battle convincingly even though he only got 1 platoon from reserve, his airforce did nothing but look beautiful, & his artillery did no more than scratch some camo. In effect, 5 crap tanks and a Fearless Trained infantry platoon won the battle on their own when Byron saw an opportunity and exploited it.
This was our first Hellfire & back battle. It's nice to be back in the desert. The new missions look very interesting & fighting with such crap kit is a nice change. Most of the troops can be made up from Midwar gear we already have, it will only take a few purchases or subs to make up most armies (for this one we only had to sub M14's for M13's).
Sunday, August 28, 2011
Tuesday, August 23, 2011
Hail Caesar 23/08/11
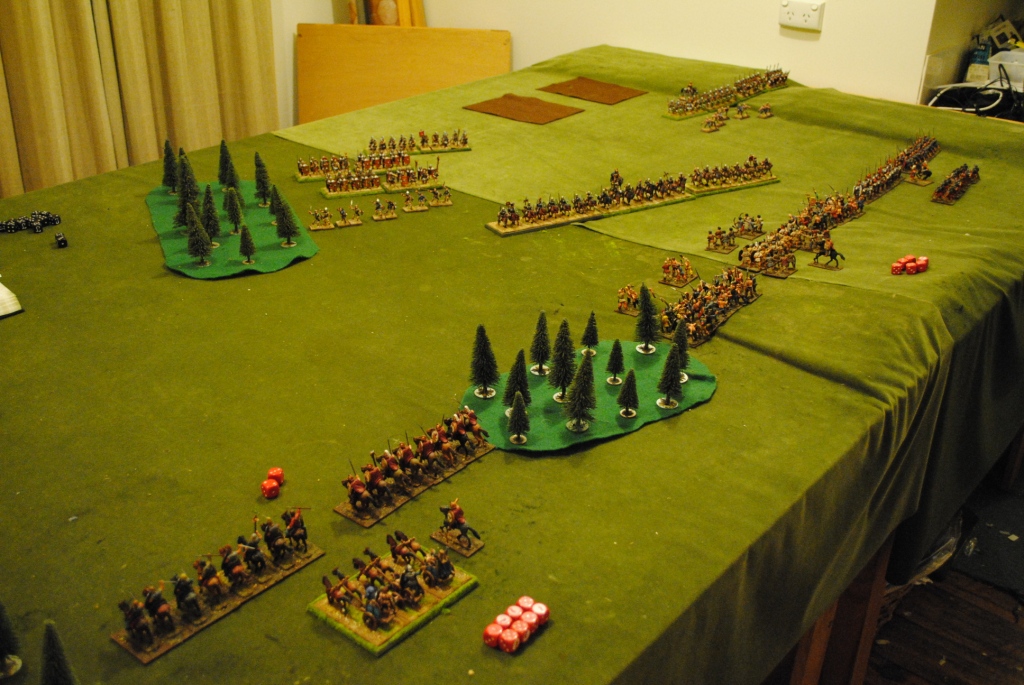
We had a not too historical put-everything-we-have-painted-on-the-table Hail Caesar battle. The troops were divided into 2 roughly equal forces with two Steves commanding the Romans, and Mark, Mike & Jim commanding their enemies.
Pic 1 is at the start from behind the Roman right. SteveJ's cavalry is out of frame behind the wood on the left, his infantry stands on the ridge. SteveP's holds the left with legionaries supported by cavalry & elephants. Jim commands the Gallic horse on the far flank, Mike the Gallic infantry in the centre, Mark the Numidian foot on their left flank. The Romans sat back while the Gauls advanced. The Gallic advance was rather ragged with half the infantry charging forward at a great rate & the rest straggling up after them. Half their cavalry sat in the rear refusing to move for most of the game.
In pic 2 the leading Gallic division is fighting on the hill, Mark's Numidians have moved up to cover their flank. The 2nd Gallic infantry is slowly getting there & the 1st Gallic cavalry division is plugging the gap between the woods bottling up most of the Roman cavalry.
In pics 3 & 4 the leading Gallic infantry division is getting beaten back and the Romans are deciding how to exploit their advantage.
In pic 5 the Gallic left centre has broken, their left is being pushed back, the 2nd Gallic infantry division is having a hard time & most of their cavalry is still sitting in the rear drinking herbal potions.
By pic 6 the Gallic cavalry has finally been stirred into action and it is galloping towards the centre in a last ditch play for victory. But it is too late. Mark's division finally cracked to break the army morale.
Mike was set a tough task charging uphill at the Roman centre. He needed more luck on the impact turns that he got. But the killer was the 2nd Gallic cavalry division sitting doing nothing until it was too late.
But once again Hail Caesar delivered a rattling good game enjoyed by all.
Sunday, August 21, 2011
Getting a weekend FOW Fix
Saturday afternoon: Rich’s Russian Infantry Coy v. Jim’s Panzergrenadiers.
It turned into a one sided affair. The Germans had a pretty good anti-strelk force & once the Marders trumped the T34s, the Russians were always in trouble. Pics taken from behind Russian right. Pic 1 at start, pic 2 after German's attack repulsed.
Sunday: Byron’s Aufklarungsschwadron v. Jim’s 7th Armoured
2000 pts late war, Roadblock mission
Byron chose a Cromwell platoon as the ambush target. Jim put the Cromwells in the village near the centre and his two infantry platoons (1 trucked & 1 in HT’s) near the objectives on each side. Racing to the rescue, the Brit’s had 2 more Cromwell platoons, Stuarts, Sextons & a 5.5” battery.
The Russians deployed a Strelk on each objective, Gods in rear, Shtraf, Scouts & T34s on the left.
The Germans deployed P/grens on both objectives and in the cornfield on their right, 105’s were tucked behind hills on the left, werfers in cornfields in the centre. armoured cars left centre, armoured mortars right rear & Marders fronting the cornfield on their right flank. The armoured P/grens on each flank had their armoured half tracks behind in support.
The battle opened with a one-sided duel between the Marders & the T34’s. The Germans got first fire & T34’s died quickly without even scratching paint. The Germans advanced on their left with the P/grens using the hill & wood to cover their advance supported by the armoured cars. The Russians also advanced on their left. The German artillery whittled away at the Gods, but more importantly kept them pinned for some vital turns.
The German attack went well at first - the half tracks & armoured cars pinned the isolated Strelk platoon on the objective, but when the infantry charged the end of the Strelk line the Russians got 5 hits & 3 kills from 6 dice and stopped them. They then refused to unpin until the game was over. But that was the only bit of luck the Russians got. On the other flank, their attacks ran into a deadly reception committee of MG armed infantry supported by MGs on half tracks & Marders (not to mention 6 tube rocket barrages). The Ivans were mown down and when the mortar half tracks machine gunned the Russian commander they failed army morale.
Sunday: Byron’s Aufklarungsschwadron v. Jim’s 7th Armoured
2000 pts late war, Roadblock mission
Byron chose a Cromwell platoon as the ambush target. Jim put the Cromwells in the village near the centre and his two infantry platoons (1 trucked & 1 in HT’s) near the objectives on each side. Racing to the rescue, the Brit’s had 2 more Cromwell platoons, Stuarts, Sextons & a 5.5” battery.
Byron put his Pumas in ambush on his left, Stugs in the centre & Panthers on the right, with 2 P/grens and more armoured cars in reserve.
The ambush took out a Cromwell platoon commander, a Firefly and half the motorised infantry. The surviving motorised dug in on the RH objective, the rifles dug in on the other. The British brought on HQ , Sextons & Cromwells on the right and 5.5” artillery, Stuarts & Cromwells on the left. The German reserves were brought on their right as the Pumas worked on pinning down the Brit right.
The objective being attacked by the Germans was initially defended by a rifle platoon. They were supported by Stuarts & Cromwells from reserve plus the artillery before the Germans attack started. They had to hang on while the Brits cleaned up the other flank and got more reinforcements across.
The German attack was gradually whittled down by artillery (aided by a spotted plane) and tank fire. The rifles held off the first P/grens in the wood and then the Cromwells mopped up by rushing the Panthers the 5.5’s missed.
Pic 1 from behind Brit right as reserves are gathered. Pic 2 is the Brit left hanging on.
Thursday, August 18, 2011
28mm Plastic Ancients
My First 28mm Plastics
If you have been following the blog you will have seen that I spent part of my recent time in Gaul productively in raising an ancient Gallic army in 28mm plastics. I took a small kit of selected paints & tools and some Wargames Factory figures (topped up by more by mail order). Assembling and painting them filled in the some of the spare time between the eating, drinking & battlefield hunting. I left the basing until I got home as they packed better unbased & I didn’t have the gear for it with me anyway.
I found the assembly of the figures to be easier than I expected, and actually quite fun, though it takes a while to get the hang of getting the arms & weapons at realistic angles. In the end only one guy finished up with his feet pointing the wrong way. I was impressed with the strength of the plastic glue and thus the robustness of the assembled figures, (which is why the guy still has his feet pointing the wrong way), although the fumes are pretty lethal – guaranteed headache if I don’t do it outside, or at least by the window.
The painting was straightforward compared with 15’s, though my results look pretty ordinary compared to the pics in Hail Caesar. I consol myself with the fact that they look great if you stand back far enough – as you do when actually fighting a wargame. The shield transfers defeated me despite finding several sets of instructions from mates & on the web, but in the end I decided that simple paint was good enough for a bunch of grotty barbarians. I can retro fit the shields if I ever master the art.
I put a lot of thought into how to base the figures. My final decision was to base them individually and use magnetic movement trays. This suits Hail Caesar very well as it is the tray size that matters and the figures can be placed on the trays in the way that best suits the particular figures & the numbers available. The Gallic infantry, bristling with javelins as they are, take up more space than the commonly used 20mm base width, but with this system you just space them on the tray to suit. There is also no need to have precisely N figures for every unit, you can just spread them out a bit more if you’re a bit short.
I based the figures on 22mm diameter steel washers. These are cheap and easy to get in bulk, they provide a bit of weight to stabilise the lightweight plastic figures, and they facilitate the use of magnetic movement trays as well. The infantry bases don’t quite cover the hole, but a bit of polyfilla both fills the hole and roughs up the surface of the washer for painting or flocking. For the cavalry I used 2 washers linked by the horse base. It makes a dumbbell shaped base that actually looks ok.
For movement trays I’ve used magnetic plastic sheet glued to 3mm balsa sheet. I used balsa as I happened to have a heap of it the right size for the job, though thin plywood or craftwood would do it too. The 3mm is just thick enough to grab hold of comfortably with fingers spanning over the figures. Plastic magnetic sheet with enough magnetism to hold the figs on upside down is available from sign makers. The stuff is expensive off the roll, but at the place I went to the bloke gathered up a pile of offcuts about 100mm wide from around the workshop and sold them to me for a nominal cost. For now I’ve just painted the bases and the edges of the trays - I’ll experiment with ways to make the bases & trays look better in due course.
The consensus among the CC blokes working on 28mm troops for Hail Caesar was to adopt 200mm as our standard unit width. I have made movement trays in 3 sizes to comply with that:
200x75mm – for standard sized warbands & phalanxes with 3 ranks of figures
200x50mm – for standard sized units in close order; infantry in 2 ranks or cavalry in 1 rank; and for small skirmisher units deployed in open order.
100x50mm – for small units – infantry in 2 ranks, cavalry in 1 rank
In the book they use 3 or 4 ranks for warbands or phalanxes and 2 ranks for cavalry. But 3 ranks of infantry gives a good enough impression of depth and 1 rank of cavalry looks fine, so I prefer to use the thinner formations to make the figures go further. Maybe when the group has accumulated enough figures we can go up to 4 rank warbands/phalanxes & 2 rank cavalry on 100m deep trays.
The overall result is very satisfying despite my limited modelling & painting skills, and remarkably economical - it only cost about $150 - approximately $100 for the figs (the A$ was roaring at the time), $20 for bases & trays, $5 for glue, say $5 wear & tear on paintbrushes and say $20 paint.
The force is a good sized Hail Caesar division comprising 1 heavy cavalry unit, 1 light cavalry, 3 warbands, 3 slingers & a small unit of leftovers. In the pic the light troops are in open order on 200mm trays, but there are also 100mm trays for them to use when they close up.
Wednesday, August 17, 2011
Hail Caesar at Camp Cromwell 16/08/11
Steve's Romans
v.
Jim & Mike's Carthaginians
The right hand Roman cavalry bounced off the warband it attacked. The other 2 Roman cavalry units rode straight over their opposition. The Carthagian centre division was broken and the remants had to flee. It looked like game over already, but the Punes soldiered on. Their infantry on their right charged forward v. the Roman left and the cavalry wheeled right to attack the Roman right.
The dice gods relented on Mike and with 3 units to 2 & a half routed the Roman left.
On the other flank the lead Roman infantry unit was routed by heavy cavalry supported by chariots. But the cavalry wa sin turn destroyed by the Roman second line.
The battle now became a race as Mike tried to bring his infantry across into the Roman rear while Steve tried to take out Jim's cavalry.
The Punic left had an interesting choice to make: 1) Try and take out the foot.
2) Try & take out the horse,or:
3) Fall back & wait for the infantry to come over.
They chose to try to break the Roman foot before their cavalry could come up. They failed to break through and then they broke under the combined attack of horse & foot before Mike could come to the rescue.
Although quite a small battle by HC standards, it was a very enjoyable game. We're looking forward to a bigger one next week.
v.
Jim & Mike's Carthaginians
Between us we scraped up enough 28mm figs to get a battle under way.
Steve deployed his cavalry division of 3 HC in the centre, an infantry divison of 2 Legionaries & a Veletes on his left and another infantry divison of 3 Legionaries & 1 Velete on his right.
Jim commanded 2 HC & a Celtic chariot unit on the left. Mike had 2 infantry divisions: 3 warbands with 2 slingers in the centre and 3 medium infantry (scutari) on the right.
The Romans won the dice off and got 1st move. Their cavalry rushed forward towards the warbands, while their infantry advanced only slowly on the flanks.
The dice gods relented on Mike and with 3 units to 2 & a half routed the Roman left.
On the other flank the lead Roman infantry unit was routed by heavy cavalry supported by chariots. But the cavalry wa sin turn destroyed by the Roman second line.
The battle now became a race as Mike tried to bring his infantry across into the Roman rear while Steve tried to take out Jim's cavalry.
The Punic left had an interesting choice to make: 1) Try and take out the foot.
2) Try & take out the horse,or:
3) Fall back & wait for the infantry to come over.
They chose to try to break the Roman foot before their cavalry could come up. They failed to break through and then they broke under the combined attack of horse & foot before Mike could come to the rescue.
Although quite a small battle by HC standards, it was a very enjoyable game. We're looking forward to a bigger one next week.
Saturday, August 13, 2011
Chateau Vincennes
Chateau Vincennes was started by Charles V in the 14th centrury when he built the keep as his personal bolt hole. It was out in the woods then, but it's now located in a Paris suburb.
Subsequent medieval kings extended it into a complete castle with a perimeter wall, towers, moat and chappel. The model shows it at this stage.

The keep is the highest medieval castle in France.
Louis XIV built a residential chateau in the south end before getting bored and moving on to Versailles.
Napoleon had all but one of the towers reduced in hieght to be the same as the walls to make it more defensible against cannon & used it as an arsenal. Even so the walls and moat are impressive.
The place was used as a prison for much of the time between Louis' departure and WWII. The walls in the keep are covered in prisoner's grafiti. Famous prisoners included the Marquis de Sade, and the Duc d'Enghien, who Napoleon had shot in the moat.
Subsequent medieval kings extended it into a complete castle with a perimeter wall, towers, moat and chappel. The model shows it at this stage.
The keep is the highest medieval castle in France.
Louis XIV built a residential chateau in the south end before getting bored and moving on to Versailles.
Napoleon had all but one of the towers reduced in hieght to be the same as the walls to make it more defensible against cannon & used it as an arsenal. Even so the walls and moat are impressive.
The place was used as a prison for much of the time between Louis' departure and WWII. The walls in the keep are covered in prisoner's grafiti. Famous prisoners included the Marquis de Sade, and the Duc d'Enghien, who Napoleon had shot in the moat.
Wednesday, August 10, 2011
Camp Cromwell Tuesday 16 August
I get back from France on Tuesday 16th August, so Tuesday night Camp Cromwell meetings will resume that night - 7.30 at 29 Cromwell St, Battery Point.
On the agenda:
Hail Caesar:
Some of us have been painting 28mm ancients while I've been away. Time to compare our work. I hope we can have at least a small practice battle & plan for a larger battle next week.
Black Powder:
I should have my copy of The Last Argument of Kings (the BP 18th century suppliment) waiting for me when I return. We can do some planning for 18th century Black Powder battles.
FOW:
If anyone's desperate for WWII, the tables in the bottom room will be available.
Show and tell:
If anyone's interested, I have endless photos of forts & battlefields in France and Belgium to show.
Saturday, August 06, 2011
La Musee de l'Armee, Paris
The last two times I've been in Paris the 17th-18th century part of the La Musee de l'Armee at les Invalides was closed for renovation. I finally got to see it. There is a plethora of swords, muskets & uniforms.
There are reports on the rest of the museum on the blog if you go back a couple of years.
There were some quite good audio visuals of a selection of battles - Rocoi, Fontenoy, Austerlitz & Waterloo. The overhead projector shows the manoeuvres on the table while you listen to the commentary on headphones (choice of French or English).
The pic is Fontenoy as the British infantry are about to attack from the top left.
In the attic there is a selection of Louis XIV's 1:600 scale models of the fortresses of France.
There was also a Charles de Gaul exhibition that was new since my last visit. They give you earphones so the English speakers can get the propaganda. Still not impressed by the pomous bastard I'm afraid. I returned to base to finish my wargamer's Saturday in Paris with a late lunch of bread and rose and a bit of painting (of Gauls of course) while listening to the AFL on the net. Note the traveller's painting kit with the pizza box used as work-in-progress tray (the pizza was jambon, pommes de terre & fromage - I passed on les escargottes).
Subscribe to:
Posts (Atom)