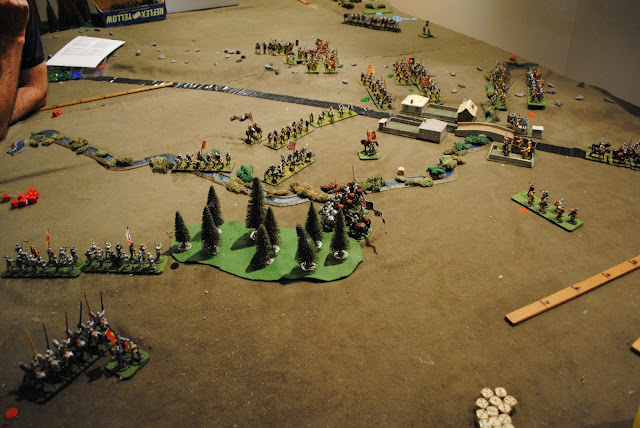
An historical scenario set up by Barrie:
French: John, Jim, Leigh
British: Rusty, Mark, Nick
The British are attacking from the left. Two waves of troops are coming on land and 2 units on boats. The French have a line of abatis in front of the wood on the heights defended by 3 regular units. Some militia & Indians are hidden in the woods. The fort is defended by two guns and another regular unit hidden nearby. The battle starts in morning mist with only 6" visibility.
When the fog lifted (during turn 2) the Brits have 2 units disembarking on the beach, 4 facing the abatis and some militia working their way down the French right flank. The French had their front line on overwatch and opened up a withering fire on the approaching British. They got their regulars card next and followed that up with an even more destructive volley. The British frontline before the abatis melted away under Leigh's dice.
A second wave of Brits came on to attack the abatis and met the same fate as their predecessors. The men off the boats were shot up by militia in the woods to their front, then a regular unit popped up on their flank to finish them off. The British militia ran the gauntlet of Indian fire down the far edge of the table and then moved towards the fort. But the Indians and French militia moved back to meet them and destroyed them.
The battle went much like the original - a British disaster. The French had a good strategy then backed it up with pretty sensational dice - a perfect storm for the Brits.
Sunday, September 29, 2013
Tuesday, September 24, 2013
Wars of the Roses
Jim's Yorkists v. Mike & Steve's Lancastrians
Both sides had armies in 3 battles with a slightly different mix of bows, crossbows, bills, men at arms, sergeants & knights. We used Hail Caesar with our house rules for the era. We deployed using the hidden chit system we started using a couple of weeks back.
Both sides put a "battle" behind the ridge at the far end and decoy chits o the near side of the table. No one was fooled & both hidden "battles" were son brought over the ridges into view.
The Yorkists made a general advance echeloned back from the right. The Lancastrians cowered on the ridge.
York didn't want the battle to turn into an exchange of archery as the enemy had more archers. But attacking uphill wasn't that appealing either. When his right stalled with bad command dice, he decided to use his cavalry concentration in the centre to smash through the Lanc's line.
This was a double or nothing tactic and despite having a small advantage the attack failed miserably. Instead of making a hole in the Lanc's line, Richard found a hole in his own full of enemy cavalry. In desperation Richard personally lead his reserve knights behind his centre in a counterattack towards the enemy right. Quick success in the charge against tired enemy cavalry could have lead to a flanking charge on the flank of the enemy right possibly turning the battle back in his favour. But a good morale throw stopped the breakthrough & held Richard's knights until they were hit in flank instead. Richard escaped the debacle, but the battle was lost.
We played on for a while, but Richard was done for. There is a hole in his centre, and his left & centre "battles" are on the verge of breaking and outflanked too boot.
Sunday, September 22, 2013
Barrie's Sunday School: COC & M&T
Chain of Command
Jim's Panzergrenadiers defending v. Barrie's Brits in Scenario 4: Delaying Action.
This scenario is fought lengthwise on the standard 6x4 table. The Germans, deployed at the near end of the table, have to defend the jump off point in their rear. Their infantry have been deployed forward with their MMG near the objective and their Panzerschreck on the corner. The infantry on the right was deployed over the road, but has fell back their target unit ran behind the church.
The Germans have redeployed their right and rear while their left flank has disposed of the enemy squad on the left flank and popped a bug with a panzerfaust as well.
The German left flank unit lost heavily, but has withdrawn into the ruined building & rallied. The second Carrier has been popped by the panzerscreck. The British have tried to fire over the walls from hard cover at the Germans in the soft cover hedges, but the Germans' firepower is winning out. The survivors from the carriers have tried to move down the left but are being shot up by the mmg near the objective. The British conceded. Once again the German's use of the buzz saws backed up by good command dice gave them decisive victory.
Muskets & Tomahawks
Meanwhile on the other table, a couple of hundred years further back, John's French won a close struggle with Rusty's British.
Thursday, September 19, 2013
Thursday Afternoon Bolt Action
Mark flexed the afternoon off for a game of Bolt Action. He took Veteran British & defended a Envelopment scenario against Jim's Veteran Germans.
The Brits are on the left. The Germans are advancing an infantry squad in the foreground supported by a Hanomag & a Panzerschreck in the centre and a medium mortar & (deceased) HMG on the ridge behind. Two squads are advancing through the village with the CO. The Brits have 2 infantry squads in the village supported by a carrier on the far flank. Their Cromwell & other support weapons defend their left.
On the near flank the German infantry have made it to the wood to gain 2 VPs. The Cromwell survived a pinning hit from the Panzerschreck, but has failed to hit anything itself. The British barrage hampered the German attack through the village, and although one squad charged through the village & destroyed a British squad, it was taken out by a counterattack by the other British squad. The game ended on turn 6 with 3 German units destroyed to give the British 6VPs, while the Germans killed 2 Brit units for 2 VPs & 1 unit into the enemy deployment zone for 2 more, making it a 6:4 British victory.
An enjoyable little battle with a big first - the Cromwell that ahs earned the name "Toast" survived a battle fully operational for the first time. Pity it couldn't hit anything itself.
Tuesday, September 17, 2013
English Civil War
Steve & Mike's Royalists v. Jim's Parliamentarians
Both sides had 2 cavalry divisions of 4 each (one cuirassier unit in one division, the rest heavy), 2 infantry divisions of 2 pike & 4 shot. The Royalists also had 2 heavy guns, Parliament 2 extra musketeers.
We did deployment by alternatively putting down divisional markers showing deployment zones. Each side had 5 sets of markers, one of which was a decoy. The table had dead ground behind ridges in each corner giving both sides the opportunity for some hidden deployment.
The Royalists are on the right. They have deployed all their horse on their left & infantry on their right and centre. Their guns are beside the creek on the far bank.
Parliament have their infantry in the centre with their extra musketeers behind the village. They have 2 sets of divisional counters out of sight behind the ridge on their right, one also out of sight on the left. The actual troops have been left off as the counters are out of sight of the enemy, so they don't know which is the dummy.
Parliament has made a general advance, bringing one cavalry division into view. The Royalists are advancing their centre infantry & have moved cavalry onto the forward slope of the hill.
Musketeers of both sides have occupied half of the central wood and are exchanging fire. Parliament have brought out their 2nd cavalry division and the Royalist have started to move their right flank infantry to their left.
The Royalist have counterattacked in the centre. Their foot have broken a couple of units and are pushing forward around the wood. In the centre their cavalry broke two musketeer units which failed to get into hedgehog. One parliamentary horse division has charged up the hill at the Royalist horse while the other is charging the centre to take the pressure of the infantry.
The Royalist right is making slow progress across the rear of the field. Their infantry attack beside the wood has run out of steam and with support from pikes, the Parliamentary cavalry is gaining ground.
Both Royalist cavalry divisions have broken while Parliament have lost no divisions. Our house rule for even numbered divisions is that an army breaks if it loses half its divisions before the enemy lose any. So parliament has won.
While the well handled Royalist counterattack looked scary for a while, Parliament exploited the hidden deployment rules better to give them a battle with four divisions v. three. The usual wild spread of dice events pretty well cancelled out & the Royalist failure to get their 4th division into the fight in time was decisive.
Lastest Accessories
I've made posters of the QRS's for both Bolt Action & Chain of Command to put on the wall above the small table. Until we make up our minds which rule set we like best we need both. The fact that the COC one is A0 while the BA one fits on A1 is probably indicative of the relative degree of complexity. This COC QRS is not the original one posted by TFL, but a fan-made one that is much better: You can get it at: http://lasthussar.wordpress.com/2013/09/16/chain-of-command-qr-sheet/ It's 6 A4 sheets that I've put together. The BA sheet is a cut & paste of the standard Rules Summary with some easy to remember bits left out to trim it down to A1.
The foam trays in my very neat & airline friendly FOW troop transporter just don't fit 28mm figures & vehicles, so I made up some deeper wooden trays for it. The trays are lined with non-slip plastic mat which works well enough for local trips in the car. For travelling to Cancon I'll probably put some foam dividers &/or foam peanuts in as well. I made three 65mm deep trays, one 42mm tray & an MDF cover. The small tray can be used for low profile infantry & support weapons, left out to leave room for rule books, change of underwear, etc, or inverted over a 65mm tray to allow pikemen, lancers & standard bearers to be transported. There's space for two BA or COC armies, or one Hail Caesar style army. Bolt Action now sell a 28mm travel case, but it's too big to be legal carry-on luggage in Australia.
Sunday, September 15, 2013
Chain of Command at Barrie's
Jim's Panzergrenadiers v. Barrie's British
We fought the 3rd scenario in which although there is an attacker & defender with different starting conditions, is really a matter of who's morale breaks first.
The Germans come on from the left, the Brits on the right.
The Brits have an infantry squad in the ruins in the centre, together with HQ, another infantry squad in the wood on the right (some trees removed to place the troops) & the 3rd behind the thatched building on the left. Their support choice a Carrier has just come on on the road.
The Germans have an infantry squad in the woods in the foreground, one behind the wall in front of the ruined church, & the 3rd one in the woods on the far left. Their commander & Panzerschrek are on the other side of the church & their support choice an HMG is in front of the right hand side of the church.
The Brits in the centre advanced to the wall in front of the ruins but were soon sent back by a storm of machine gun fire. The Germans in the centre have now advanced from their original position onto the road.
On the right the German squad has advanced to the hedge line and with the support og th HMG in the centre is getting the better of the firefight with the Brits in the wood.
The Carrier has moved up to engage the German HMG.
The carrier has been blown up by the Panzerschrek. The Brits on the right have broken & retreated back into the wood. The Brit squad on the left moved down the road to help out their comrades, but the Germans got two phases in a row, moved their centre infantry onto the road and hit them so hard their retaliation was knackered & they never recovered.
The Brits conceded, saving us the trouble of trying to figure out the morale rules (after 3 games they are still a mystery to me). That's two big wins in my two goes at COC. Perhaps Barrie is letting me win to make me like his favourite game. I did throw good dice - but when you get so many some have to be good - you gotta love Hitler's buzzsaws. But the command system allows you really exploit an advantage if the dice cooperate & you've got the hang of how to use them.
Thursday, September 12, 2013
Bolt Action on Thursday afternoon
Jim's British v. Steve's Panzergrenadiers
1,000 pts Envelopment Scenario, British attacking.
The British gain VPs by killing Germans (1/unit), getting units into the enemy's deployment zone 12" from the far edge (2/unit) & getting units off the far edge (3/unit) . The Germans gain 2 VP's per Brit units destroyed. The Brits come on the near edge. The Germans start with up to half in their deployment zone - rest to come on as reserves.
At the start the Germans have 2 infantry squads (left & centre) & an HMG on the hill on the right. The Brits brought on infantry on each side, support weapons on the ridge & 2 carriers (with Piat or small infantry units) though the village.
Disaster struck for the Brits on turn 2 when their artillery threw a 2 which allowed Steve to reposition it on the village. This pinned down both carriers and their passengers so badly that they became useless for most of the game. The Brit infantry advanced on both flanks while their supports tried to supress the opposition. The Germans brought on 2 Hanomags & a Hetzer.
On the right, the Brits made it to the line of trees but were destroyed by MG fire from the Hetzer, Hanomags, infantry & MMG. The MMG was eventually destroyed by mortar fire, but too late.
In the centre, the German infantry was destroyed by the British support weapons on the ridge. On the left, the Brits advanced through the woods and charged the Grenadiers, but the Grenadiers won.
The Brits did finally get some of the troops in the village forward into the 12" zone, but it was too little too late, the Germans won comfortably.
So how does Bolt Action compare with Chain of Command?
To start with it's hard to love a set of rules that allows your own artillery to destroy your plan on turn 2. To have a 1 in 6 chance of the enemy moving your aiming point up to 24" is a bit extreme - if the enemy throw good dice, as in this case, it can be game over.
Putting the artillery debacle aside, the BA game played along very well - I think BA is much easier for beginners to learn & play than COC. In general I prefer BA's systems as quicker & less complex than COC's. For BA the un-rememberable data is usually easily found in the rules summary & most other issues are not hard to find in the book. The COC summary sheet is badly laid out & lacking much of the necessary data, and stuff is generally harder to find in the text. With regard to the COC fanboy's claims of it being a superior simulation, I am not convinced - there are weird things in both COC & BA. The COC Command system is interesting and makes a good game, but I don't see how it makes for a better a simulation of real tactics than BA's system.
However, I also dislike a number of aspects of BA - in particular the fact that there are too many opportunities for bad luck to overcome good tactics - not just artillery which can be anywhere from useless to devastating to either side, with little chance of skill influencing the outcome, but every Close Assault is a huge winner-take-all gamble. Luck is an essential part of any set of wargames rules - you shouldn't ever go into an action knowing the outcome, but the range of outcomes in some BA actions are far too extreme for my liking. However, I haven't played enough COC to be sure it doesn't suffer the same problem.
Both BA & COC provide an opportunity to have fun with great toys, but I'm still undecided which I like best. I suspect that if you took either one of them, tweaked the annoying bits & took some good ideas from the other you'd come up with a pretty good game.
Tuesday, September 10, 2013
Richard III rides again
Jim's Yorkists v. Mike & Steve's Lancastrians
After a bit of a break for other periods it was good to get onto our armoured steeds again.
We are trying a new deployment system. Each side has a set of counters 3 each A,B,C,D,E. In this battle we had 3 divisions each so 3 counters were placed face down beside the divisions on their trays to give them a name. Mine were E, C D, making the A & B counters phonies. The two sides then alternated putting their pairs of counters down in their deployment zones (24" in from their edge). The divisions were then deployed on the frontages indicated by the counters. The Yorkists are on the right so had 2 divisions this side of the creek and 1 on the rocky ridge. The Lancastrians also put all their divisions at this end leaving half the table empty.
The pic is after both sides have had a one turn. York had advanced on the left with his strongest division. Lancaster has fallen back around the small wood on that side while advancing his left and centre.
Both sides advance their left.
The Lancastrians have counterattacked with their knights on their right while their left advances slowly along the rocky ridge. The Yorkist cavalry on the right has discouraged them from dropping onto the plain to move more quickly.
Despite having superior numbers Richard is making hard work of it on the left flank. In the centre the Yorkist cavalry is advancing again after their backward blunder ruined the coordination of the elft & centre divisions. On the ridge the outnumbered Yorkist's bowmen are shaken and falling back.
On the left, York has finally got the upper hand, breaking the enemy knights. The Yorkist centre division is also attacking & their cavalry has broken through the bowmen but has stalled against the men at arms in the second line. Lancastrian cavalry is galloping down the road through the village. We could find no rules to help infantry defending a road through a village so the cavalry probably had it easier than they might have. They brushed off the bow fire from the houses & rode over the billmen in the street.
The victorious Yorkist left has advanced too slowly to help the centre division which has failed to break through. The Yorkist right used the terrain to hold off nearly twice their number. But despite their advantage on the left, the Yorkists were unable to break through there fast enough. York withdrew his two wings in good order.
By the time we'd finished we realised that we'd forgotten a few rules (we should have read the half page of house rules for Hail Richard III first, not afterwards). But we had a good time anyway.
Sunday, September 08, 2013
Chain of Command at Barrie's
Jim's Brits v. Barrie's Panzer Grenadiers
Scenario 2: The probe - Brits attacking. The Brit objective was to get one team across the table & off the far edge. The table being at Barrie's is big step up from my utilitarian style.
In the scouting phase the Brits gained a small advantage with a better spread of jumping off points. The Brits were allowed some extra support for the scenario & chose a Preliminary Bombardment. This meant that in the first turn, the Germans were likely to be delayed in deployment - requiring a 4+ to deploy each unit. This did delay the German deployment and gave the Brits a good start which they used to get some of their force down & start advancing before any Germans arrived.
The first German squad was deployed on the left behind the fence behind the thatched building. The Brits concentrated the fire of two squads on it and broke it with small loss to themselves.
While the fire fight was happening on the left, the rest of the Germans were deployed behind the hedges in the rear (they had to deploy within 6" of the established jumping off points). The third Brit squad with the CO then moved as fast as they could to the right, down the road, through the field and behind the wood. The Germans didn't get as good command dice as the Brits and were unable to do anything to stop this move to the rear and the Brits got to the table edge and gained a pretty quick victory.
The battle went a bit quicker than the last one now we had a better handle on the rules. The Brits won with a good plan backed up with good command dice - which they exploited to the full. It was an interesting exercise each phase to decide what to do with the hand you rolled, and there is clearly scope for skill as well as luck, but I remain sceptical about the connect between the command dice system and reality.
The patrol phase is an interesting concept and provides variety to the standard scenarios in that they could all start off in many different ways. But it also produces a sameness in that all scenarios start with it. I can see something similar being used to good effect in scenarios for other rules.
We intend to do another Bolt Action next to help make a fair comparison.
Thursday, September 05, 2013
Chain of Command
We pressed our Bolt Action armies into service to try out the new Two Fat Lardies WWII platoon scale rules.
Steve & Chris's German Panzergrenadiers v. Barrie's British Regulars
We played the Scout Mission which is pretty much a free for all.
The battle started with a scouting phase where counters are pushed around to define each sides' deployment zones. This an interesting little game within the game that looks like it will provide a lot of extra variety as each of the 6 standard missions could have many variations depending on how this phase goes, and I expect, a bit of scope for skill to gain an advantage in terrain.
Both sides have 3 infantry squads with some support - the Brits have a bit more support as their core force is rated lower. The Germans are in the foreground. Their 3rd squad is off camera moving through the wood on the left. The halftrack carries a small recon team.
The Brits also have 3 infantry squads plus an HMG (in the field on the left) & a Piat (in the field on the right).
The Germans had some initial set backs. Their half track was immobilised by the Piat and the squad in the centre was pulled back to rally after taking effective fire from the Brit HMG. But their squads had greater firepower than the Brit's and they gained the upper hand in the firefights on both flanks. The centre squad was rallied and advanced again to the rear of the village. With their flanks melting away, the Brits made a desperate close assault in the centre, When it failed, they conceded the battle.
The rules are available as a pdf download or hard copy - I have the tablet pdf & Barrie has a hard copy. The game has obvious similarities with Bolt Action. It's the same scale of game and the force lists are very similar, but it is significantly more complex. Both eschew IGOYGO - BA by a drawing coloured dice from a bag to allow units to be actioned 1 at a time, but not strictly each side alternately - COC by a much more complex system of command dice that divide the turns into a variable number of phases each with limited options for activation of units. Both make movement unpredictable - BA by requiring a command test before an action, COC both by limiting command options & by having a dice roll limit move distance. The combat systems in COC are generally more complex and sometimes clumsy compared with BA.
We spent a lot of time looking for rules & it seems a lot harder to find what you're looking for & to learn to play than BA. We often had to give up looking for stuff, just did what seemed reasonable & get on with it. For example, I'm still quite mystified as to how the morale system works. The summary sheets (available as free pdf) lack much of the data you want to look up. I'm not convinced that the extra complexity adds enough depth & interest to compensate for the extra work involved in learning and playing the game. The command system seemed unduly complex and gamey to me - I don't see how it is any better a simulation of command issues than the simpler BA system - it may well provide much scope for skilful play, but it looks more like game skill than war skill. The rules do get a tick for actually having an index, but it's brief and it often failed to point me to an answer to a question.
I think my old brain's only got space for one of BA & COC and at this stage I think I'm going to prefer the simplicity of BA. But one game isn't enough to judge fairly & we'll give it another go. Barrie's going to run another game on Sunday - I'll see how I like playing it.
Steve & Chris's German Panzergrenadiers v. Barrie's British Regulars
We played the Scout Mission which is pretty much a free for all.
The battle started with a scouting phase where counters are pushed around to define each sides' deployment zones. This an interesting little game within the game that looks like it will provide a lot of extra variety as each of the 6 standard missions could have many variations depending on how this phase goes, and I expect, a bit of scope for skill to gain an advantage in terrain.
Both sides have 3 infantry squads with some support - the Brits have a bit more support as their core force is rated lower. The Germans are in the foreground. Their 3rd squad is off camera moving through the wood on the left. The halftrack carries a small recon team.
The Brits also have 3 infantry squads plus an HMG (in the field on the left) & a Piat (in the field on the right).
The Germans had some initial set backs. Their half track was immobilised by the Piat and the squad in the centre was pulled back to rally after taking effective fire from the Brit HMG. But their squads had greater firepower than the Brit's and they gained the upper hand in the firefights on both flanks. The centre squad was rallied and advanced again to the rear of the village. With their flanks melting away, the Brits made a desperate close assault in the centre, When it failed, they conceded the battle.
The rules are available as a pdf download or hard copy - I have the tablet pdf & Barrie has a hard copy. The game has obvious similarities with Bolt Action. It's the same scale of game and the force lists are very similar, but it is significantly more complex. Both eschew IGOYGO - BA by a drawing coloured dice from a bag to allow units to be actioned 1 at a time, but not strictly each side alternately - COC by a much more complex system of command dice that divide the turns into a variable number of phases each with limited options for activation of units. Both make movement unpredictable - BA by requiring a command test before an action, COC both by limiting command options & by having a dice roll limit move distance. The combat systems in COC are generally more complex and sometimes clumsy compared with BA.
We spent a lot of time looking for rules & it seems a lot harder to find what you're looking for & to learn to play than BA. We often had to give up looking for stuff, just did what seemed reasonable & get on with it. For example, I'm still quite mystified as to how the morale system works. The summary sheets (available as free pdf) lack much of the data you want to look up. I'm not convinced that the extra complexity adds enough depth & interest to compensate for the extra work involved in learning and playing the game. The command system seemed unduly complex and gamey to me - I don't see how it is any better a simulation of command issues than the simpler BA system - it may well provide much scope for skilful play, but it looks more like game skill than war skill. The rules do get a tick for actually having an index, but it's brief and it often failed to point me to an answer to a question.
I think my old brain's only got space for one of BA & COC and at this stage I think I'm going to prefer the simplicity of BA. But one game isn't enough to judge fairly & we'll give it another go. Barrie's going to run another game on Sunday - I'll see how I like playing it.
Tuesday, September 03, 2013
Scottish Civil War
Covernanters: Mike & Steve
v.
Royal Scots: Jim & Chris
700 pts using Hail Cromwell rules (hail Caesar house ruled for renaissance period).
The Royal Scots are on the left in 3 divisions. On their right 2 pike & shot regiments, in the centre a mix of pike, shot, dragoons & horse, on their left highlanders with some dragoons & horse.
The Covernanters have pike & shot divisions on their right & centre, a cavalry division on heir left. They have 2 light guns on the right.
The Royals tried to make a general advance, but allowed their centre to get a bit ahead - for which the lead units suffered before their comrades caught up.
On the far flank the Highlanders are advancing more slowly than their leaders would like. In the centre the musketeers are blasting away. On the near flank, the Royals formed hedgehog to stop the Covernanter horse.
On the far flank the Highlanders did some damage with their first charge, but not enough. Their have steadied & the Highland division has stalled. In the centre, poor command delayed a Royalist pike counterattack. Half the Covernanter horse is doing a caracole while the rest are slowly moving around the Royalist flank.
On the far flank the highland division is hanging on, but is almost all shaken & it loosk only a matter of time before it breaks. In the centre the Royalist pikes finally broke through the Covernanter musketeers, but it happened too late & their centre broke.
With their centre broken & both flanks damaged and outnumbered the Royalists conceded the battle.
It was good to get back to the period after a spell in later periods. We were a bit rusty already, but our house summary sheet soon got us back up to speed. My new bargain Scots looked magnificent, pity about their performance. However I later found that due to administrative error they were deployed a gun and a horse unit short ... maybe significant in a close battle.
Monday, September 02, 2013
Muskets & Tomahawks at Barrie's
Jim's French Canadians v. Barrie's British 400 pts
French objective: Defend the village.
British objective: Slaughter the villagers.
The Brits are coming on the far side. They have 3 elite militia units on the right & 2 Indian units on the left. The French have 2 regular units behind hedges in front of the store (2 storey building) and the whorehouse (on the right) plus Indians on the right, militia on the left. They have another Indian & Militia unit in reserve at the mercy of the dice gods..
Hot fire from the elite militia has decimated the French regulars who have retired into the whorehouse.
The French regulars on the left moved to the right to defend the whorehouse, but suffered the same fate as their comrades & the survivors also retreated to the whorehouse. The Brit militia also drove the French Indians off.
The French Militia on the left retired to the farmhouse as the French reserves finally came up - Indians on the right, militia on the left. The Brit Militia stormed the whorehouse where the French survivors were holed up. They killed the French at the door & windows and rushed in to dispose of the ladies. The undefended store also fell as the Brit Indians advanced on that flank.
The French were now just playing for time hoping the End-The-Game dice would happen before they were over-run. It didn't happen. Their remaining Indians ran away due to army morale and the Brit Militia stormed the farmhouse to complete the British win.
Subscribe to:
Posts (Atom)