Tuesday, April 30, 2019

Rome v. Pyrrhus with Hail Hannibal

Two weeks ago we fought Rome v. Pyrrhus using straight Hail Caesar.  This week we used basically the same armies but Hail Hannibal for rules - that is our ancient subset of Hail Whoever, our house ruled extension of Hail Caesar up to 1990AD.
In comparing the troops stats for the two rules sets I realised that I had made a mistake & Pyrrhus was outnumbered in points by about 30% in both systems.   Even so, last time Pyrrhus managed a Pryrrhic victory.
This time, Mark commands the Pyrrhic left opposite Chris.  Mike commands the Pyrrhic right v. Jim.
Pyrrhus holds his heavy infantry centre back while advancing his cavalry & elephants.  The Romans make a steady advance with their legions, echeloning cavalry & triari back to protect their flanks.
On the near flank the Roman cavalry is being smashed by the larger Pyrrhic cavalry units & the elephants are giving the LH legion a very hard time.  On the far flank Pyrrhus' cavalrys attempt to go around the Roman flank  is being hampered by bad command dice.
The Roman cavalry on this flank has been broken.  The LH end of the nearest legion has some success, but the elephants & Galacians broke thru their other flank & the legion is about to break. Things are looking grim for Rome, but they havn't given up - the centre legion has moved their Principes forward & deployed their Hastasi & Triari to their left.
While the LH legion has been broken, they inflicted a lot of casualties & the counterattack from the centre legion has got the mixed division of Galacians & elephants verging on breaking.  On the far flank Pyrrhus' other cavalry division is taking a long time manoeuvering around the Triari.  In the centre, the centre legion's Principes have smashed thru the enemy's centre.   
The last of the Galcians & elephants are broken & about to be removed.  Triari are coming up to try & hold off the cavalry on this flank.  On the far flank, the Triari are finally outflanked, but it's their turn & they a chance to reface.  In the centre the Pyrrhus' remaining infantry is looking vulnerable against the line of Principes. 
The Triari on both flanks are still holding on as Pyrrhus's remaining infantry desperately hold on against the tide of legionaries.
Pyrhus' foot is hanging on, but giving ground & relying on hot break test dice to hang on.  The Triari are still holding on desperately on both flanks.
The cavalry have finally broken thru the Triari, but it's too late, Pyrrhus has lost all 3 infnatry divisions & thus fails his army break test.

The battle looked like a Pyrrhic walkover after the Roman left flank was destroyed by cavalry & elephants, but the Romans kept their nerve & eventually their points told & the tide turned.

The pair of Hail Caesar & Hail Hannibal battles had very different results, but that difference was due to better tactics & maybe a bit of better luck by the winners in each case. The tactical play of the game was little different, which is hardly surprising as the basic systems are the same.  But the Hail Hannibal version took 1 3/4 hours, the Hail Cesar version took 2 3/4 hours.   The difference coming from Hail Hannibal not having saving throws (less dice to hit instead) & having rules making it harder for shaken troops to hang on if kept under pressure.

Sunday, April 28, 2019

Sunday Cruel Seas

A flotilla of 2 Farmiles & 4 Vespers intercepted a convoy of 2 coastal freighters with an escort of a Minesweeper & 4 E-boats.  Jim v. Chris.
We overdid the table size a bit & sped up the first few turns by simply moving all the boats simultaneously.
The E-boats move out ahead to intercept the Brits before they get into torp range of the convoy. 
A Fairmile & a Vesper have slipped past the bloody melee between the islands.
The big ships are dodging torpedoes as small boats of both sides are mutually destroying each other.  The Minesweeper escaped the torps but the Farmile sunk her with gun fire.
The last E-boat had doubled back to intercept the last 2 Brit boats & got the Vesper.
But the Farmile got the E-boat leaving the freighters with only their own machine guns for their defence.
The Farmile was caught between the island & the Tankers & couldn't get out of machine gun range & had to slug it out.  It's guns inflicted serious damage on both ships, but it had already been damaged in its succesfull attack on the minesweeper & the merchantmen's machine guns finished her off.

The freighters are the only survivors so the Germans have won.  The death rate may have been unrealistic but it was a rattling good game.    

Tuesday, April 23, 2019

Hail Caesar: Pyrrhus v. Rome

Mike had finished a Pyrrhic army so we got out some Romans to give them a run.
We also decided to use straight Hail Caesar for a change.
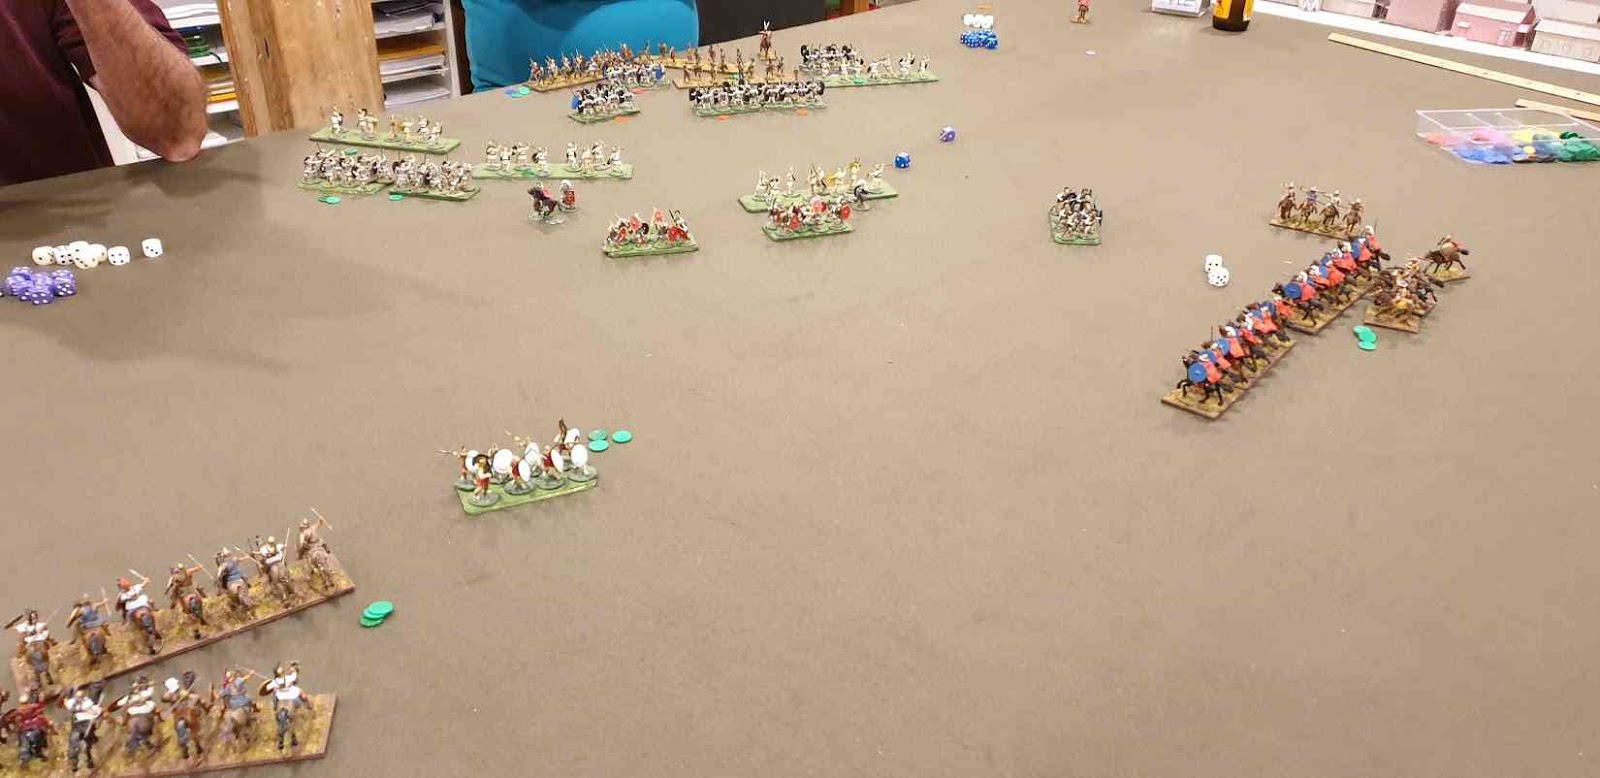
The Romans (on the left) have a small cavalry division of 2 medium & 2 light & 3 legions, each of 2 Velites, 6 Hastasi/Principes & 2 Triarii, all small units.  Divisional command 9, CIC 7.  Army break test: break on losing 2 infantry divisions.
Pyrrhus on the right has 2 cavalry divisions, 2 divisions of 2 slinger, 2 spearmen & 2 light infantry & a division of 2 elphants & 2 Galatian warbands.  Command 8.  Army break test: lose 3 of 5 divisions.
On the near flank the Roman cavalry dashed forward & took out a cavalry unit before bouncing back off the 2nd line to form a line with their supporting infantry.
On the far flank Pyrrhus' cavalry advance is held back by poor command dice.
The central legion has advanced ahead of the other two.
The Pyrrhic commander on the left saw that the Roman advance in the centre had exposed their flank & charged their flank with his elephants.
On the far flank the Roman legion is held up in its advance by the Pyrrhic cavalry.
The Roman centre is still desperately hanging on despite being attacked front & flank.
On the near flank the Romans are advancing cautiously.
On the far flank the cavalry have finally got past the Triari, but the Principes & Hastasti have attacked the enemy infantry before the cavalry can get to them.
In the centre the Romans are still hanging on.
On the near flank the Galacians were scattered by the Roman foot & the elephants broke with them.  The Pyrrhic cavalry on the near flank has beaten off another cavalry attack.
The Roman centre has finally collapsed, but the Pyrrhic foot there is under great pressure.
The Pyrrhic horse on the far flank has arrived too late to save the RH Pyrrhic infantry, but has hit the Roman foot before they could regroup.
The battle should have ended when the Pyrrhic cavalry hit the Roman foot in rear, but hot dice saved the division & the cavalry have been beaten off.
Then it should have ended by the LH Pyrrhic infantry breaking, but they too hung on against the odds.
The Pyrrhic cavalry on the right charged again, but were again repulsed.
The Pyrrhic foot in the centre fell back on half strength, but the Romans were too shaken to follow up & finish them off.
Finally a double or nothing charge by the last fresh Pyrrhic infantry unit got lucky & took out a cohort to break the Romans on the far flank & give Pyrrhis a ... Pyrrhic victory.

It's been a while since we played Hail Caesar straight by the book.  I was reminded why we developed Hail Whoever even though HC is a rattling good game:  HC has a great basic structure but we think it has a number of flaws we have house ruled out, such as:
- Troop characteristics are too dominant relevant to tactical factors.
- It's too easy for shaken units to hang on & on leading to indecisive end games.
- Saving throws slow the game down.


Wednesday, April 17, 2019

Poles v. Ottomans

A couple of months ago we did a Poles v. Ottoman battle that was a decisive win for the Poles.  Tonight we used the same forces but gave the Ottomans more defensive terrain.
The Ottomans (Mike, Leigh & Chris) deployed first - behind the river.  They put their 2 heavy cavalry brigades & swarm of light horse on rising ground on their left & their 3 infantry brigades on their right.
The Poles (Jim, Steve & John) then deployed 27" away from the river.  3 cavalry brigades on their right, 3 infantry brigades on their left.
 The Polish cavalry is advancing rapidly but their infantry is being delayed by poor command dice.
The Polish cavalry charge up the hill driving back the cloud of skirmishers, but the Ottoman cavalry with an uphill advantage augmented by hot dice are no push-over.
Casualties are high in the cavalry fight, but the Ottomans are gaining the upper hand.  Meanwhile poor command dice has continued to hamper the Polish foot.  Their slow advance allowed the artillery to inflict significant damage before the Polish musketeers could shake them. The Jannisaries then advanced past the shaken gunners to the river line.
The end is nigh for the Polish horse.
The Polish pikes have finally charged across the river.
All 3 Polish cavalry brigades have been broken while the Ottomans lost only 1 of their heavy cavalry brigades.  Their foot had some success near the village, but the attack on the left went nowhere.  The brigade attacking the Janisiaries has also broken & the Poles have failed their Army Break Test.

It was a very different result to last time with these armies.  The terrain, good tactics & a bit of luck gave them a crushing victory this time.

Monday, April 15, 2019

Sunday Tank Wars

Germans (Chris): 1 Tiger, 4 MkIV, 2 truckloads of Panzergenadiers.
Brits (Nick & Jim): 2 Cromwells, 2 Shermans, 1 Firefly, 1M10, jeep with PIAT team, 2 truckloads of vets.
Tank wars scenario with 7 objectives on a 12'x6' table fought lengthwise with a turn 0 where units were deployed in a 24" deep deployment zones at their end of the table.  1,750 pts each.
The Germans at the far end have Tiger & a MkIV on the hill commanding a lot of ground, 3 MkIVs on their left & infantry in trucks on the road.
The Brits have infantry, PIAT & M10 on the left & the rest on their right.
The Panzergrens have seized the 2nd bridge.  The Brits have put one infantry section in the village & the other is in the woods on the left.
The 2nd Panzergren section has moved up onto the ridge on the left to seize that objective.   The M10 & Firefly are trying to pin down the Tiger  firing at long range from cover.  MkIV's, Shermans & Cromwells are trading blows at long range without much effect.  The Panzergrens on the bridge are pinned down by fire from infantry in the village & tank mgs.
The Tiger took out the Firefly, a MkIV got a Sherman& the PIAT took out the MkIV on the left, but the infantry decided the battle.   At the start of turn 7 the Germans held 4 objectives, the Brits 2 & 1 was not taken.  In turn 7 both Panzergren units were charged after been worn down by fire & broken in hand to hand combat.  The un-taken objective on the right was disputed by tanks of both sides so the Brits won 4 to 2.

Wednesday, April 10, 2019

Napoleonic: French v. Austrians

Following the relocation of my wargames space I have made removable extensions to the wargames table to allow it to be expanded in various ways to fully utilise the extra space available.  Tonight it was set up 14' long x 6' wide with a 6'x4' extension on one side to give room for manoeuvre for a Napoleonic scenario.  Rules: Hail Napoleon.
A Landwher division of 6 Landwher, 1 yeger & 2 guns is deployed defending a village at a vital road junction & river crossing (on the right).
A French corps of 2 infantry divisions each 5 line, 1 light & 1 gun & a cavalry division of 2 dragoon, 2 hussar & 2 chasseur is muching down the table to attack them.
A relief column is coming up from the left.  It comprises an infantry division of 6 line, 1 grenadier & 1 gun & a cavalry divsion of 4 dragoons.
The Austrians got the first turn & the relief columns are advancing rapidly.  The 1st French infantry has deployed to their left & is preparing to attack.  The French cavalry has had their plans compromised by poor command dice. 
The chaseurs have forced the head of the Austrian infantry column to deploy into square while the hussars face the Austrian dragoons.  The 1st French infantry are deploying in attack columns with skirmishers in front.
The French infantry have broken the front line of the Landwher right but some of theri columns have been delayed by disrution by artillery fire artillery despite the skirmish screen. 
The French cavalry has failed every morale test they took & have been broken by the Austrian dragoons exposing the right flank of the French infantry.
The French infantry have broken the second line of Landwher but the Austrian grenadiers have reached the village & are counterattacking the victorious columns.
A square is protecting the French right but is being pounded by artillery.  The 1st French infantry's attack on the village is grinding to a halt as the landwher stubbornly hold on in the field & the grenadiers have stopped the advance on the French left.
The grenadier shave been driven back by skirmish fire, but have done enough to stabilise the landwher's position.  The 1st French are close to breaking point. The Landher are battered but the 2nd French attack is not breaking through & the Austrian line infantry is now in a position to support them & take over should they break.  The French concede the battle.

Sunday, April 07, 2019

Sunday school: Bolt Action & Cruel Seas

Now the wargames space has expanded we have room for multiple tables & 3 games at once.


Bolt Action: Sean's Italians v. Chris' Brits in the Desert: Sectors Scenario:


The Italians won comfortably.

Bolt Action: SteveD's Volkstruum v. Mark's Soviets:

It turned into a turkey shoot & a big win for the Soviets.


Cruel Seas:  Jim's Brits v. Matthew's Germans:

4 E-boats (on the left) are about to attack a convoy of 2 merchantmen escorted by an armed trawler as 4 MTBs race to the rescue.

 The Germans lost two E-boats, but they sunk both merchantmen & 1 MTB to claim victory.