Saturday, December 31, 2022

WWI Cruisers

 Germany (Jim): von der Tann, 3CA, 3CL, 4x2DD
Britain (Chris): Inflexible, Indominable, 2CA, 3CL & 4x2DD
Rules: Dreadnaughts house rules.
Ships: 1:1,500 3D Printed. 

The Germans are in the foreground.
Both sides adjust the position of their DDs as the bigger ships steam forwards.
The British CAs & BCs turn towards the enemy to close the range.  The Germans maintain course.
The first losses are some of the British DDs who ventured too close to many enemy light & heavt cruisers.  The von der Tann has ranged in on Indominable & CA Blucher on CA Black Prince.  Black Prince has ranged in on Blucher, but has her T crossed.
CA Black Prince goes down under the concentrated fire of 3 German CAs. von der Tann & Indominable are ranged in on each other, but Indominable has her T crossed & getting the worst of it.
Von der Tann changes targets to Inflexible leaving CA  to finish off Inflexible.  The other German CAs sink the CA Duke of Edinborough.  The British LC sink some German DDs, but small compensation for their losses elsewhere.
The Inflexible is doomed & goes down in hail of fire from von der Tann & 3 CAs.  She didn'rtsurvive long enough to worry about the torpedoes the DDs have put in the water (directions hidden under blue cards).  The British LCs & remaining DDs run for home.

A crushing German victory with 2BC, 2CA & 2x2DD sunk for the loss of 2x2DD. 
The Germans out maneuvered the British & crossed their T as well as being blessed with some good dice in the right places.

Tuesday, December 27, 2022

WWII Desert War

Afrika Korps: Jim & SteveD. Troops Confident Vets. 
British: Chris.  Troops Confident trained.
House rules. 15mm figs 10'x6' table.
Scenario: Prime objective: Break the enemy army.
                Second objective:  If no one achieves the Prime Objective: Take the village.

The Brits are on the near side of the table after deployment platoon by platoon BA style.

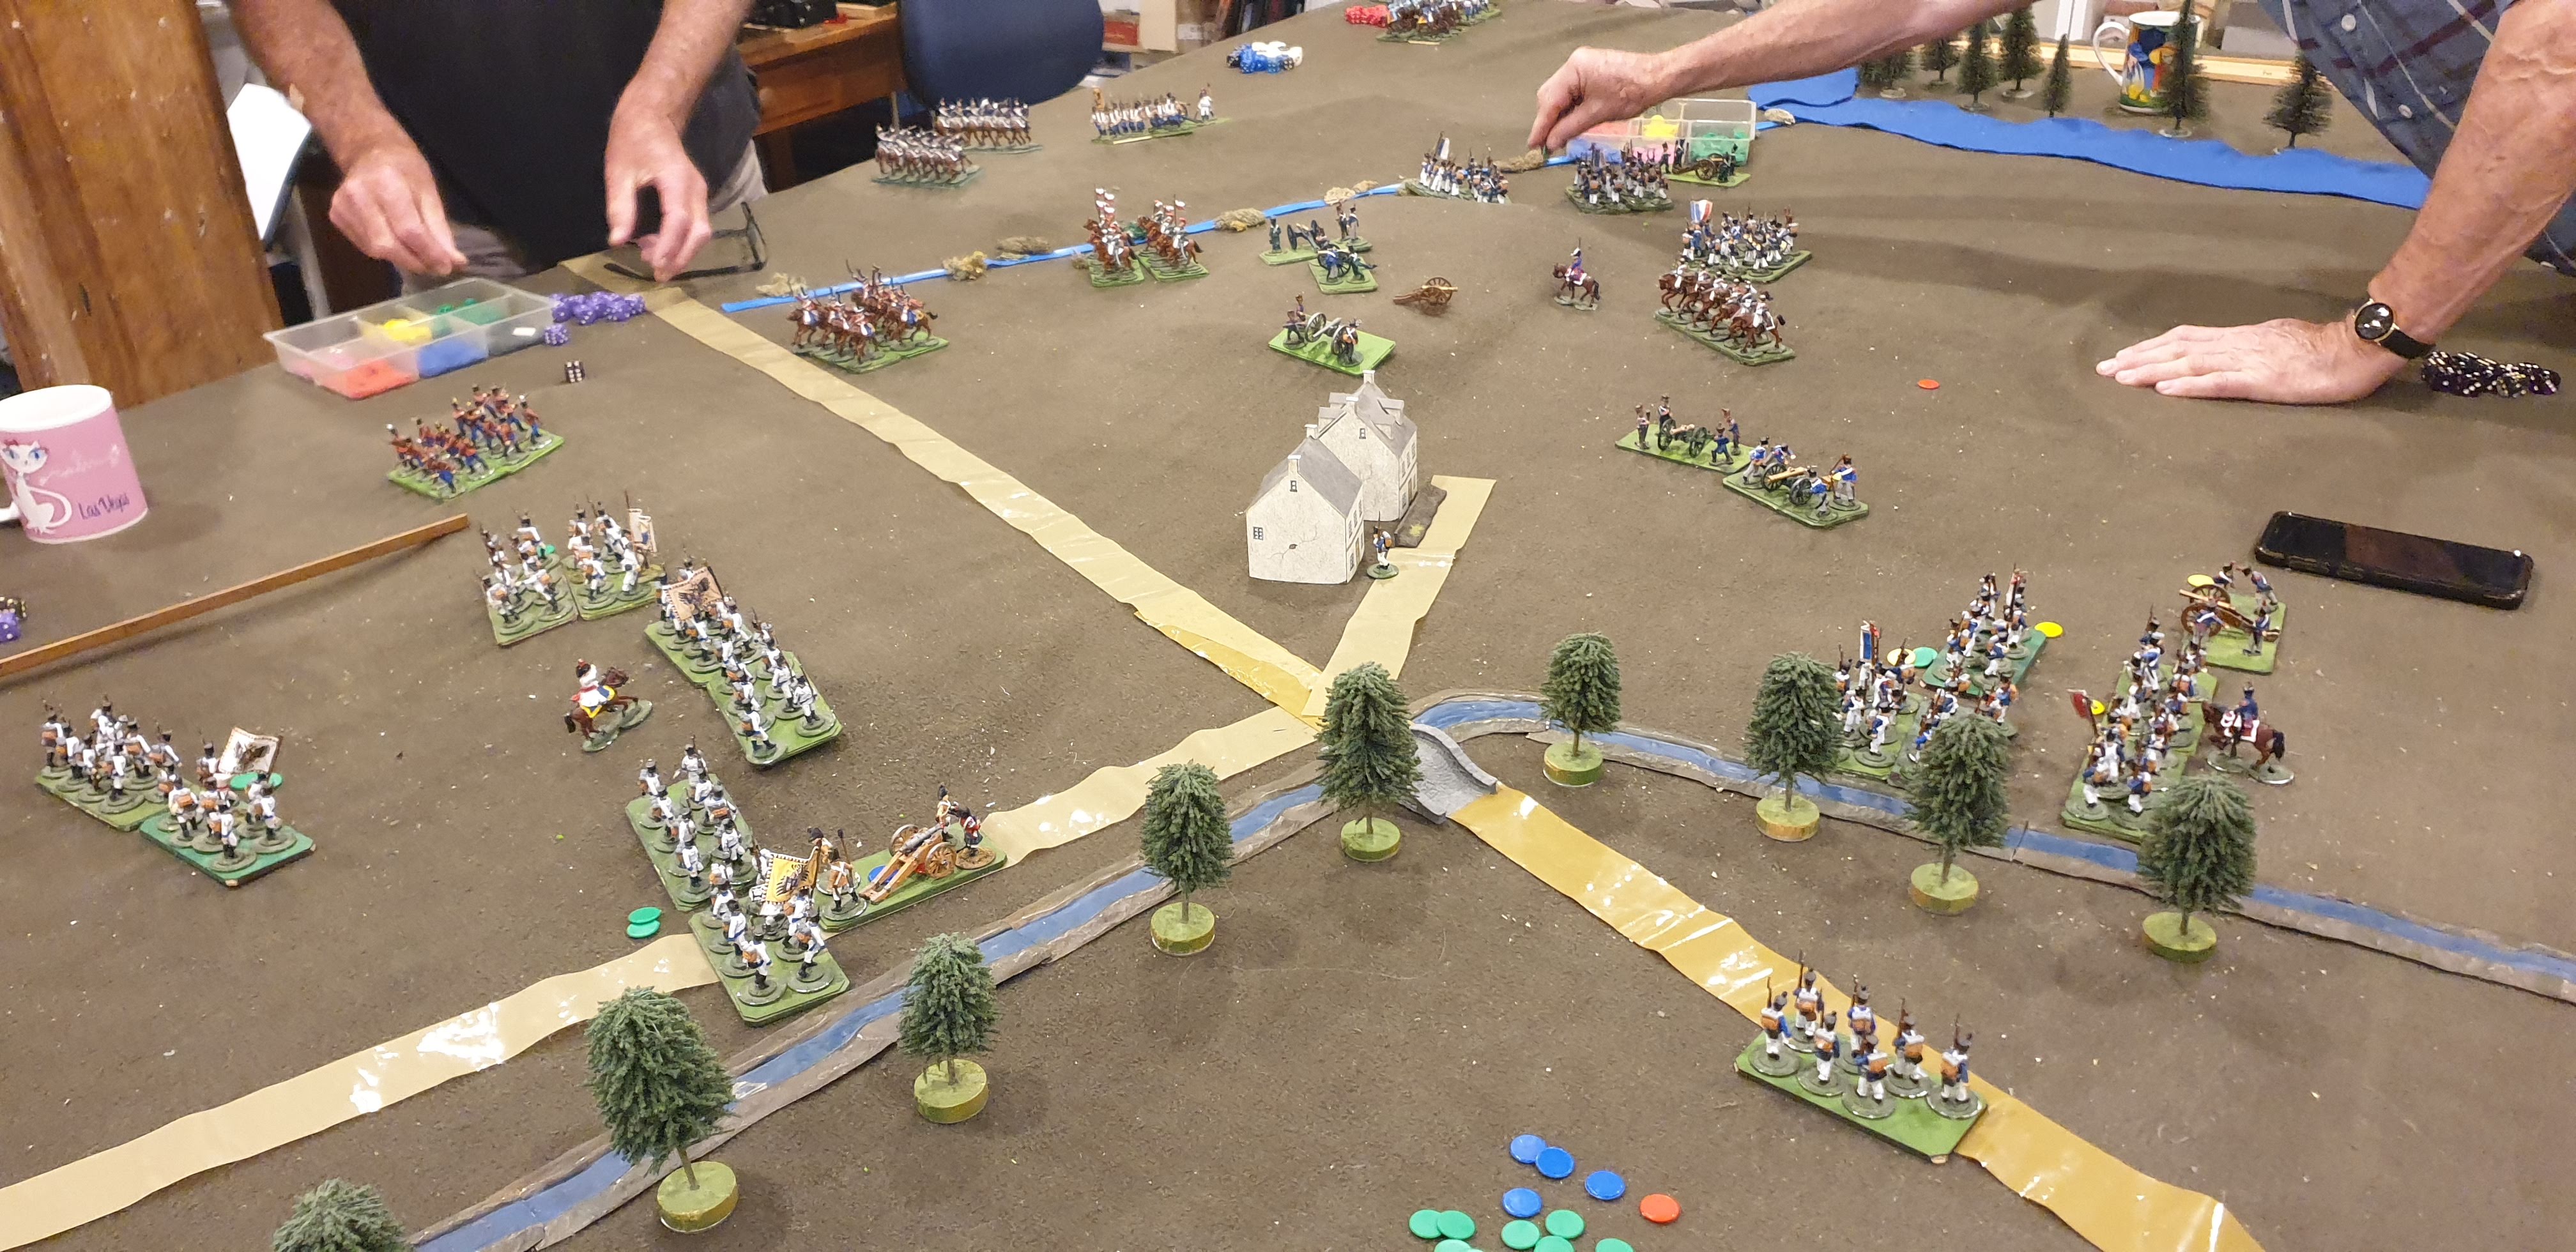
The Germans have concentrated their infantry to advance thru the palm plantations towards the village. The British have two platoon deploying out of trucks into the village.  Their 3rd infantry platoon is still in its trucks in reserve. 
The Brits have one 25pdr battery on the ridge on their right.  Another battery was deplyed on their left but is being moved to the centre.
The German light howitzer battery is on the plateau on their right, currently laying smoke to screen the 25pdr battery.
The German Pak38 battery is being deployed in the palm trees in the centre. 
On the far Flank 3 Crusaders & 3 Matildas are advancing on the German left.  5 MkIII* & 3 MkIV are moving to meet them. 
The Germans have sent 2 MkIII to their right flank to counter 3 Crusaders heading that way.
The Infantry are exchanging fire in & around the village. 
The Brits have deployed their 2nd 25pdr battery on the central ridge to engage the Paks.
On the far flanks the Panzers are getting the better of the tank
One British infantry platoon has been broken, another is below half strength & shaken, but they are being reinforced by the 3rd platoon and 4 bugs. 
On the far flank the panzers have won the tank fight.  The 2 surviving British tanks are retreaing while the panzers are moving back towards the centre.
The Germans have now lost an infantry platoon, but the other 2 are in good shape & the Brits only have 1 infantry platoon left.
The Brits have finally advanced their tanks in the centre against the Paks after reducing them to two by artillery fire.   But it's too late as the panzers are moving into a position to counter them & the last of the British infantry have been broken by Hitler's buzzsaws.
The British force isn't yet broken, but the Germans have the village & they have no way of re-taking it.  The Brits concede defeat. 


Friday, December 23, 2022

WWI Naval: Dogger bank variant

The scenario is based on Dogger Bank, but the OOBs varied to make it a more balanced scenario - more interesting than the real thing which was a simple matter of the Germans trying to get away from a superior force.

The British fleet is as Dogger bank, except we cut down the no. of DDs.
The German fleet is as Dogger bank plus von der Tann & some extra CLs.  DD's also cut back.

Both sides started in 3 columns on convergent courses.  Each with a BC column in the centre & a column of CL & DD on each flank in front. The Brits are on the left.  The Germans have begun manouvering to close the range with their BCs with their LCs & DDs out on front giving them a clear line of fire on the British BCs (still out of range, but closing).
The Brits have also turned onto converging courses.
The lead BCs are exchanging ranging shots, but no hit yet.

The lead DD squadrons are exchanging 4" gun fire.
The blue cards hide British torpedoes (left hidden at their launch spots until after the Germans have had a move).
The lead CL squadrons are exchanging 6" shells.
The Derfflinger has ranged in on Lion, but no hits yet.
The lead German DD squadron has turned away to allow their CLs to deal with the enemy DDs.
The German CLs held their course under torpedo attack but were fortunate to get away with just one ship hit, but not fatally.
The 3 leading German BC have now got the range & Lion & Tiger are copping pounding.
Only the Tiger managed to range in, then lost the range before doing any damage. 
The German CL damaged by torpedoes has been sunk by CL fire.
The lead british DD squadron is being pounded by the German CLs.
The Molke has lost the range on Princes Royal, but Derfflinger & Seydlitz are pounding Lion & Tiger.
The Lion & Tiger hare both sinking under the accurate salvoes from Derfflinger & Seylitze.
The leading British DD squadron has been sunk.

The British concede the battle & turn away laying smoke.
British losses: 2BC & 6DD.
German Loses: 1LC.
The German BC's advantage in range finding was amplified by better dice.  The Germans BCs sunk 2 BCs without taking a hit.


Tuesday, December 20, 2022

Dresden 1813 Western Flank

At Dresden Napoleon faced 120,000 Russians & 170,000 Austrians with 120,000 men.  Over night after the first day he utilised interior lines to support Victor's Corps on his right flank with Latour-Maurburg's cavalry.  Murat then had 35,000 men facing the Austrian 3rd Corps of 24,000 men, cut off from the main Austrian army by a flooded stream.  In the pouring rain, muskets were hardly half effective, the superior  numbers of French cavalry forced the Austrian infantry into square & blew them apart with their horse artillery.  Meanwhile Napoleon held off the rest of the Allied armies the outskirts of the city.  The 3rd Austrian Corps was destroyed & the Allied withdrew.

The battlefield was scales at 0.5m to 1km rather than the true scale of the rules of 1m per km & the no. of battalions halved.  This made the action the right size to fight in a night. 
Rules: House Rules M2M. 
Figures 28mm.
French: SteveD, Mike & SteveJ.  Austrian: Mitch & Chris.  

The Austrian are deployed on the left, with Victor's first Division at the table edge at the start of play.
Victors other 2 divisons & Latour-M's cavalry are now on the table.
The French suffer significant casualties from the Austrian batteries as they push forward in the rain.
The French are attacking the centre of the Austrian line with infantry & cavalry & have set a battery to support an attack on the village.
The French are making hard work of their attack on the village with their artillery fire failing to find nay decent dice.  Their cavalry have broken the line on the central ridge & are now fighting the second line on the far slope.
The French attack on the village has taken one house, but has run of steam.  The Auustrian behind the village are withdrawing to a new line on the ridge behind.  On the central ridge French artillery is steadly reducing the last Austrian squares.
The French have given up the attack on the village after their force on this flank was reduced below half strength.  French cavalry have broken thru the Austrian centre leaving the artillery to mop up the last squares. On the far flank the French have finally crossed teh creek after the Austrian hussars on the far back had to withdraw to avoid being flanked.
At the scheduled end of battle time the French have mopped up the Austrian right, but the Austrian left has beaten of the French infantry & formed a new defensive line.

The French have won the ground & won the battle, but the Austrian players can claim victory as they did much better than the original Austrians. 


Saturday, December 17, 2022

Napoleonic Naval

A small action to try out some new rules ideas.  In particular, testing out the IGOUGO limited by with command counters placed in your previous turn.  We invented for Dreadnaughts, where it worked so well we wanted to see if it would work as well for Men o' War.

Mark: 2 squadrons of French with regular crews, each 1 1st rate & 3 3rd rates.
Jim: 2 squadrons of Brits with elite crews, each 1 2nd rate, 2 3nd rates.

The French have both squadrons in line ahead with the wind abeam  form their Port side.
The British squadrons are separated one up wind & one downwind.
The Brits tied to combine their fleets, but misjudged & the French engaged the windward British squadron before the the leeward one could get within range.
The British flagship has coped a pounding as each Frog ship passes it.
The lead British ships have been so pounded they have struck their colours.  The lead French ships have changed broadsides to engage the leeward British squadron.
The 3rd British ship in the 1st squadron has struck its colours while the 2nd has floundered.  The 2nd British squadron is being so pounded by all 6 French ships, the lead ship has struck its colours & the other two have turned away to try a escape. A move that exposed them to so much raking fire that they too stuck their colours.

So we had the rarest of rare events:  A totally decisive French naval victory.  The Brits miscalculated their course at the start & as we've seen before, it's hard to recover from a bad position in linear naval warfare.  They should have conceded the weather gauge to combine their squadrons before engaging the French.

The proposed rules changes we were testing worked out well & will be adopted.


Tuesday, December 13, 2022

WWI Naval

Germans (Steve & Mike): 1BC (von der Tan), 4 CA, 4 LC, 8DD.
British Mark & Chris): 3 BC (Invincibles), 2CA, 4LC, 8 DD.
Rules: House rules Dreadnaughts.
Models: 1:1500 3D printed. 

The British are in the foreground. BC's in the right column.  DD's in front.
The Germans have DDs in front, von der Tann leads the centre column with Blucher 2nd.  LC's  on their right, CA's behind their left.
The concentrated German DDs are blasting the lead British DD's. The lead british CA is getting pounded by von der Tann.  
Two British BC's are exchanging salvoes with von der Tann & Blucher.  The third one has sunk the lead German CA.  The German DD's first salvo of torps are going to miss.
A second salvo of torps from the German DD's has sunk the 2nd British CA & the Blucher has sunk Invincible.
The Blucher & a German CA have sunk, but the von derv Tann has put down Indominable.  The British CL's have their T crossed & the lead CL has been blow away has been blown away. 
The British CLs turn away laying smoke & the Brits run for home. 

German losses: 3CA & 6DD.
British losses; 2BC, 2CA, 1CL & 4DD.
The Germans won because:
1, The Germans got more value from their DD's
2. The British failed to capitalise on the range advantage of their 12" guns.
3. The Germans partially crossed the British T.


Tuesday, December 06, 2022

Modder Fokkers: WWI Air

Game 1:
Germans: 2 Albatross (Mike & Mark )
British: Nieuport VII (Chris), Pup (Renfrey), RE8 (Jim)

The Albatri are on the tail of the RE8, but the cavalry are coming from the right of pic.
The RE8 got away as the Albatri turned to face the fighters, but the Nieuport got on the tail of Mike's Albatros at point blank range & blew it away.  Mark ran for the German lines with the fighters chasing him.  The RE8 tried to intercept, but the Albatross shot it down & escaped anyway.

Both sides lost 1 plane, but as an observation plane is more valuable than a fighter it was deemed a marginal German victory.

Game 2:
2 Fokker DVII (Chris & Renfrey) v. 2 Camels (Mark & Mike).
The Camels got the upper hand in the initial dogfight which broke up with both Fokkers with significant damage, Renfrey on the German side of the Camels & Chris on the other,
Renfrey ran for home with 2 camels chasing him, but reached the protection of Archie at the German table edge & got away.  The Camels turned to intercept Chris as he tried to get past them.  

Mike managed to get right on Chris' tail & shot him down.
A clear British victory this time with one Fokker shot down & the other forced to flee.


Sunday, December 04, 2022

WWI Cruiser Battle

Germans: BC Von der Tan, CAs Blucher, Scharnhorst, Gniesnau & Roon, 3CLs & 6 DDs. (Jim)
British: BCs Indominable & Invincible, 3CAs, 3CLs, 6 DDs (Chris)
Ships 3D printed 1: 1500.  Rules: House Rules Dreadnaughts.

The Germans are at the far end.  The DDs out front are within sight of each other.  
The Brits sail forward with only small course changes to avoid islands, with CA on the left, BC in the centre & CL on their right.
The Germans are re-ordering their squadrons, to match the British with like on like, sending the CAs to the right & bringing their CLs to wards their left.
The BC's are firing ranging salvos over the German CLs, but so far without success.  
In the foreground the German CLs have got in front of the von der Tann & Blucher to engaged the British CL & DD.  In the centre the Bulcher is the first ship to range in (on Invincible). The German CA are engaging the British BCs.
The LC action is going in favour of the Germans.  Most of the Brit DDs have been sunk though they did inflict serious damage on one CL. 
The German CAs have suffered heavy damage from the British BCs.
The Blucher's 8" guns have sunk the Invincible with a flurry of 6's, but  von der Tann hasn't hit anything yet.

The German DDs have sunk a CL with their 1st salvo of torpedos & the rest of the squadron is running away from a second salvo - without success as a 2nd CL is sunk by it.  
The CA Roon has been sunk by Indominable, but the Brits have had enough & Idominable & the Brit CAs lay smoke & runs for home.
The Germans have lost only the obsolete CA Roon.
The Brits have lose BC Invincible, 2 CLs & 4 DDs.

Tuesday, November 29, 2022

Napoleonic naval:

British: Mark, Chris & SteveJ - one squadron each. 12 ships with elite crews
French: Mike, Jim & Renfrey - 1 squadron each. 12 ships with regular crews, one Spanish 1st rate with inexperienced crew.
The French & Spanish have more bigger ships to make up for crew quality.
House rules.  Ships & bases are 3D printed.
The battle is set in the Caribbean.  Both sides' fleets have been scattered in a storm & are regrouping in a sheltered strait with scattered islands & sand banks.  The wind is blowing across the strait so the Brits have it from starboard & the French from port.  

The French are on the right.
The forward (3rd & weakest) British squadron on the far side of the table has tacked & is sailing away from the 3rd & 2nd French squadrons.  The 1st & 2nd British squadrons are sailing up the centre of the straight.  The 1st & strongest French squadron is sailing up the windward side of the strait to get the weather guage.
The British 3rd squadron is wearing ship while their other 2 squadrons turn downwind towards the 3rd French squadron.
The 3rd French & 2nd British are passing each other starboard to starboard. 
The French 3rd squadron has passed the British 2nd & is now passing the British 3rd port to port.  The French 2nd squadron is passing the British 1st port to port.  
The British 1st & 2nd squadrons had double shotted their guns & got the better of the exchange of fire of the passing squadrons.  The French 1st is finally in action but only partly & at long range.
The French 3rd squadron has two ships too badly damaged to stay in the fight & the 2nd squadron has one.  Both squadrons are passed the British & reluctant to rejoin the fray.  The French 1st is bearing down on the British 3rd hoping to finish some damaged ships before the other British squadrons can wear ship & rejoin the fight.
The French 1st squadron turns away hoping to sink the British ship on the end of the line, but though badly damaged it stays afloat.

The French are content to have got past the British with no ships sunk.  The British claim victory as the French have sailed away from them, but with no prizes it's a pretty poor victory.

The Brits did better in selecting their ammo at the start, inflicting significant casualties by have a  lot of double shotted first broadsides.  The French 1st squadron sailed too high & was out of the acy=tion for too long.  These two factors gave the Brits just enough advantage to persuade the French to break off when they had the chance to do so.