Tuesday, November 29, 2022

Napoleonic naval:

British: Mark, Chris & SteveJ - one squadron each. 12 ships with elite crews
French: Mike, Jim & Renfrey - 1 squadron each. 12 ships with regular crews, one Spanish 1st rate with inexperienced crew.
The French & Spanish have more bigger ships to make up for crew quality.
House rules.  Ships & bases are 3D printed.
The battle is set in the Caribbean.  Both sides' fleets have been scattered in a storm & are regrouping in a sheltered strait with scattered islands & sand banks.  The wind is blowing across the strait so the Brits have it from starboard & the French from port.  

The French are on the right.
The forward (3rd & weakest) British squadron on the far side of the table has tacked & is sailing away from the 3rd & 2nd French squadrons.  The 1st & 2nd British squadrons are sailing up the centre of the straight.  The 1st & strongest French squadron is sailing up the windward side of the strait to get the weather guage.
The British 3rd squadron is wearing ship while their other 2 squadrons turn downwind towards the 3rd French squadron.
The 3rd French & 2nd British are passing each other starboard to starboard. 
The French 3rd squadron has passed the British 2nd & is now passing the British 3rd port to port.  The French 2nd squadron is passing the British 1st port to port.  
The British 1st & 2nd squadrons had double shotted their guns & got the better of the exchange of fire of the passing squadrons.  The French 1st is finally in action but only partly & at long range.
The French 3rd squadron has two ships too badly damaged to stay in the fight & the 2nd squadron has one.  Both squadrons are passed the British & reluctant to rejoin the fray.  The French 1st is bearing down on the British 3rd hoping to finish some damaged ships before the other British squadrons can wear ship & rejoin the fight.
The French 1st squadron turns away hoping to sink the British ship on the end of the line, but though badly damaged it stays afloat.

The French are content to have got past the British with no ships sunk.  The British claim victory as the French have sailed away from them, but with no prizes it's a pretty poor victory.

The Brits did better in selecting their ammo at the start, inflicting significant casualties by have a  lot of double shotted first broadsides.  The French 1st squadron sailed too high & was out of the acy=tion for too long.  These two factors gave the Brits just enough advantage to persuade the French to break off when they had the chance to do so.


Tuesday, November 22, 2022

30 Years War: The Empire v. the Swedes

Empire: Chris, Mike, Mitch & Renfrey.
Swedes: Mark, Jim & SteveJ
28mm figs, house rules.

The Swedes are on the right with musketeers in the farm on the near flank, Cavalry in the centre & pike & shot on the far flank.
The Empire has all their cavalry on the far flank, heavy infantry Lanschnecks in the centre & medium pike & shot on the near flank.
Initally the Empire advances their left & centre.  The Swedes advance part fo their cavalry on their left.
On the far flank the Swedish infnatry have advanced & ben charged by Empire horse.  Some of the Empire's horse have crossed the river on a flanking manoeuvre.  
In the centre the Lanschnecks have deployed on the reverse slope of the ridge.
On the near flank the Swedish muskteers have formed column & are msrching towards the centre behind the cavalry.  Part of teh Sedish cavalry have been detached to support the far flank.
On the near flank some of the Swedish cavalry have charged the advancing pike & shot.
On the far flank the Empire cavalry are making bo progress against the swedish pike & shot.
On the near flank the Swedish cavalry have fallen back.
In the centre the Swedish musketeers have deployed .
On the far flank the Empire cavalry have fallen back. 
The Lanschnecks are advancing on the  weak Swedish centre as the Swedes move infnatry from the right & cavalry from the left to strengthen it.
On the near flank, the Swedish cavalry continue to fall back from the Empire's pike & shot.
In the centre the Lanschnecks charged up the hill, the Swedish gunners ran away, the Swedish cavlry countercharged the pike & shot while they were disordered, broke them & charged on to take out the Empire]s guns on the other ridge.
The Swedish cavalry continue their retreat on the near flank.
In their centre the Swedes are cobbling togther a defensive line on the ridge.
The far flank is a stalemate with pike & shot v cavalry. 
The Swedes have consolidated into a defensive line.  Most of the front is cavalry v. pike & shot.  Casualties are about equal with neither left with enough fresh units to mount a serious attack.  Dusk is approaching (the kettle's on), so both sides agreed it was a draw.

The intial deployment with cavalry facing pike & shot on opposite flanks made an interesting conundrum for both sides.  The Empire nearly broke thru the Swedes' centre but the Swedes had a cavalry reserve blessed with good dice that saved the day there. 
 
.   


Sunday, November 20, 2022

WWII: Germans v. US mechanised.

Sunday school veterans of Cambridge Road in the '70's.  We used similar armies as a fortnight ago but with a different scenario.  This time an encounter battle with a 24' no mans land diagonally across the table & simultaneous map deployment. US: Jim & Chris.  Germans: Mark & Renfrey. 

The US are on the near side with their infantry in half tracks behind the village supported by 2 Honeys & their armour on the more open ground on their right.
The Germans have deployed their infantry & antitank guns on their right side of the table where they have depth & more terrain. They have tank platoon behind each flank. 
The US armour is trying to sweep around the German left flank.  So far they have suffered losses from the MkIVs behind the wood & antitank guns on the left flank.  The US have taken out the Pak in the woods but so far failed to hurt the MkIVs.
On the other flank the US infantry have dug in behind the orchard as Panzergrenadiers & MkIVs converge on their flank.
The US armour continue to advance & fire at the MkIVs but are losing tanks for little reward.
On the other flank, the GI's repelled the first German infantry assault thru the orchard, but have MkIVs swarming behind them.
The two Sherman platoons are below half strength & shaken, but the M10's have got into the rear of the Germans. The MkIV's are reduced to one tank, but the fearless vets are still fighting.
On the left, the GI's have been over-run by the combination of infantry & armour & both platoons have been broken.
The US concede the battle.  Both sides tried to attack on their right & defend their left.  The US attack of 10 Shermans & 4 M10's was held off by just 5 MkIVs with a bit of help from a couple of Pak40s.  The German attack was a well coordinated combined attack of infantry & armour against a hastily deployed defence with inadequate antitank.  


Monday, November 14, 2022

Liebertwolkwitz 1814 in Canberra

Liebertwolkwitz was a prelude to Leipzig.  Murat was ordered to cover Bonapart's southern flank while the main French army deployed.  Wurtemburg was ordered to advance on Leipzig with a mixed force of mainly Russians & Austrians plus a few Prussians. 
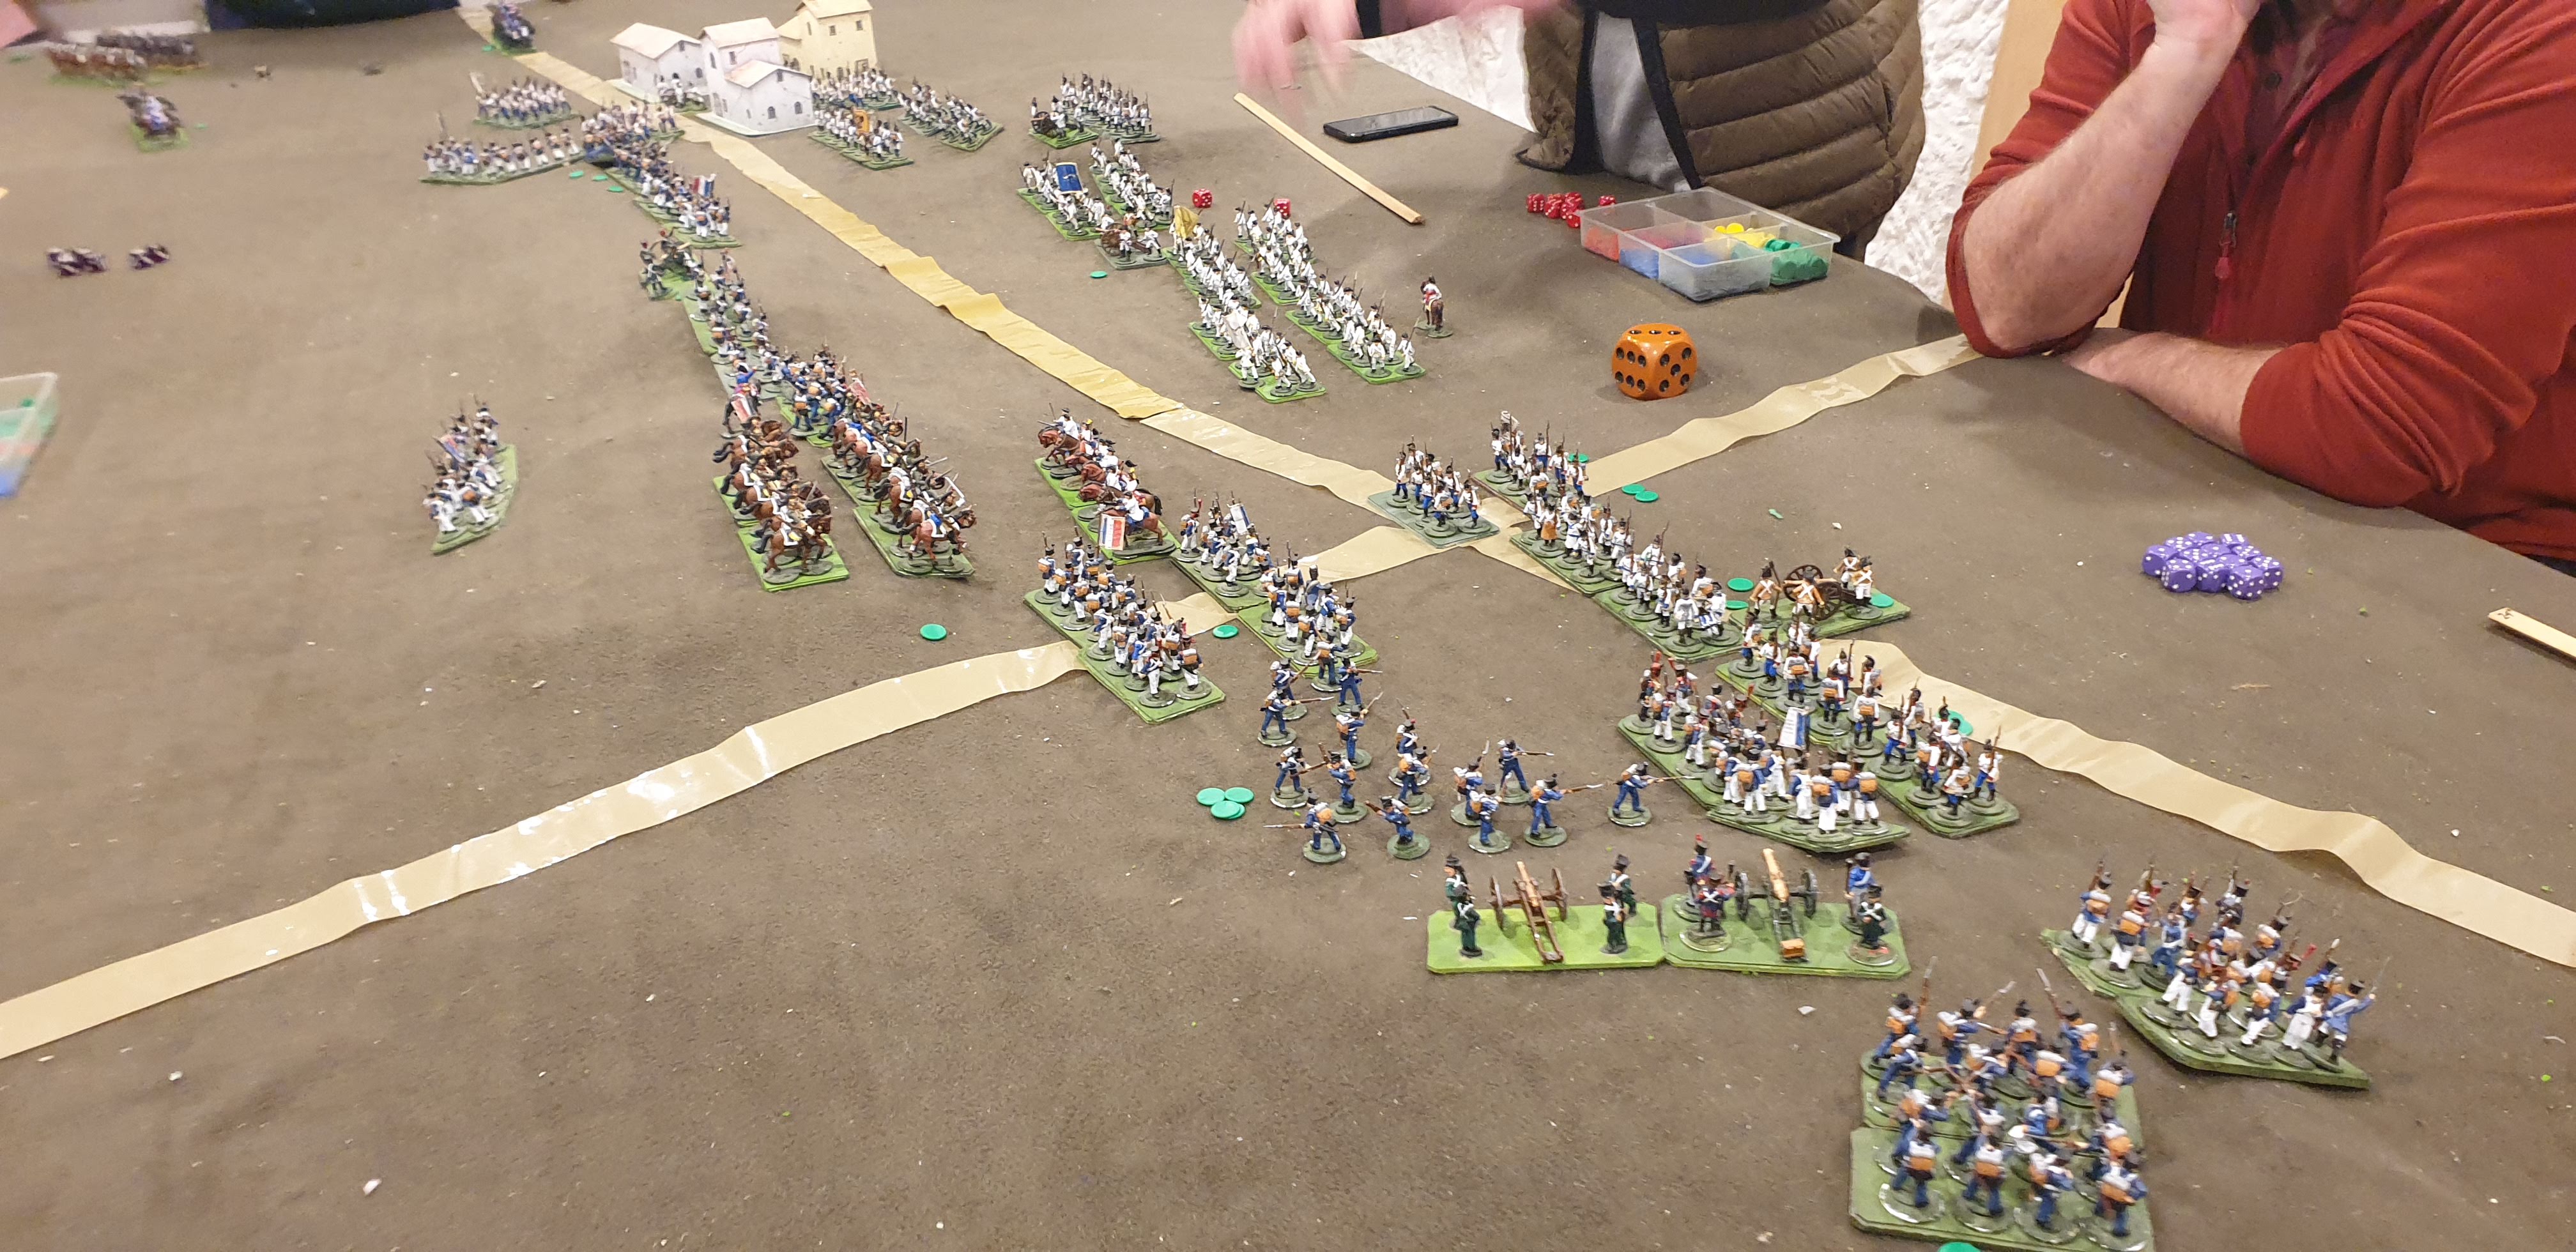
SteveD set the battle up with his 15mm figs on a 10"x6' table fought with Camp Cromwell rules.


The French started in two lines of corps.  The front line of infantry centre & left.  They second line is mostly cavalry centre & right. Poniatowski's corps is coming up behind the French right & Laurston's corps is coming up behind the French left. 
The Allies have Austrian infantry on their right, Russian infantry in their centre & a mixed force of cavalry on their left.  They have more troops coming up behind both flanks.

Both sides spend some time sorting themselves out into fighting formations. 
The French take up a defensive line on the chain of ridges.
The Allies advance their infantry & artillery on their right & centre.
The French are concentrating their cavalry on their right.
The Austrian corps on the right is advancing in a mix of line & column while a reserve corps comes on behind them.
The Russian corps in the centre deploys into line behind their numerous artillery which begins to bombard the French on the ridge.
The Allied cavalry on the left has deployed defensively with both flanks covered by infantry & artillery to provide crossfire on any French attack.
On the far flank Poniatowski's corps is advancing on the infantry deployed in the woods & the French cavalry has advanced to just outside artillery range.
In the centre the artillery duel continues with the sheer number of Russians guns giving them an advantage.
On the right the Austrian infantry has engaged the French left which is hard pressed against superior numbers though Lauriston has now come on in support. 
Laurenson's arrival behind the French left is too little too late as the mass of Austrian infantry, cavalry & artillery break the French first line on that flank.
In the centre Russian infantry has deployed into columns & advanced past their batteries towards the French lines which have been softened up by bombardment.
Some French cavalry has been detached from their right flank & is being sent to support their crumbling left flank.  The Allied cavalry then advanced within charge range of the remaining French cavalry.
On the far flank Poniatowski is being bogged down in the woods.
On the right Lauriston is being overwhelmed by Austrian infantry & artillery.  Austrian cavalry has broken through on the right of the village & met the French cavalry from the far flank behind the French centre.
In the centre, the French infantry held off the attack close to the far village, but on the main ridge their outnumbered & shot up line has been shattered.
On the far flank the French cavalry have finally charged the Allied cavalry.  
On the right Lauriston is on the verge of breaking.
In the centre, Austrian infantry have broken through & hit the French cavalry engaged with the Austrian cavalry in flank ending any hope of the cavalry saving the day.
On the left the French had lost their numerical superiority on the flank when they detached a division to support their left & both sides have won & lost units in indecisive mutual destruction.

At this stage the French have lost all hope of holding the position & so ordered a withdrawal.   They had held on for 17 turns so although the Allies have clearly won the battle, Murat could argue that he had delayed the allies for long enough to achieve what Bonapart had asked of him. 

Sunday, November 13, 2022

Wargame in Canberra: Mortem et Glorlam rules

Chris & I are spending a week in Canberra with our primary mission being as FIFO workers building a shed & carport for SteveD.   Today heavy rain made work on the project impossible, but conveniently it was Sunday so Steve & Dale could take us to a local wargamers meeting.  The informal wargaming club have an arrangement with a leagues club.  On Wednesday nights & Sunday afternoons they have free use of huge room, with a bar & restaurant laid on.  There were about 50 wargamers there playing a variety of wargames, including Wings of War, WWII naval, 6mm Napoleonic, WWII both 28mm & 15mm, board games & 100 Years War 28mm.  

Dale set up a 100 Years War game with 28mm figs using Mortem et Glorlam rules. 
Dale & Jim with French v. SteveD & Chris with English. 

The French are on the right.  The rules have a number of unusual features, in particular a cards system that governs command & limits maneuverability of the troop types & a combat system using special dice of several colours.

Each dice colour having a different number of each of a set of symbols, a deaths head = 1 stand killed, crossed swords = 1 wound (2 wounds = 1 kill), S (only counts in certain circs) or blank. So the best dice, the red, had more deaths heads & the black dice the least.  So the difference in combat value of opposed troops determined which colour dice they used.  Units break on exceeding 50% casualties.

The cards were similarly coloured with black cards being pretty useless & red best.  Each turn, cards were dealt out for each general, 4 for best generals, 3 for average ones & 2 for dummies.  There is a complex table of what each type of unit can do if a certain card is played.  For instance, a red card might allow a drilled unit to make a double move plus a wheel, but a less well trained unit only allows a double move straight ahead.

The turn sequence goes:
1. Deal out a new set of cards.
2. Charge & immediately resolve 1st impact combat.
3. Shoot.
4. Move.
5. HTH combat (including another round of the new charges.

In the movement phase the players take turns to select a units or group of units under the same commander & move them subject to having the appropriate card to play. 

The French are advancing on their left with mounted & dismounted knights.
The English sent their knights to strengthen their right & are advancing their own left.
The French attack of dismounted knights has broken the English billmen on the right flank & the French are wrapping around the English left.  The English knights sent to the support their right have been met with French reserve cavalry.
The English counterattack with bowmen & some men at arms v. crossbowmen in the centre also had some success.  
The far flank in a sideshow of lighter forces.
The French gained the initiative & their attack was led by their best attacking troops, while the English counterattack was made by troops better suited for defense.   As a result the French attack was more effective & the English broke before their counterattack could do enough damage to effect the French.

I enjoy trying new rules, you never know wheren you might pick up a good idea. That the best strategy wins is a good sign for a set of rules, but I found nothing worth adopting into our own rules in these rules.  The combat system provided too few ways for skill to influence results.  The use of different coloured dice seemed more like a way of being different than a means of making combats easy to resolve.  And I seriously dislike being dictated to by cards.  Real generals don't examine a deal of cards & select the best option available.  They decide what is their best option & issue orders with the knowledge that it might not happen. Our rules' system of requiring a test to activate orders replicates that.  


Tuesday, November 08, 2022

WWII: Mechanised Americans attacking Germans

 US: Jim, Mike & Chris.  2 armoured infantry platoons, 2 Sherman platoons, 1 Honey paltoon, 1M10 platoon & off table battery of 105's.  All confident trained.
Germans: SteveJ & Renfrey. 4 infantry platoons, Pak 40 platoon & heavy mortar platoon dug in with Paks hidden in ambush. 2 MkIV platoons in resevre (to come on turn 3 in nominated locations).  All fearless veterans.

I forgot to take pics until the battle was well under way.

The Germans are tasked with defending the two villages.
The US attacked from the near side of the table attacking the RH village & the centre. with the intention of breaking thru then wheeling left to attack the LH village. 
The Pak ambushes took out 2 Honeys 2 Shermans before the 2 in the centre were shot up & the other two on the left screened off by smoke. 
The Panzers have come on.  The platoon on the right are exchanging fire with the Sheramns & M10's on teh central ridge.  The platoon on the left are moving up into firing positions on the ridge. 

At this point the US were feeling they were in trouble.  In the centre their infantry attack had been beaten back with ehavy losses & they had lost half their armour.  On the right they were slugging it out with stubborn grenadiers in the orchard.

At thei point the Germans made a critical error.  They laid smoke to protect theri tanks on their left from the M10s on the central ridge so they could counter the US armour in the  orchard.  But thsi allowed the US armour in the cntre to concenrate on the second Panzer platoon.  The US lifted their smoke screen on the left braving the Paks & concretrated their tanks guns & artillery on the Panzers on the ridge.  They were rewarded by a run of luck.  The artillery landed on the tanks 1st time & took one out & thee M10's got one each.


Next turn the US artillery put the smoke screen back in front of the Paks & the M10's took out another MkIV on the ridge, while the Shermans broke thru the orchard & enagaged the other panzer platoon.

The Germans tried to launch a counterattack with their infantry from their right flank, but with the panzers dealt with the US armour was free to mow them down.  So a decisive victory for the US after a shaky start.


Friday, November 04, 2022

Carthage v. Syracuse at Black Hills

 Carthage: PeterC & Jim v. Syracuse: Renfrey & Chris.

Carthage on the left.  Deployment by divisions by BA style coloured dice draw.  Both sides have their cavalry on the far flank  & their infantry on the near flank.
The Syrcusians made a general advance. Carthage echeloned their infantry back.
The first clash in the centre saw two Carthaginian cavalry units broken by a shower of hot Syrcusuan dice.
The Carthaginians plugged the hole in their line with their elephants & tried to send cavalry round the far flank.
The Syracusians met the fanking force with their last cavalry reserve.
The leading Carthaginian infantry unit in the centre was was broken on first contact, but they used their last reserve cavalry to pin the winning hoplites down.
The elephants have won & turned around to face the hoplites.  The Carthaginian infantry on their left was broken & the unengaged cavalry turned to cover that gap in the line.  The cavalry fight on the far flank remains undecided as the Syrcusian infantry are finally getting to grips with the outnumbered Cartho foot.
The Carthagnian infantry is being overwhelmed by superior numbers & the Syracusian cavalry has finally won the fight on the far flank.  The Carthaginians fail army morale, so Syracuse has won.

The Carthaginians never recovered from the quick loss of two cavalry units in the opening clash.  


Tuesday, November 01, 2022

Almonacid 1808: French v. Spanish

A scenario from Wargames Scenarios The peninsular War 1808-1814 by Jon Sutherland & Dianne Canwell.  In the real thing Sebastiani, though outnumbered nearly 2 to 1, attacked Vanagas deployed on a line of hills & won.

The Spanish (Renfrey, Chris & SteveJ) deployed further back than Vanagas (on the far side of the table).  The French (Jim & Mike) deployed much like Sebastiani with the intention of following his plan to attack on his right.
The French advanced in column then deployed into line before engaging the enemy.
The Spanish made minor adjustments to their line as the French advanced. The only aSpanish dvance being their cavalry on the far flank where they had 4 regiments to the French's 2.  The French infantry division commander on the left misunderstood his orders & advanced over the ridge prompting a furious message from Sebastiani to pull back to the reverse slope & defend on his flank.
On the near flank the Spanish have formed columns on the reverse slope.  On the far flank the Spanish cavalry is slowly advancing, hampered by their poor command rating.
On the near ridge the Spanish managed to time a counter attack of their massed columns perfectly & poor French shooting gave the Spanish a real chance of success, but the dice gods favoured the French in the HTH combat.  
As the Spanish division on their left flank crumbled & broke, the adjacent French brigade pressed forward.  On the far flank the Spanish are trying to mount counterattacks out of the town & with their cavalry.  The left flank French infantry deploy to defend themselves on t& behind the ridge, while their cavalry, outnumbered 2 to 1, hang back to delay the clash.
On the far flank the Spanish have finally got to grips with the French cavalry & infantry.  In the centre Spanish cavalry have made desperate counterattack on the French dragoons as the French infantry begin to wrap around the now exposed Spanish left flank.
The French dragoons have swept away the Spanish cavalry as a second Spanish infantry division has been broken by the French flanking attack.  On the far flank the French hussars have been defeated, but the lancers have broken through the Spanish cavalry.  The French infantry battalion on the far end of their line has repelled a Spanish column attack but is now being attacked by a second wave.
On the far flank the lancers are trying to distract some of the Spanish cavalry but 2 Spanish cavalry are moving towards the French left.  The valiant French infantry at the end of the line has finally been broken, but it has bought time for a defensive line to be formed facing the Spanish cavalry. 
However, in the centre, the 3rd and largest Spanish infantry division has now broken under converging attacks from flank & front.  The Spanish are reduced below half strength & fail army morale.  French losses are 1 infantry battalion, 1 cavalry regiment & 1 battery.

Our points system actually rated the French force about 10% better than the Spanish, so the result vindicates the points system.  But while it ended up a decisive victory, if Renfrey's defence on the Spanish right had been blessed with a bit more luck, the result could have been different.  Outnumbered as they were, the French had to win fast as they relied on poor Spanish command delaying counterattacks, & they lacked the numbers to survive a battle of attrition.