Thursday, August 27, 2020

Ancients at Black Hills: Magnesia 190BC

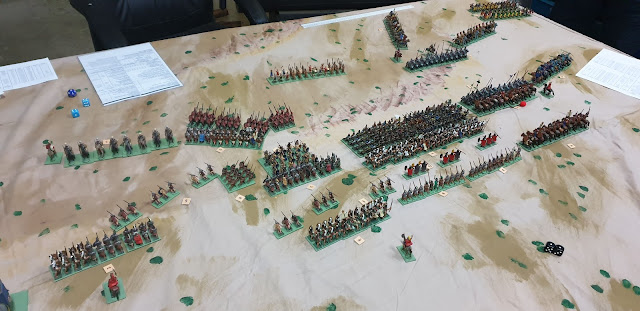
Chris & I went to Black Hills to fight Magnesia 190BC using PeterC's troops & rules.
Jim: Roman & Pergumum.
Chris: Seleucids.

The Romans are on the right. Legionaries in the centre.  Bowmen & elephants on their left. Cavalry on the their right.
The Seleucids have their phalanx just left of their centre.  Cavalry & light infantry on their left.  Galacians & Argaraspids are on the right of the phalanx, then cavalry & elephants on the right flank.

The Romans made a general advance.  The Seleucids started moving their heavy cavalry from their right to their left.
The first clashes are cavalry on the right & some skirmishing in the centre.
The cavalry fight on the right is so far indecisive.
Legionaries have engaged the phalanx & Galacians in the centre.
On the left legionaries have driven back the light cavalry & engaged the elephants.
On the left the legionaries & Pergumese elephants have driven off the Seleucid elephants & light cavalry & broken the Argaraspids behind the Galacians.  Triari have wheeled to face the flank of the Galacians.   The phalanx has got the upper hand, but the legionaries are stubbornly hanging on.  The Seleuicid cavalry has also got on top, but has not yet broken through.
The Triari have charged into the flank of the Galacians.  The Legionaries & the Pergumese cavalry on the right are still holding on.
The Galacians have broken exposing the flank of the phalanx.
The Pergumese cavalry have finally broken on the right, but the winners have lost heavily & fall back behind their supports.
A fresh cohort hitting the flank of the phalanx has broken it.  Now with their right flank & centre both broken the Seleucids concede the battle & retreat.
The Seleucids erred in leaving their right too weak to resist the Roman attack.  The Romans broke that flank then rolled their army up from there. 


Tuesday, August 25, 2020

Musket Action: 7 Years War

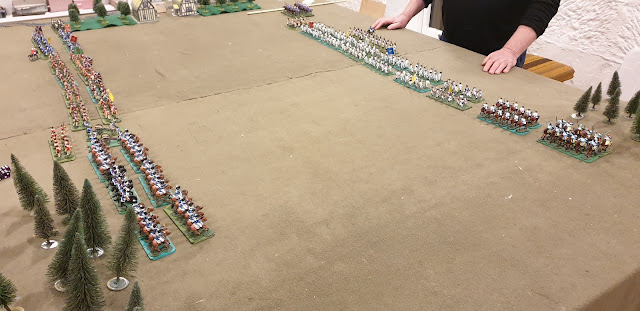
 Chris' French v. Jim's British in a small 7YW battle.
A change from AWI - no Indians, less terrain & more cavalry.


The French are on the right.  They have cavalry on both flanks, their artillery on their right  & grenadiers in reserve.  The Brits have all their cavalry on their right next to their guns supported by grenadiers.  They have a light coy on the far flank behind the village.

The British are advancing on the left & extending their right.  The French are advancing in the centre.

On the far flank the French cavalry have charged & broke thru the first line. 

The British cavalry have charged on the right breaking half the French horse in the first impact.  The French cavalry on the far flank have been broken by a crossfire of musketry, but the French grenadiers have come up to counterattack.  There is an indecisive but deadly firefight going on in the centre.


On the far flank the Hessians & Light infantry are holding their own against the grenadiers.  The dour struggle continues in the centre.  On this flank the French have left their flank vulnerable. 


On the far flank the grenadiers are flanked by the light infantry & dying fast.  The French infantry have charged with some success in the centre.  But a converging attack on the French left by the British artillery, grenadiers & cavalry has destroyed their left & caused the French to fail their Army Break Test.

These rules are very old school with casualty removal but with a BA style move sequence. They make a quick & enjoyable game & 7YW troops look so good. 

Tuesday, August 18, 2020

AWI Musket Action

 Chris' British v. Mark's Continentals & French.

Pics all taken from behind the French & Continental force.The regular French infantry is deployed opposite the gap in the wooded ridges with Colonial troops on each flank & cavalry in support.  The Brits have their veterans opposite the gap with their Indian allies on their right & cavalry on both flanks. 

The British are advancing.  The French have formed up in a defensive line with Colonials movoing forward into the woods on each flank.
There is indecisive skirmishing in the wood on the left as the British attack in the centre.
British musketry blasted a hole in the French line.  A French cavalry counterattack broke through the British front line then broke on the second line, but it bought time for infantry to plug the gap.   
The British continue to attack in the centre.
The British attack has punched a hole through the French line & the French & Continental army begins to withdraw conceding defeat. 

Wednesday, August 12, 2020

Bolt Action in the Desert

Mark's British 8th Army v. Chris' Afrika Korps.

Both sides 1,350 pts + free transport as mechanised coys. Double Envelopment Scenario on 8'x6' table with 18" wide deployment zones. 

Pics taken from German side of the table.  After turn 2 most forces are on the table, some delayed by poor command out of reserve.

Mitzi checks out the action.

The battle developed in 3 parts. 
On the right 3 British infantry units advanced into the oasis opposed by 2 German infantry supported by a MkIII. 
In the centre artillery, mgs, mortars & a Sherman exchange fire at long range.
On the left armour engages at close range on the ridge & the bugs pin down German mg teams.  The Germans got the better of the tank fight paving the way for their Honey & a truck full of infantry to race towards the enemy rear.

The German push on the left past the burning Shermans has gained them a lot of VPs.  The Schurtzen attacking through the oasis clawed back some VP's by killing infantry, but their failure to push any units gave the Brits a decisive victory.

We have used some house rules in both BA battles this week & liked them.  They include:
Trucks are strictly transports, no mgs.
Trucks don't have their own command dice (use their passengers') & don't count as VPs if destroyed.
Fire at trucks is like firing at the passengers in the open.
Instead of 6+6 for Nigh Impossible Shots: 7 = 1/2 dice & 6 to hit (or 6 & 4+ if 1 dice).  8+ = no hit
Down bonus is only +1 if going down as a reaction.  +2 if already down.|
No templates.  Use dice as v. houses, but no. of dice capped at no. of men in target.
Allow vehicles to turn more freely.

Using a big table with mechanised forces is also highly recommended as an interesting game.


Sunday, August 09, 2020

Sunday Afternoon Bolt Action

 Jim's Panzergrenadiers v. Chris' Soviets. 1,000 pts Meeting Engagement

Pics are taken from the Soviet side.  

The Germans are nearly all veteran infantry with support from an MMG, a medium mortar & a half track armoured car.  The Soviets are mainly regular infantry with support from an MMG, a heavy mortar & an SU.

Both sides deployed a bit on each flank & make a main push in the centre.


The Soviets moved their SU to the right to counter the half track which was shooting up their infantry. It got a hit, but failed to kill & the half track fell back behind the wood.  Then the German mortar got the range on the SU, immobilised it then pounded it until it blew up.    

In the infantry fight in the centre, German firepower & veteran status were backed up by some good dice & the Soviet infantry melted away.  The Soviet mortar took out one German infantry squad, but that was their own win in a decisive German victory.


Tuesday, August 04, 2020

Preparing for Jutland Campaign

The group are preparing to fight a Jutland Campaign. PeterW in Canberra is updating a set of campaign rules he ran for his group in Darwin some years ago & Jim modifying my Dreadnought rules to make them more suitable for the the very large battle we might get to.  We followed a good Zoom Pub discussion last Friday with a training game tonight - Dogger Bank which was also a training run for the real thing.  The meeting was all Zoom tonight with just Jim in the room. 
It was simple scenario with just 4 German capital ships, 5 British & flocks of light cruisers & destroyers on each side. The battle started with the two fleets on converging courses.  The Germans opened fire at nearly 20,000 yards (12 hexes) as the Brits tried to move in closer.   The British flagship, the Lion was hit hard by the Derfflinger & turned away with critical damage before any British ships found the range.  But when the range closed the Brits started scoring hits.  The Germans then decided they had done enough in severely damaging the Lion & turned away behind a smoke screen laid by their DDs & began work on their press release regarding their glorious victory. 

The game was followed by more discussions.  The tactical rules got a general tick with just a couple of points raised for minor tweaks.  The strategic rules are expected to be ready for the campaign kick off in a few days.