Tuesday, April 26, 2022

Ozzies v. Italins in the desert again

I tweaked yesterday's armies & terrain a little for tonight's battle.
Australians: Jim, Mitch & Mark.
Italians: SteveJ, Mike & Chris.

There are 3 objectives: The village, the hill top with the Sidi & the crossing of the wadi.
The Italians are on the far side. 
The Italians have their armour & artillery on the far flank, Fucilieri in the centre & Bersagliaeri on the near flank.
The Australians have artillery on the near flank & centre, one platoon infantry platoon on each flank & one in the centre, bugs on the far flank & Matildas in the centre. 
Part of the Italian armour is advancing through the oasis, the rest enagaging the Matildas which have wheeled right to face them.  The bugs have been moved to the centre to support the diggers advancing up the hill.  Another digger platoon is digging in on the wadi crossing as artillery bomards the Bersaglieri advancing on them.
The diggers in the oasis are being decimated by the Carri.  The matildas are whitling away the Cari facing them.  The diggers in the centre have charged over the hill top & routed one Fucuilieri platoon.  The diggers on the wadi crossing are hanging on desoite high casualtie, but the bugs have arrived to protect their right & the artillery is pounding the Bersaglieri on the left.
On the far flank the Carri have taken the oasis & turned to attack the Matildas.  In the centre the diggers have charged & broken the second Fucilieri platoon.  On the near flank the Bersaglieri are pinend down under the fire of the bugs & artillery.

In the next turn, the Matildas take out one Carri platoon but are then decimated by the platoon coming out of the oasis throwing 6's. But both Bersgliaeri platoons are finished off.  So the Italians have lost 5 of 8 platoons & fail army morale, so cannot advance.  The Australians have lost 3 of 8 platoons & hold 2 of 3 objectives.

Monday, April 25, 2022

Anzac Day battle: Australians v. Italians in the desert

The Italians have Fucilieri dug around the oasis with an artillery battery in support & 2 paltoons of tanks & 2 platoons of Bersaliagieri in reserve.  The Australians have 3 infantry plattons, 2 platoons of Matildas, 2 batteries of 25 pdrs & 2 bugs.  (Once again the 3D printer came in handy to add another 3 Matildas).

The pics are taken from behind the Oz line.
The Australian infantry have deployed to attack the oasis head on with artillery & armour support on their left.  On the left 2 bugs are making a strike at the Italian artillery but Carri platoon has come on the Italian left & intercepted them.
The diggers are advancing on the oasis as the armour enages on their left.

The diggers have over-run the defenders of the oasis.   A second Carri platoon came on behind the artillery as the tanks slug it out.  4 Matildas are knocked out, but the 25 pdrs help the Matildas take out all the Carri.  Bersaligieri have come on eitehr side of the oasis, but hot shooting by the Oz artillery & the right flank infantry have decimated them before they could mount a counterattack.
While both Matilda platoons have lost too many casulties to remain effective, the Italians have lost more than half their platoons & fail army morale. 
 

Thursday, April 21, 2022

Auestadt 1806

PeterC set up an Auestadt 1806 scenario for Chis (Prussians) v. Jim (Davout). 
All pics taken from behind the French.

Davout's advanced guard is approaching Hassenhausen.  Blucher with the Prussian advance guard is advancing towards him.  
In accordance with scenario rules, the impetuous Blucher threw his cavalry at the French infantry.  Davout's veterans stood in line & brushed off the hussars.As more troops arrived on both sides, Davout deployed a defensive line either side of Hassenhausen. A hasty infantry attack directly at Hassenhausen was beaten off.
The Prussians amass more troops for another assault.  Davout extends his line to the left as his last units come up.
A Prussian infantry on the French left centre has been halted by musket & artillery fire as more Prussians deploy to both flanks & artillery fire dominates the centre.  On the right the Prussians have deployed guard infantry & cavalry .  The French infantry have got out of square into line to face the coming attack (counting on artillery support to help resist the cuirassiers). 
On the left Prussian cavalry has gone around the French flank, but Davout is deploying his reserve infantry in squares to meet them.
In the centre the Prussian infantry has been broken, but another division is moving up to replace them.
On the right, the Guard Cuirassiers survived the artillery fire & rode down one French infantry brigade & the guard infantry broke another brigade with a bayonet charge.
On the right the Prussian guards have broken thru the front French line, but they had lost significant casulties in doing so & were not supported.  The chasseurs a cheval held the line while the French infantry & artillery beside Hassenhausen wheeled right & stopped the Prussian advance by shaking the enemy brigades. 
On the left, Prussian cavalry charges uphill at the squares have been beaten off. 
In the centre the Prussian infantry is making yet another advance.

Once again French firepower has stopped the Prussian infantry in the centre.  The Prussian army has only one un-shaken brigade left & night is about to fall.  They have to concede defeat & retreat.

So our simulation produced a similar result to the original with Davout's Corps defeating a much larger Prussian army.  The scenario rules that helped this to occur included:
- Historical times of arrival of divisions.
- Blucher was deemed impetuous so had to make piecemeal attacks at the start. 
- Davout's troops were all rated veteran in all respects (shooting, HTM, drill & command).
- The Prussian line were rated poor command & poor shots, but good drill & good HTH. 
- The terrain provided some advaatages for the defence.


Wednesday, April 20, 2022

Bolt Action Tank War

As Mike had completed a 1500 pt early war British desert armoured force I designed an Afrika Korps Pamzer list for the same period.  Then I realised that I didn't have a 28mm 88.  A quick Google & I had a 3D file & my 3D printer had one ready for action just in time.

The British (Mike & Chris) are on the left with 3 Matildas & lots of support guns & infantry.  The Germans (SteveJ, Mark & Jim) had 4 MkIIIG's a MkII, the brand new 88, & half as much infantry.  
Alas after the fuss of getting the 88 into action, it's performance was a total anti-climax.  In turn 1 the 88 fired just one ineffective shot before the British mortar ranged in & killed the entire crew.  The 88 was later re-manned with a mortar crew & it got back into action late in the battle, but it still failed to achieve anything except immobilising a Matilda that didn't have to move anyway.
Meanwhile the battle had raged on.  The Brits did well early, but Germans hit back & when time ran out the honiours were even, with both sides losing just 4 units, though with others decimated.
 

Tuesday, April 12, 2022

Maloyaroslavets 14 Oct 1812

Another Age of Eagles scenario fought with 28mm figs & our M2M house rules.
Russians: SteveJ & Chris.
French: Mike, Mitch & Jim.

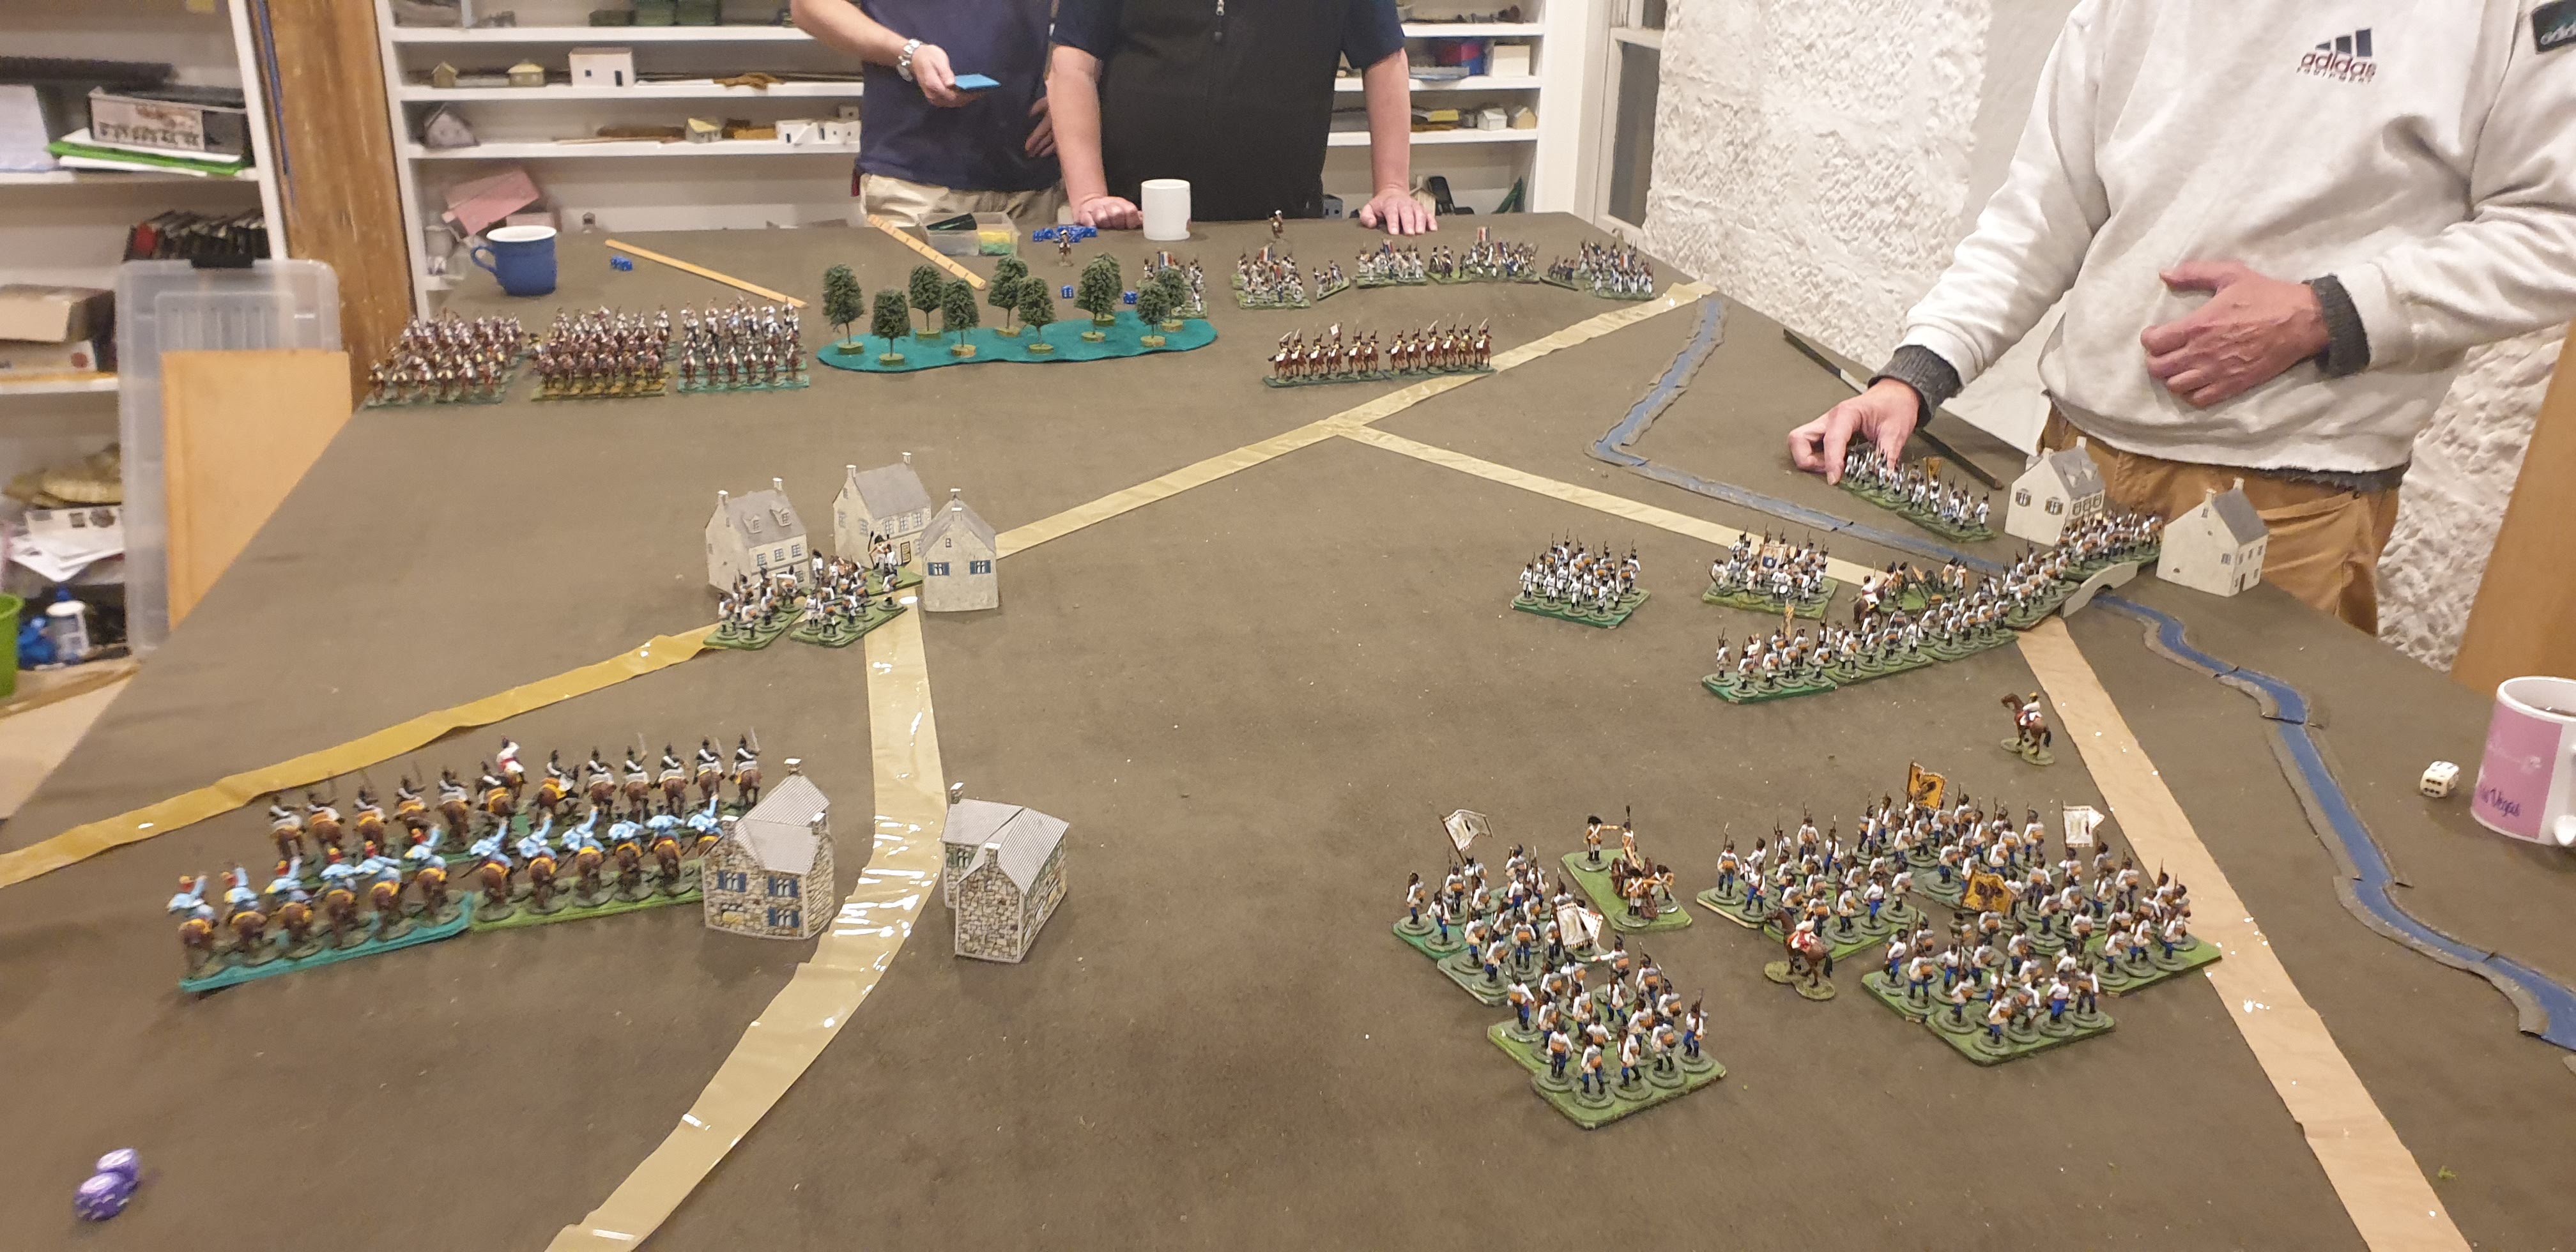
The French are coming from the far side in a road column, crossing the river & deploying around Maloyaroslavets. 
Cosacks have come on from the far left & the head of a Russian column is about to start deploying in front of the village.
Eugene's Corps is now fully deployed with infantry & artillery in & around the village & cavalry on the flanks.
The Cossack have been charged by French cavalry on the far flank.
The 1st Russian Divison has deployed facing the French right.
A 2nd Russian Division is starting to deploy facing the French left.
Davout's Corps has arrived to support Eugene.
On the far flank French cavalry have forced the Russians into square to make good targets for the french foot.
On the near flank French cavaly is delaying the Russian deployment by forcing them to be careful.
There is an exchange of musket & artillery fire in the centre, with both sides fighting mainly in line.

In the centre Russian columns from the 2nd Division have broken thru the French front line & gained foothold in the village.  On the near flank the French cavlry has fallen back in the face of massed Russian columns, but they have bought time for Davout to reinforce the French left with his 2nd brigade..
Right of centre, the French have pulled back their front line after taking heavy casulaties, but have been reinfoced by Davout's 1st brigade.

On the near flank the Chasseurs have charged the columns & while repulsed, they have further delayed their attack. 
Left of centre, the Russian breakthrough has been beaten off by the French 2nd line.
Right of centre, the French are retiring to a reverse slope position, but still occupy the houses in the village.
On the right a cavalry v. square stalement suits the French, & the Cheveaux Legere brigade is now being moved to the left
On the left, the Chasseurs have been withdrawn leaving Davout's veterans to face the Russian columns, but their attack was beaten off with sufficient loses to break the Division. 
On the right the French infantry have completed an orderly withdrawal to a reverse slope thru the village to avoid Russian artillery fire.
The Russian 1st Divison is still in good shape, but on it's own it has no alternaytive but to withdraw as dusk closes in.
So in our version of 1812, Napoleon's army may have the option of marching south to the Ukraine.  My analysis is that the French use of their cavalry superiority was the key to their victory.  Though the French cavalry were too few to be decisive itself, the French used them well to delay the Russian advance long enough for Davout to stiffen the defence before Eugene could be over-run. 

Wednesday, April 06, 2022

Weisseritz 27 August 1813

This is a scenario from Age of Eagles.  Bonapart has orderd Victor, with support from Murat, to take the bridge at Plauen in preparation for the battle of Dresden next day. 
Fought using our M2M house rules & 28mm figs.
French: Mark & Mitch.
Austrians: Steve, Chris & Mike.

Pic taken from behind the Austrians.
Victor's corps is advancing on the French left, Murat's cavalry on the French right.
The Austrians have infantry & artillery in the village of Ober-Gorbitz forward of their line, supported by cavalry on the ridge behind.  An infantry division is deployed near the bridge at Plauen.  Another infantry division is coming up in support.
Murat's 1st cavalry division is advancing past Ober-Gorbitz towards the bridge.  The Austrians to their front have formed squares.  Victor is angling his advance towards Ober-Gorbitz.
Victor is attacking Ober-Gorbitz with his infantry.  Murat's 2nd division is advancing past the village on the French right. The Austrians behind the river line on their right have been driven back by French fire.
Murat's 2nd division has charged the Austian cavalry on the ridge.  Victor is making slow progress in his attack on the village.  Murat's 1st division has forced the Austrian infantry into square but the French artillery have not caught up, & it is the cavalry that is suffering from artillery fire in the centre.
After putting up stout resistance the Austrian cavalry are now hard pressed by the superior numbers of French cavalry.  The Austrians in the village are still holding up Victor's infantry.  Murat's 1st division has been withdrawn in the centre, replaced by a French battery.
The Austrian cavalry has finally broken, as have the defenders of the village.  But they have done their job.  It has taken the french so long to sudue them that they have insufficient time left before dark to take the bridge.  The Austrians have won.

The Austrians made a sound defensive deployment.  The French plan to turn the enemy's left took too long due to a bit of dithering, & to stubborn Austrian defence (helped by some hot dice).  The French also failed to properly coordinate their cavalry & artillery in the centre. 

Saturday, April 02, 2022

WWII Tank War

Jim's Germans v. Chris' US
Encounter battle using house rules & 15mm figures.

Pics are from behind the Germans.  Their infnatry are on foot so being left behind by the rapid advance of Pak 40's down the road & armour on their right.
The US are advancing in two groups.  Armoured infatry & M10s on the ridge & armoured innfatry, Shermans & Honeys on the other flank.
The Germans are deploying their paks to cover their lefr flank & concreting their armour on the right.
The Armour have come within range of each other.  The Germans have lost a MkIV, but the paks & Panthers are taken out 2 Shermans & 2 M10's. 
The US armour has struck back, taking out the Mk IVs, but the Panthers have in turn destroyed all the US armour.  The US infantry on the ridge on the right have been pinned down by artillery fire & the other platoon has lost the race for the village.  
The US infantry on the ridge have failed morale & are withdrawing under a baraage of artillery, tank mgs & infantry fire & with that the US fail army morale.  It is  decisive German victory.