Thursday, November 27, 2014

Thursday afternoon Bolt Action at Good Games


Jim's Panzergrenadiers v. Chris' Soviet Rifles.

This afternoon two grizzled retired gentlemen rode their electric bikes to Good Games with army boxes on the carry racks for some Bolt Action.  We played the new scenario from the Tank battles supplement that we played last week with armour.  The scenario has D6 objectives placed alternatively by the players, then they dice to see who chooses which side of the table to deploy from.  Both sides then come on from opposite sides.  The winner is the side who holds the most objectives after 6 or 7 turns, or if that is a tie, you win if you destroyed 2 more enemy squads than you lost.  This makes for a very interesting scenario, with 2 ways to win & variety in the number of objectives.

The Germans have come on from the right.  The objectives are in the wood near left, the wood far right and between the houses.

The Germans seized the nearest house in turn 2 (the turn counter hasn't been advanced).

The Soviets attacked the near house held by the Germans with veteran tough fighters and have taken it.  The Germans have occupied the other house.  Long range firefights are going on both flanks.

A second Soviet infantry unit has tried to attack the second house but has been pinned down on the road by firepower. 

The Soviet unit trying to attack the 2nd house has been routed by German fire, as have the Soviet units on the far flank.  Both sides hold 1 objective with one in dispute, but the Soviets have lost 5 units to the German's 2, so a German victory.

Tuesday, November 25, 2014

1806 Campaign: Battle of Eilenburg (or Bittefeld) - afternoon

We restarted the battle tonight on turn 10. 
(Note that the troops near the turn counter are the broken units removed from play).
 
The Prussian column is continuing along the road on the left towards Eilenburg with divisions deploying to the right as they reach their place in the line. On the other side of the wood Davout's lead division's initial success has left it in an exposed position and it is being pulled back.  (The troops in the wood are Prussians).  The rest of the French line is being straightened out.
The two armies have formed parallel lines just out of artillery range. In the right foreground Ney's Corps has arrived.
 
Davout has renewed his attack on the Prussian right.  There has been some opportunistic attack & counterattack on the far flank, but it's late afternoon and neither side seems very keen on starting a fight they won't have time to finish.
 
In the foreground, Davout's attack has petered out as night falls.

Casualties at the end of the day amount to:
Prussians: 4 inf brigades, 3 cav brigades & 2 batteries broken.
                 3 inf & 3 cav shaken.
French: 2 inf brigades, 6 cav brigades, 2 batteries broken.
             1 inf & 1 cav shaken.

The casualties were very light because primarily both sides seemed more concerned with not losing that winning.   The Prussians had more troops on the battlefield with about 58 units to the French initially about 45.  But the Prussians expected more French to be arriving either behind them or through Leipzig.  As it happened only Ney arrived with just another 12 units (from the SW) taking the French to about parity, but too late to get involved.  The Prussians also believed that clearing the road through Eilenburg to Torgau the Elbe fortress where they could wait for the Russians had to be their prime objective.  The difference in command rating of the two armies also weighed heavy in the Prussian thinking: Previous experience at Gera made them very wary of the speed & flexibilty of  the French troops & very aware of their own army's tendency to move slow & to miss opportunities. 

The French had a chance of a crushing victory if they could have pushed through to the road in the morning, but the superior Prussian cavalry delayed their advance and bought time for the infantry & artillery to come up.  Having missed that opportunity, & knowing more troops were coming, their decision to go on the defensive against superior numbers of cavalry & artillery was understandable.


Nick in Launceston - Catch up

I have been lazy, and haven't given an update for a few weeks.

1. 2 weeks ago.

Nothing to see. Just my Saracens being overrun by Crusaders again in Saga. One day they will figure out how to fight, and it will be glorious!!!!!

2. Last Week.

Rod couldn't make it, so Rob had a game we Brucey (As in Bruce Lee, as in the sound you make when doing karate, as in ... oh, forget it). It looked like a close game of FOW, with Panzer IV's and Shermans duelling.

Nick vs Ben in a Vietnam. Ben's Australians pushed the Vietnamese off the objective, but not without losing 4x M113 to RPG fire, and miraculously surviving an ambush by 20+ stands of AK47 wielding insurgents! A close but well deserved victory by Ben.


Thursday, November 20, 2014

Bolt Action Armour - Practice for Cancon

Chris & I are again going to Cancon to play Bolt Action.  With the big table at Camp Cromwell occupied by Napoleonics and the small one covered in stuff, Chris & I went to Good Games for Cancon practice this afternoon.  We tried out the Tank Battle Scenaro from the BA Tank War supplement with 1500 pt armies.

There are 3 objectives on the table, one on each side about 2/3 up the table & one on the road behind the house.  (The no. of objectives is diced for in this scenario).  The Germans are coming on the right & the Russians on the left.

In the foreground, the panzergrenadiers won the race for the house.  Soviet infantry have occupied the house at the far end.  The armour is engaged in a long range duel.  The Marder died fast, but the Tiger has been making itself felt.

On the far flank the inexperienced Soviet infantry are advancing towards the objective opposed only by a panzerschreck team.  On this side the veteran Soviet infantry are preparing to storm the house full of panzergrenadiers.  The Tiger has scored another kill while the Stug is alive, but pinned down.

The Soviet charge on the house was a bloody affair with the Soviets armed with smgs & the p/grenadiers mostly with assault rifles, but eh Germans won and maintained control of the objective.  In the foreground the Puma won a game of hide & seek with the T34 & put a 50mm round up it's clacker. The Soviets on the far flank had been pinned down by the panzerscheck team but are again on the move.

In turn 7, the Soviet infantry shrugged off their pins and advanced within 6" of the objective on their right.   The Tiger doubled over to dispute the objective.  The Stug with 3 pins failed to activate  the p/grens didn't get enough hits to drive the Ivans away.  So both sides have 1 objective & 1 is in dispute.  If the objectives are split, then the tie breaker is killing 2 more enemy than you lost.  The Soviets have lost 4 tanks & an infantry squad, the German have lost their Marder, so win 5 kills to 1.

This was our first try at BA armoured since the book came out.  It went a bit faster than most 1000 pts infantry fights, taking about 1 & 1/2 hours and was great fun.  Love my Tiger. 

Wednesday, November 19, 2014

1806 Campaign: battle of Bittefeld

After the storming of Leipzig, the Prussians continued their move north over the Saale breaking bridges behind them.  Not being able to catch the Prussians south of the Saale, the French seemed to spread out south of the river looking for ways to cross.

The Prussians, knowing they couldn't cover all the crossings and would soon be outflanked one way or another, headed north.  Their intention now is to get to the Elbe as far east as possible with their army still intact to meet up with their Russian allies and claim some kind of we-did-a-lot-better-than-they-did-in-1806 victory.

Having reached Bittefeld with no sign of the enemy other than in the west, and reports from a strong cavalry recon force that all was quiet at Leipzig, the Prussians decided to make for Torgau, the easternmost Elbe fortress, and the one closest to the Russians, to maximise their claims to some kind of victory.  However, Bonapart had indeed gone towards Leipzig as the Prussians had originally expected, but his army had been delayed by an admin error.  As a result, the French marched out of Leipzig to attack the Prussians as they marched from Bittefeld to Eilenburg.

Map showing approximate manoeuvres to the battlefield at Bittenfeld.

Bittefeld is in the far RH corner.  Eilenburg is in the near RH corner.  Leipzig is off table to the left.  The battle started with turn 5 of a 16 turn day.  This pic is after the first move.

The Prussian column is spread along the road on the far side and continues for some distance off table to the left of Bittefeld.  3 Prussian divisions are going cross county past the village & wood of Delitzch.  Two French cavalry divs have deployed on the Bittefeld road with Davout coming up behind.  Bernadotte is on the road to Eilenburg.  Soult has emerged from Leipzig between the two roads. 

Prussian cuirassiers have persuaded the head of Bernadotte's columns to form square.  Likewise French cavalry have slowed the advance of the Prussian 2nd div near Delitzch. Soult is advancing fast in the centre.  The head of the Prussian column has reached Eilenburg.

In the foreground Bernadatte pushed some infantry & guns too far forward & they have been ridden down by Prussian cuirassiers.  Bernadotte's corps has come to a halt.

The Prussians are being pushed back near Delitsch.  The French heavy cavalry took out 2 infantry brigades that took them on in line, but a cavalry counterattack has that French cavalry division verging on breaking. Davout's infantry has now taken over the attack there & is doing well.  The other French heavy cavalry division has attacked in support of Bernadotte with some success, but it too is on the verge of breaking.

At the end of turn 9 we decided we weren't going to get near finishing tonight and agreed to continue next Tuesday.   

The battle is still very much in the balance.  The Prussians actually have more troops on the battlefield at this point, but poor command makes it hard for them use their numbers and very likely more French are on the way.

Sunday, November 16, 2014

A trip to Molesworth for WOTR

Dave had completed a Yorkist army and invited us up county to give them their first taste of battle.  That I also took a Yorkist army mattered little as both side looked much the same anyway.  So Chris & I lead the Cromwell Yorkists v. Dave & Mark's Moleworth Yorkists.  Both sides had 3 battles with slightly different mixes of bow, men at arms & cavalry.

The Molesworth army is on the far side.  Mark commanding their right & centre, Dave their left.  The Cromwellians are on the nears side with Chris commanding their left & Jim commanding right & centre.
The Cromwellians made general advance with 2 bow units seizing the village on their right flank.

In the foreground Mark's bowmen are enjoying good shooting from the hill against Chris' battle.  On the far flank Dave is attacking the village.  On the left of the village The Cromwellians have charged with foot and horse but devastating defensive fire has blunted the attack at the start.
Both Dave's attack on the village and Jim's in the centre have been beaten off.  The Cromwellian cavalry charged in the centre, but it was a debacle with one unit broken & the other pushed abck 7 followed up. 
On the far flank, the Cromwellian right battle has broken, but Jim's centre division has counterattacked and broken the Molesworth centre.  The surviving Cromwellian cavalry somehow held on as they were driven back until the Moleworth cavalry was attacked in rear by men at arms and destroyed.
Now both side had lost a battle the fight entered a new phase.  The Molesworth left is trying to move to the centre to help their right.  The Cromwellians are attacking the Molesworth right to try & take them out before their left can come over.
The Cromwellian attack has succeeded and the Molesworth right has broken.  The Cromwellian victory in the centre was more valuable than the Molesworth victory on their left as the Cromwellian centre was able to join in an attack on the Molesworth left before the victorious Molesworthians could help them.

Thursday, November 13, 2014

Practicing Bolt Action for Cancon

Jim's Panzergrenadiers v. Chris's Soviets

Chris & I have both signed up for Bolt Action at Cancon & are starting to hone our skills.

We fought scenario 1, Envelopment, with the Soviets defending the far side of the table.  The Germans moved their lmg squads, mmg, light howitzer, MkII & mortar up on the hill on the left to give fire support to the 2 infantry squads attacking the village.  Unfortanately for the Soviets, all went according to the German plan.  Soviet units were picked off by long range fire while the stormtroopers cleared the village.  The Germasn didn't get any units over the Soviet deployment line but having killed 5 Soviet units to 1 won 5:2.

Tuesday, November 11, 2014

1806 Campaign: Storming Leipzig on day 6

The campaign has moved on to day 6 since last week.  After Gera the Prussians retreated to the NW followed by the French. The 8th Saxons retreated from Gera to Jena. On the Western side of the Saale, the Prussians moved north followed by the French who had come down the Saalfeld road

The valiant 8th Saxon division was caught at Jena & surrendered. after a brief fight we didn't bother putting on the table.

One of the restrictions the Prussians had was that the King would not let them retreat north of the Jena-Gera line without a fight.   The battle of Gera convinced the King of the folly of that and the Prussian command was released from the restriction.  The Prussian command was felling pretty good about a small win to get the King off their back then getting over the Saal.  That is, until they found out that Napoleon was following them with only part of his force and 2 whole Corps had been sent to Leipzig.

The map shows about as much as both sides know & doesn't give the full story.  The red is the French advance before Gera-Polnitz.  The green is the French after Gera-Polnitz.  The blue is the Prussians after Gera-Polnitz.

Leipzig is not a fortress.  The old medieval walls are in total disrepair and suburbs have grown outside the walls.  The garrison comprises only 5,000 Prussians & 5,000 Saxon militia.  We fought this battle in 15mm, though as the French have about 50,000 men we didn't have enough figs.  We put all their cavalry & artillery on the table, but only half their infantry, intending to replace broken divisions with fresh ones if that happened.  Only the garrison troops on the walls are deployed, the rest are out of sight of the French initially and not put down at the start.

Mike threw Bernadotte's first division at the wall beside the river to find it defended by Steve's Prussians.  Meanwhile, Chris with Soult's army moved around to attack from the north.

Bernadotte's attack was beaten off with his lead division broken.  But Soult's men found their section of wall defended by Saxon militia.  Here the French broke through.  Prussian reserves held a second line in the houses ad the first line of French columns were beaten back, but they had weakened the defence enough for the second wave to break through.

When the Prussian division broke under Soult's attack, the Saxons surrendered and the city was taken before Bernadotte's second division came up.

Taking Leipzig is a significant step towards victory for the French, but the main Prussian army is still intact, the war isn't over yet.

Friday, November 07, 2014

Nick in Launceston -- more Crescent and Cross

For the first time in a long time, there were more Historical games than fantasy / Sci-Fi at the club!

Nick vs Rod in Crescent and Cross.

Nick was Saracens.  Rod was a military order.  The Saracens played a maneuver game, and were slowly picking off units of the military order.  Rod charged into the center of the Saracen line with a unit of sergeants, and they beat up a poor unit of Saracen infantry.  But, more importantly, the Saracen infantry were supporting the Saracen warlord.  The Warlord suddenly found himself in range of the Crusader warlord, and he had to charge, but had no support.  The end was predictable.


Doug and co were playing a WWII skirmish game. They got in about 6 games in the time it took us to finish one SAGA game -- and SAGA is quick!!!


Meanwhile, somehow Dennis's Russians got to Normandy, where they walked over Ben's 21st Panzer force. Both forces were works of art


Wednesday, November 05, 2014

1806 Campaign: day 3: Battle of Gera


In the last week we have got through to day 3 of our 1806 campaign.  The French have stormed through the Thuringerwald while the Prussians, caught by surprise with a scattered deployment have reorganised their scattered forces to meet the onslaught.  The campaign is being fought with hidden movement and incomplete information.  This difference this makes is profound, the Chiefs of Staff in particular have become quite obsessed as they ponder the conundrums of decision making on incomplete and confusing information fed to them by a notoriously mendacious umpire.  Every turn involves much emailed correspondence between the members of each staff as they thrash out their plans of operation.  The blog will have to wait to the end to get a detailed account of the campaign as secrecy is vital.  Mark dropped out of the French team to take up battle umpiring duties - deemed necessary by Peter by the complex nature of the first battle.
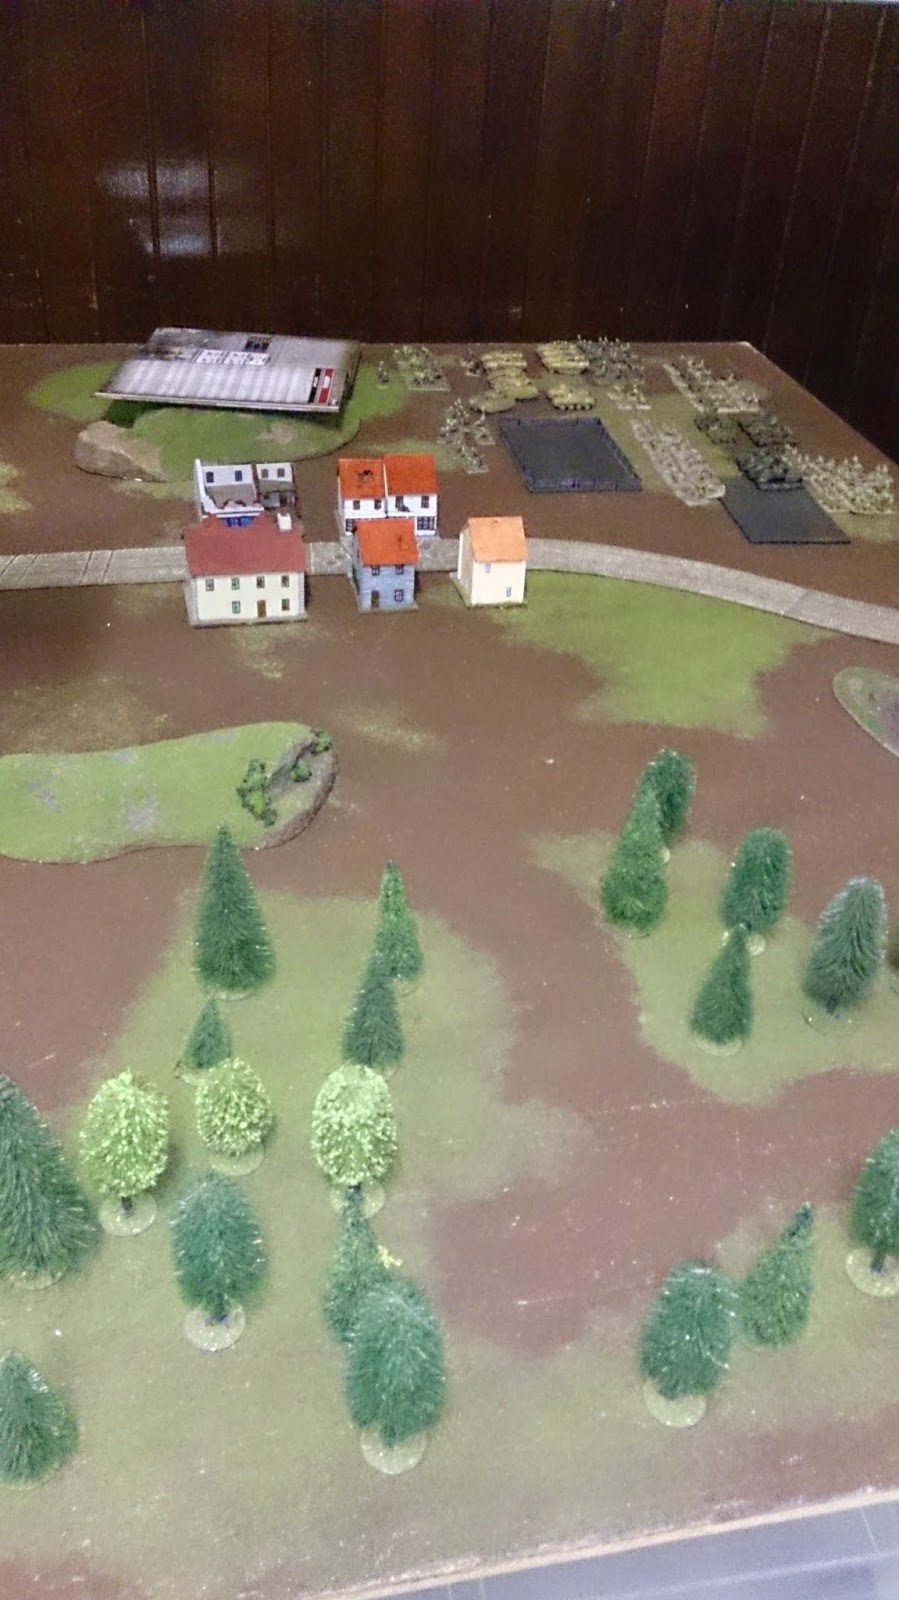
This is the campaign map.   When battle is joined, the main features are taken from this map and detail added from google earth. This battle is in hexes 0908 & 0909.  The French have advanced through the Thuringerwald on the eastern side of the map.  Their right has marched north through Hoff & Plauen sweeping aside the cavalry screen and has swung left to march on Gera. The French centre has advanced north towards Gera through Schlieux.  Prussian forces are already in the 0909 hex at dawn.  There has been contact between cavalry screens in the Rudolstadt-Saalfeld area on days 1 & 2, but no action there today.   
At dawn on day 3 there is French light cavalry in the Gera hex and Prussians in the Polnitz hex marching towards Gera.  Neither side knows the enemy order of battle in detail.  We expect it to be based on the historical, but varied to some degree to produce uncertainty.   At the start of the battle each side knows pretty well when their own forces are going to arrive on the battlefield, but have no detailed info on the enemy.  What info they have comes via the umpire  from cavalry scouts, reports from spies, some previous near contacts of Division/Corps in adjacent hexes and making judgements on how the umpire might have warped the other side’s historical order of battle.   As a Prussian I was pretty sure there are at least 2 French Corps coming down the Plauen road and a large Corps approaching from the south.  That’s all we knew at the start.

Because the battlefield extends over 2 hexes, and the expected numbers of troops involved, the umpire has decreed that the battle be fought with 6mm figures.   Our Hail Napoleon variant of Hail Caesar is to get its baptism of fire with 6mm figs here.  We would have liked to have had a practice battle in 6mm before a major engagement, but the campaign moved too fast so we had to jump straight into slightly unfamiliar territory – not unrealistic at the start of a war.   But our experience of our other extensions of HC has always been good and the changes required for 6mm are not that great.  Hail Napoleon is structured so battles can at different ground and figure scales depending on the scale of the action.  Our intention is to fight army sized actions with 6mm figs, corps sized actions with 15mm figs and divisional sized action with 28mm.  Our 6mm system has a ground scale of 8”=1km and the units are brigades of about 2400 infantry or 1200 cavalry, or batteries of 16 guns.   This makes our 10’x6’ table about 15km x 9km - about 2 hexes.  For 15mm figs the ground scale is 16”=1km and the units are demi-brigades of 1200 infantry, regiments of 600 cavalry or batteries of 8 guns.  So we would fight a 30,000 man a side battle with 15mm figs on a 7.5km x 4.5km area, or a 60,000 men a side battle with 6mm on a 15km x 9km area – each with the same number of units, so either can be fought in an evening.   Our 28mm figures could be used for small actions of 15,000 men a side, with units being 600 man battalions, 300 man half regiments of cavalry & batteries of 6 guns on a 4km x 2.5km area, but we don’t expect the campaign to produce any such actions. 

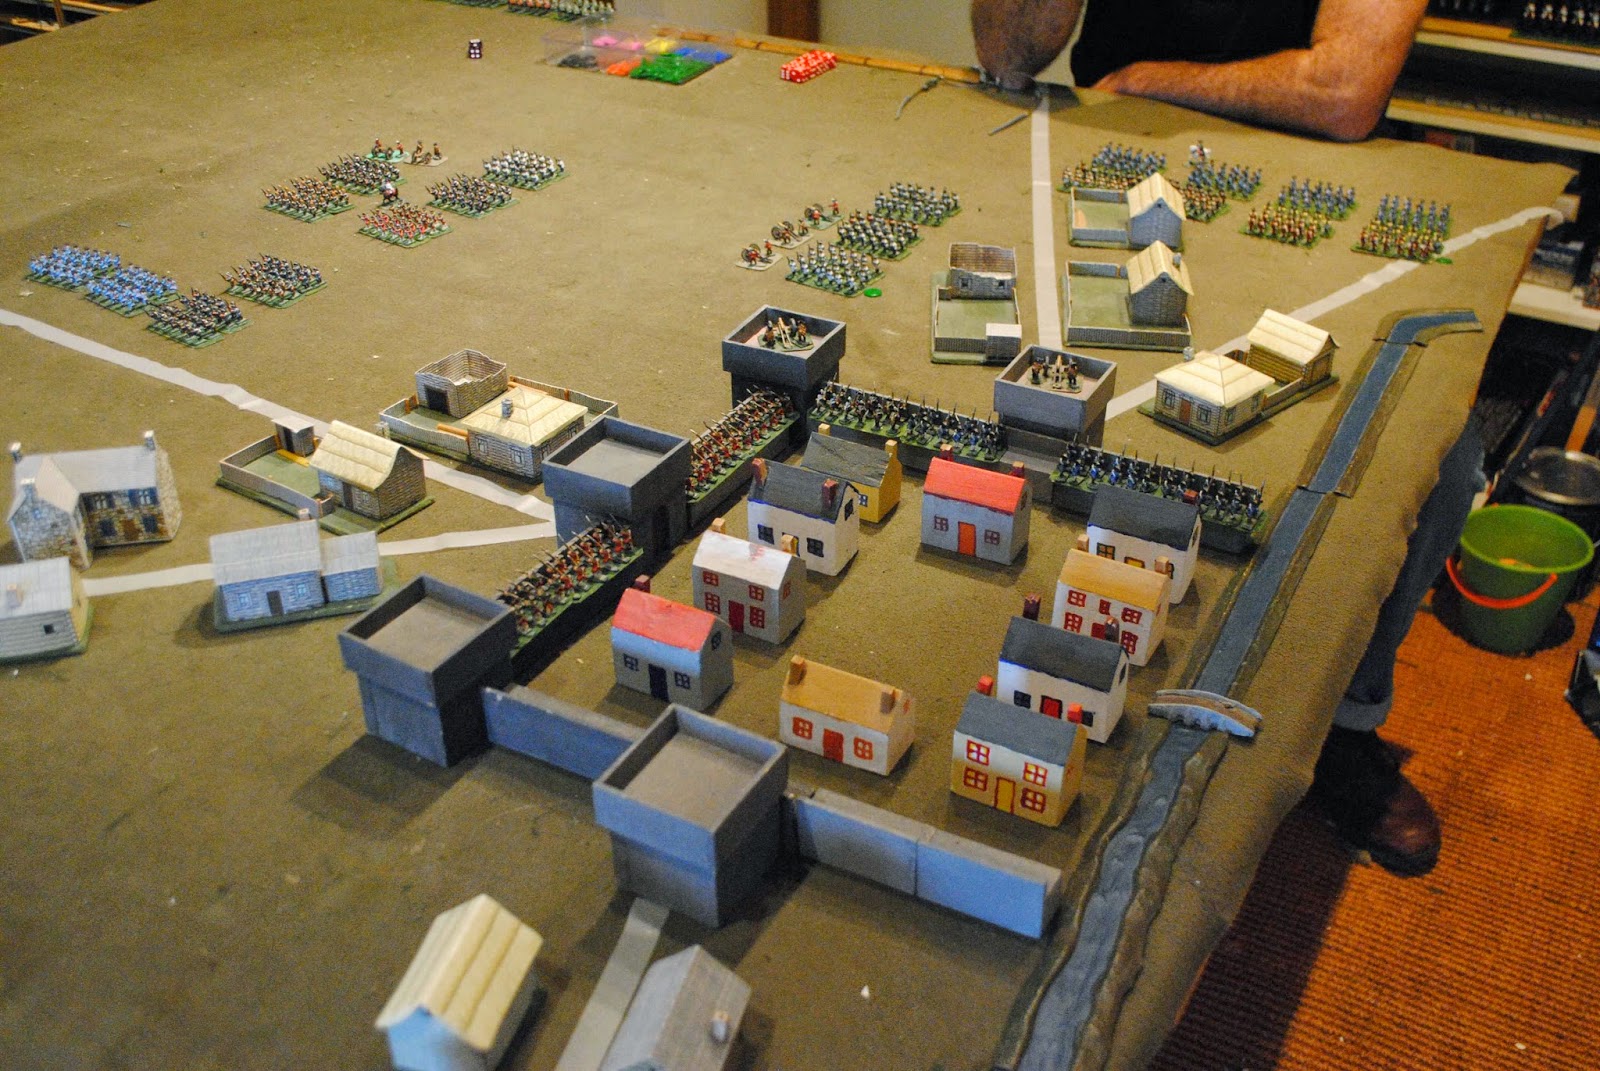
Pic taken from the southwest corner.  Gera is at the north edge.  A French Corps has marched onto the table on the Plauen road on the east edge.   The 9th Saxon division is in the centre of the table.  The 5th Prussian & 8th Saxon are on the road behind them.

Due to an oversight in campaign orders, the Saxons are stuck in the middle of the table for 2 turns until HQ arrives.  The other 2 divisions march up the road past them.  The Prussian 7th division has come on the far left hand corner, but has not yet been put down as the French can't see it.

What we now know is Soult's Corps, has got to Gera before us, but Steve is attacking it.  The Prussian cavalry has moved to force some of Soult's infantry into square as the 5th's infantry & artillery  follow up.

The 5th division is engaged Soult's left.  The Saxons are advancing but very slowly.  Steve's infantry is losing the fight for Gera, but with 3 batteries and 3 heavy cavalry brigades still there Soult isn't breaking out that way.

Meanwhile at the south end of the table masses of French are pouring onto the table.  The Saxon cavalry has caused a delay by standing in front of the pass while their infantry form up around Polnitz.  But one French division is moving quickly down the right of the wooded ridge.  However, Prussian reinforcements have arrived too.  The 6th & 4th divisions have come onto the table on the left.  It was apparent now that the Prussian high command had wrongly assumed the main French thrust to be through Plauen.  Napoleon was coming up from Schieux - and at a much faster rate than they considered possible.

The Prussian cavalry is being used to slow down the French advance by forcing them out of march columns & into square. 

At the southern end Mark is adjudicating as Chris attacks James' Saxons - which are somehow holding on. Prussian cavalry continue to delay the French infantry on the left.

As the ring closes in on Gera, with 9 batteries of artillery being assembled, Soult decides to make his escape over the river while he can.   At the same time the 8th Saxon has broken and the French take Polnitz,

The French have a command rating of 9 to the Prussians 8.   It doesn't sound like a lot of difference, but it is very significant.   The relative speeds of the French & Prussian infantry on the battlefield was very obvious.   The Prussian system of having their cavalry split up among mixed divisions has been much criticised, but on this battlefield, Murat's cavalry corps was nowhere to be seen while the Prussian penny packets of heavy cavalry were where they were needed to slow down the French advance and buy the time needed to surround and retake Gera.

It was a long and exhausting evening - going on to 11.30.  It was a big battle to be the first test of Hail Napoleon for 6mm, but as always with our Hail Caesar variants it did the job.  There were about 160,000 men in this battle, but we got through almost all of a 16 turn day in about 4 hours.

The umpires will translate the battle losses in broken, shaken & damaged units into permanent losses for the campaign.  The Prussians had the infantry of the 6th broken & the 8th Saxon.  The rest had few casualties.  The Saxons took a few with them, but nothing serious.   Soult's force had only a couple of units broken, but the rest had heavy casualties and were mostly shaken.  Soult might have held out in Gera, but he also might have lost his entire corps if he'd tried to hold out.  Napoleon wasn't going to get there before nightfall, and the Prussian ring was tightening and 144 guns being brought up.