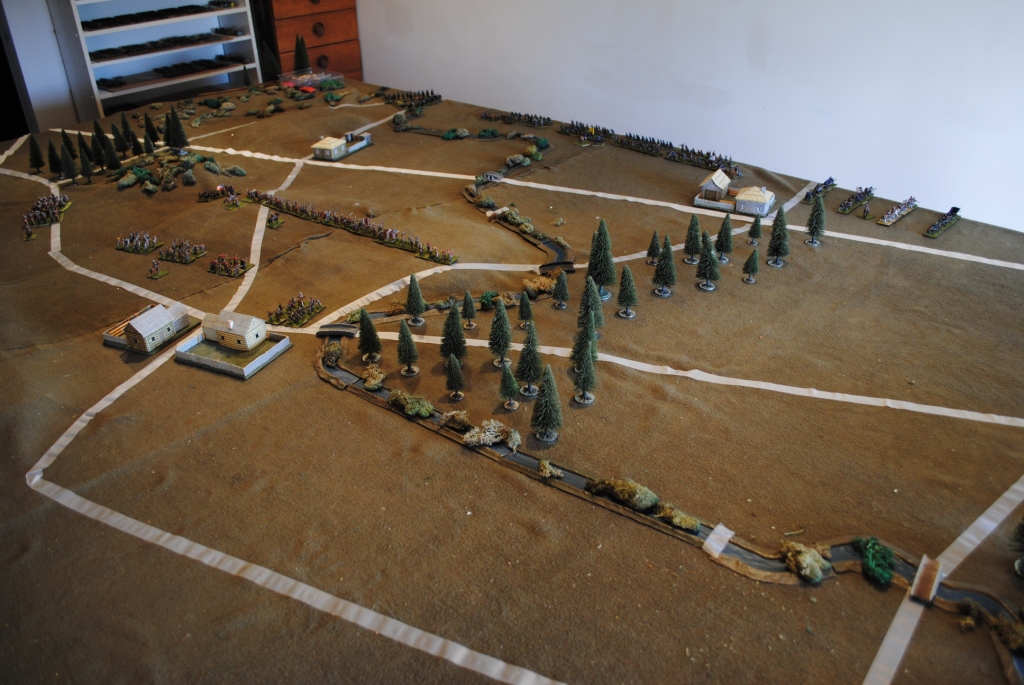
Jim's Austrians v. Nick's French
The French are on the right. Cavalry division on near flank. Elite infantry division on hill. 2 infantry divisions on far flank. The Austrians have an infantry division on the far flank, a Landwehr division in the centre and a Cuirassier division in reserve off table. The French are the attackers and have an objective marked by a flag on the Austrian left. (Them taking the object would increase the probability of the Austrians failing an army morale test).
The Austrians have stood on the defensive on their left. They have sent 2 Landwher units into the village and brought on their Cuirassiers on their right.
The French have taken the village but the Landwehr have formed a second line. The Cuirassiers are driving the weaker French cavalry back.
The French cavalry is almost gone. The French infantry are now advancing on the rest of the front.
The Austrian Cuirassiers have finished off the French cavalry and are moving to outflank the battery. The Landwehr have taken losses, but are holding on. The regular Austrian foot are holding their own on the far flank.
The French attack on the Landwehr has taken enough casualties that when added to the loss of the cavalry an army morale test was required. The French failed giving the Austrians victory.
This was my 2nd Lasalle, Nick has played a few, Leigh had studied the rules enough to be a great help looking things up. The rules seem to work in that just doing what seemed right for Napoleonic warfare generally gave a plausible result. Personally, I'm not fond of this style of game where things have to done in a specific order in specific ways, but the battle took about 2 & 1/2 hours, so it moved along reasonably quickly. Next week we intend to do the same battle with Black Powder (with distances halved for 15mm on a small table).
Saturday, June 22, 2013
Tuesday, June 18, 2013
Hail Caesar - Dacian War
Mike & Chris's Dacians v. Jim & Steve's Romans
The Siege of Sarmizegetusa Regia scenario from the Dacian book.
The Romans have made a steady advance. Their engines are in the centre with an infantry division each side and the cavalry division on the far flank. The Dacians have a division in the city and another deployed on the near side. Their other 2 divisions are still off table.
The Dacians have brought on their 3rd infantry division on the near flank and their cavalry on the far flank. The Roman left has deployed to face the foot. In their centre their artillery has deployed and has pinned down the end of the Dacian infantry line near the city. On the far flank the Roman horse has met the Samartans head on while their foot tries to move in support.
On the far flank the Samartan cavalry has been defeated by cavalry and infantry. On the near flank the Romans have fallen back to buy time.
The legionaries in the centre have counterattacked the Dacian foot. On the far flank the Romans are trying to sort themselves out and move to the left.
The Roman left has been reinforced and had crushed the Dacian right. The Dacian field army has been destroyed, the Romans can now take their time to storm the doomed city.
This was the first time we had played this scenario. In hindsight it is apparent that the Dacian forward defence strategy used tonight was a mistake. They would be better off keeping their field army off table until the Romans are committed to attacking the city. It was an entertaining battle anyway.
The Siege of Sarmizegetusa Regia scenario from the Dacian book.
The Romans have made a steady advance. Their engines are in the centre with an infantry division each side and the cavalry division on the far flank. The Dacians have a division in the city and another deployed on the near side. Their other 2 divisions are still off table.
The Dacians have brought on their 3rd infantry division on the near flank and their cavalry on the far flank. The Roman left has deployed to face the foot. In their centre their artillery has deployed and has pinned down the end of the Dacian infantry line near the city. On the far flank the Roman horse has met the Samartans head on while their foot tries to move in support.
On the far flank the Samartan cavalry has been defeated by cavalry and infantry. On the near flank the Romans have fallen back to buy time.
The legionaries in the centre have counterattacked the Dacian foot. On the far flank the Romans are trying to sort themselves out and move to the left.
The Roman left has been reinforced and had crushed the Dacian right. The Dacian field army has been destroyed, the Romans can now take their time to storm the doomed city.
This was the first time we had played this scenario. In hindsight it is apparent that the Dacian forward defence strategy used tonight was a mistake. They would be better off keeping their field army off table until the Romans are committed to attacking the city. It was an entertaining battle anyway.
Tuesday, June 11, 2013
Hail Mr Lincoln in 15mm
Mike's Rebels v. Steve's Union
We used the same terrain and troops as a week or so ago when Chris & Jim fought. This time the battle was a free for all. The Rebs had 10 infnatry, 2 cavalry 4 guns, all vets. The Union had 12 infantry 2 cavalry & 4 guns all trained.
The Rebs are on the right. Both sides have an infantry division on the far flank & in the centre with cavalry on the near flank. The Union artillery is divided between the 2 infnatry divisions, the Reb's is all left of centre.
In the centre the Union have advanced to the creek line. The Rebs have advanced to meet them . The Union cavalry has moved onto the Reb's flank. The Reb cavalry has failed to move up, but the guns have redeployed to face the cavalry. On the far flank the Rebs have advanced Zouaves through the wood in advance of the main body.
The 1st Union cavalry units was shaken by artillery fire but the 2nd advanced past them and charged the guns. Now ACW cavalry are not supposed to be able to charge batteries frontally, but dice don't always obey the laws of probability either. The Reb artillery was ridden down and the sweeping advance took out an infnatry unit as well.
The Reb cavalry finally got moving, charged the Union horse in flank & broke it. But the Union cavalry hurt them enough so a wiff of minie ball from the Union foot broke the Reb cavalry as well.
On the far flank the Zouaves in the wood broke the Union defenders. The Union have curved their line back to cover their flank as the Rebs advance on their front.
The outflanked Reb centre has pulled back. The Zouaves charged out of the wood at the Union flank but were replused.
The Union centre has followed up. A volley at a shaken Reb unit was all it took for it to break & with it, the division & thus the army. Another Union win. The battle showed up a couple of minor oversights in Hail Mr lincoln, but they are working just fine. All is ready for our ACW campaign when God who is in Canberra comes back from his reseach trip to Nippon at the end of the month.
We used the same terrain and troops as a week or so ago when Chris & Jim fought. This time the battle was a free for all. The Rebs had 10 infnatry, 2 cavalry 4 guns, all vets. The Union had 12 infantry 2 cavalry & 4 guns all trained.
The Rebs are on the right. Both sides have an infantry division on the far flank & in the centre with cavalry on the near flank. The Union artillery is divided between the 2 infnatry divisions, the Reb's is all left of centre.
In the centre the Union have advanced to the creek line. The Rebs have advanced to meet them . The Union cavalry has moved onto the Reb's flank. The Reb cavalry has failed to move up, but the guns have redeployed to face the cavalry. On the far flank the Rebs have advanced Zouaves through the wood in advance of the main body.
The 1st Union cavalry units was shaken by artillery fire but the 2nd advanced past them and charged the guns. Now ACW cavalry are not supposed to be able to charge batteries frontally, but dice don't always obey the laws of probability either. The Reb artillery was ridden down and the sweeping advance took out an infnatry unit as well.
The Reb cavalry finally got moving, charged the Union horse in flank & broke it. But the Union cavalry hurt them enough so a wiff of minie ball from the Union foot broke the Reb cavalry as well.
On the far flank the Zouaves in the wood broke the Union defenders. The Union have curved their line back to cover their flank as the Rebs advance on their front.
The outflanked Reb centre has pulled back. The Zouaves charged out of the wood at the Union flank but were replused.
The Union centre has followed up. A volley at a shaken Reb unit was all it took for it to break & with it, the division & thus the army. Another Union win. The battle showed up a couple of minor oversights in Hail Mr lincoln, but they are working just fine. All is ready for our ACW campaign when God who is in Canberra comes back from his reseach trip to Nippon at the end of the month.
Friday, June 07, 2013
Nick in Launceston - Lasalle
Nick and Dennis had planned this for a while -- a Napoleonic game using Lasalle. Dennis was Austrian, and Nick was the French. The forces were appropriate for the 1809 invasion of Austria.

The battle field was the 'crossroads at the farm'. Lasalle operates on a set of 12 pre-built battlefields, which are then customised with up to 3 pieces of additional terrain.
The French had a division of 3 brigades -- and infantry brigade (8 units), an elite infantry brigade (3 units), and a light cavalry brigade (4 units).
The Austrians (commanded by Dennis, who for some reason failed to wear the funny hat required by all Napoleonic cammanders) has a division of 3 brigades -- and infantry brigade (6 units), and landwehr brigade (6 units), and a cuirrassier brigade in reserve (2 large units).
At this point the French light cavalry had advanced on the right, forcing the Austrian infantry into square. But next turn the Austrian cuirassiers would arrive from reserve and blow through the light cavalry like they werent there!
The French infantry attacked on the left, and went through the landwehr like a dose of salts -- except for the Duchy of Salzburg landwehr. This little unit destroyed two veteran French units, holding out till the end of the game.
The Austrian cuirassiers did a marvelous ride around the French army, destroying one light cavalry unit, mauling two others, and destroying three artillery batteries.
Eventually both sides got to the point where they were taking morale tests. Dennis passed his first morale test, caused by losses to his landwehr brigade. But the loss of all of their artillery was enough to tip the French into morale test territory -- and they failed. So victory to the strudel makers in a fun game!

The battle field was the 'crossroads at the farm'. Lasalle operates on a set of 12 pre-built battlefields, which are then customised with up to 3 pieces of additional terrain.
The French had a division of 3 brigades -- and infantry brigade (8 units), an elite infantry brigade (3 units), and a light cavalry brigade (4 units).
The Austrians (commanded by Dennis, who for some reason failed to wear the funny hat required by all Napoleonic cammanders) has a division of 3 brigades -- and infantry brigade (6 units), and landwehr brigade (6 units), and a cuirrassier brigade in reserve (2 large units).
At this point the French light cavalry had advanced on the right, forcing the Austrian infantry into square. But next turn the Austrian cuirassiers would arrive from reserve and blow through the light cavalry like they werent there!
The French infantry attacked on the left, and went through the landwehr like a dose of salts -- except for the Duchy of Salzburg landwehr. This little unit destroyed two veteran French units, holding out till the end of the game.
The Austrian cuirassiers did a marvelous ride around the French army, destroying one light cavalry unit, mauling two others, and destroying three artillery batteries.
Eventually both sides got to the point where they were taking morale tests. Dennis passed his first morale test, caused by losses to his landwehr brigade. But the loss of all of their artillery was enough to tip the French into morale test territory -- and they failed. So victory to the strudel makers in a fun game!
Nick in Launceston -- FOW Practice for the States II
Flames of War practice for the States competition. Shane with his list, vs Rob, running a list I may or may not take -- Russian Strelkovy. (I was otherwise busy, so I dropped the troops off, took some pictures, and then ran off to work.)
Apparently the strelkovy overran the objective, but didnt have sole possesion, and took so long that the time limit was called. A 5-2 victory to Shane.
Nick in Launceston -- FOW Practice for the States
No pictures because I forgot to take some.
Nick (US) vs Shane (Spaghetti Monsters). 1750 mid war.
Nick tried an attack on two flanks. An infantry assault on one flank was perfectly set up, and fell to pieces. A tank assault on the other flank met a PaK 40 ambush and evaporated. An impressive win to Shane. Boy those Italians are hard to move once they are dug in!!!!
Nick (US) vs Shane (Spaghetti Monsters). 1750 mid war.
Nick tried an attack on two flanks. An infantry assault on one flank was perfectly set up, and fell to pieces. A tank assault on the other flank met a PaK 40 ambush and evaporated. An impressive win to Shane. Boy those Italians are hard to move once they are dug in!!!!
Nick in Launceston - Fields of Glory

This is an old battle. I cant remember when we played -- almost a month ago. But I thought I bet to write it up before it is forgotten.
Nick (Romans) vs Dennis (Carthaginians) in Field of Glory, using the pre-set starter armies.
I am a fan of pre-set starter armies. No fiddling around to find the balance. it is even better when I have the figures for a starter army -- my reboubtable Romans! However, my luck with these matchups has not been good. This must be my 5th Field of Glory game in Launceston, and the Romans were yet to achieve a victory. However, in true Roman fashion they just kept coming back!
Dennis tried to outflank the Romans, while the Romans just charged foward and aimed to crush the Carthaginian center. The Carthaginian plan had worked well in the last few games, so why change it! But in this game, things didnt work out well. Dennis didnt manage to time everything so they came together well. The Romans managed to see of the Carthaginian skirmishers. Then a turn later thay managed to repulse light cavalry on one flank. And the Carthaginian heavy cavalry probably advanced too soon -- a unit of Roman triarii managed to get onto the cavalrys' flank.
Net result was the Romans managed a win -- their first in a long while! In true Roman fashion, the general will now be denounced in the senate and sent into exile!
Sunday, June 02, 2013
Hail Mr Lincoln v.15
Jim's Union Corps v. Chris' Confederate Division
For the upcoming ACW campaign we want to be able to do small actions of 1 Corps/Div a side (A Union "Corps" is equivalent to a Reb "Divsion") with 15mm figures using a smaller ground scale. Battles of that size with our 6mm system wouldn't have enough units to make them interesting battles. So we have knocked up a version of Hail Mr Lincoln for 15mm figures by putting back some of thetactical detail we took out to make HML work with really large battles. The figures are Chris's. They were based for Fire & Fury on 25mm stands, but before starting we stuck them onto 75mm card strips with double sided tape, 2 stands to a unit.
Pic taken from behind the Rebel right. The Union objective is the hamlet of Cunning Springs in the left foreground. The Rebels have an inf div of 6 units + 4 guns on the central ridge. A 2nd inf div of 4 is in reserve behind. All Rebs are Veterans. The Union have an inf div of 8 plus 4 guns on the tabel edge in the centre. A 2nd inf div of 4 in march columns on their left and a cav div on their right. All Union troops are Trained.
The Union centre is advancing cautiously to maintain the line. Their is advancing rapidly in march columns. The Rebs have advanced the cavalry into the woods. I unit of their reserve inf is defending Cunning Springs, the rest are advancing on the left.
The Rebs pre-emptive strike on the left ran into trouble when the Union deployed 2 guns on the hill on their right to enfilade it while the Union infantry formed a solid front to meet them. Union cavlry ahve dismounted to protect the guns form the Reb cavalry. In the foreground the 2nd Union inf div has had a great run with command dice and is threatening Cunning Springs.
In the centre the Rebs have advanced to the creek line where the two lines are exchanging fire. In the foreground the 2nd Union inf has come to a halt. Dismounted cavalry are exchanging fire on the far flank.
The Reb cavalry are attacking on the far flank. The Reb 2nd div's attack has been beaten off. The Union 2nd div still hasn't got attack going.
On the far flank Reb cavalry has broken through and over-ran the battery but too late to save the 2nd inf. The 1st Reb inf is noe being enveloped from both flanks. The Union 2nd inf has finally charged Cunning Springs.
The Rebs are holding out heroically in Cunning Springs, but their 1st inf have been broken. The Rebs concede the battle.
Once again the flexibility of the Hail Caesar system has been demonstated by being extended even further out of period. It was very enjoyable game & done at at good pace - less than 2 hours for about 8 turns each... at the 15 game min per turn we recon on for campaigning, it was about real time.
For the upcoming ACW campaign we want to be able to do small actions of 1 Corps/Div a side (A Union "Corps" is equivalent to a Reb "Divsion") with 15mm figures using a smaller ground scale. Battles of that size with our 6mm system wouldn't have enough units to make them interesting battles. So we have knocked up a version of Hail Mr Lincoln for 15mm figures by putting back some of thetactical detail we took out to make HML work with really large battles. The figures are Chris's. They were based for Fire & Fury on 25mm stands, but before starting we stuck them onto 75mm card strips with double sided tape, 2 stands to a unit.
Pic taken from behind the Rebel right. The Union objective is the hamlet of Cunning Springs in the left foreground. The Rebels have an inf div of 6 units + 4 guns on the central ridge. A 2nd inf div of 4 is in reserve behind. All Rebs are Veterans. The Union have an inf div of 8 plus 4 guns on the tabel edge in the centre. A 2nd inf div of 4 in march columns on their left and a cav div on their right. All Union troops are Trained.
The Union centre is advancing cautiously to maintain the line. Their is advancing rapidly in march columns. The Rebs have advanced the cavalry into the woods. I unit of their reserve inf is defending Cunning Springs, the rest are advancing on the left.
The Rebs pre-emptive strike on the left ran into trouble when the Union deployed 2 guns on the hill on their right to enfilade it while the Union infantry formed a solid front to meet them. Union cavlry ahve dismounted to protect the guns form the Reb cavalry. In the foreground the 2nd Union inf div has had a great run with command dice and is threatening Cunning Springs.
In the centre the Rebs have advanced to the creek line where the two lines are exchanging fire. In the foreground the 2nd Union inf has come to a halt. Dismounted cavalry are exchanging fire on the far flank.
The Reb cavalry are attacking on the far flank. The Reb 2nd div's attack has been beaten off. The Union 2nd div still hasn't got attack going.
On the far flank Reb cavalry has broken through and over-ran the battery but too late to save the 2nd inf. The 1st Reb inf is noe being enveloped from both flanks. The Union 2nd inf has finally charged Cunning Springs.
The Rebs are holding out heroically in Cunning Springs, but their 1st inf have been broken. The Rebs concede the battle.
Once again the flexibility of the Hail Caesar system has been demonstated by being extended even further out of period. It was very enjoyable game & done at at good pace - less than 2 hours for about 8 turns each... at the 15 game min per turn we recon on for campaigning, it was about real time.
Subscribe to:
Posts (Atom)