Barcelona was named after Hamilcar Barca, Hannibal's dad. For Hannibal it would have been the last Carthaginian city before entering Gaul on the way to take on the Romans.
Wargaming is pretty popular here. I found the Alpha-Ares Wargames Club. They have a big space over two levels with lots of tables permanently set up on both levels. I think they have a couple of hundred members but I was there on a quiet night - Barca FC was going to win the European Cup later (and consequently there is a great deal of yahooing & hornblowing going on in the street outside as I write this).
English isn't as common here as in France, but I found a couple of guys who could speak a bit of English.
Big old fashioned board games seem to be the biggest thing here - there were several mega board games set up and in progress (with plastic covers to preserve them between meetings), including WWII, WWI, ACW & Medieval. FOW is very popular, though I wasn't there on FOW night & didn't see any games in progress. They also do Napoleonics & ancients miniatures. There was a big Napoleonic game left set as a diarama on one table. There is a coven of fantasy players, but it seems much in the minority.
The local wargames shop reflects what I saw at the club - it has huge range of FOW, some ancient, ECW & Napoleonic miniatures, lots of boardgames, a little fantasy, lots of books. Not a bad shop, but unfortunately they had nothing I needed to buy.
Sunday, May 29, 2011
Saturday, May 28, 2011
Gaming Garage
two battles, with some spectators.
Flames of War -- Byron vs John, 1750 points, Late war, Cauldron Mission.
Byron was defending a Russian village with a Sperrverband from a Russian force of heavy tanks, stuart light tanks, and infantry. The German anti tank guns failed to inflict any casualties, taking out one Stuart before they were overrun. The Russian infantry went into the village in an assault, taking out the defenders. Meanwhile, the Russian heavy assault guns took the other objective, brushing aside the veteran Hetzers. Byron had terrible luck, getting no reinforcements during the whole game.
Flames of War Vietnam -- Steve (US) vs Cameron (Vietnamese). Leigh took over when Cameron had to leave. leigh and Nick umpired.
The battle started with a horde of Vietnamese ambushing a US armoured column. Unfortunatly, they only took out one vehicle, bailing a lot more. But the US remounted their vehicles, and let off an impressive array of fireworks -- including a two 'zippo' flamethrower tanks burning all in sight. The Vietnamese were pinned down, and refused to unpin. Their RPG's didnt do much damage, and the next turn the remaining Vietnamese were gunned down. At this point the Vietnamese had lost one platoon, and had no reinforcements, so they had to roll morale to continue the battle. They were successful, and more infantry with RPG's arrived. A protatracted firefight saw the Zippos destroyed, and the US Armoured Cav platoon slowly whittled down to nothing, while the Vietnamese took horrendous casualties. But then a second US armoured cav platoon arrived as reinforcements, and the firefight kicked back into top gear. Eventually Cameron had to go, and Leigh took over. But then Steve had to leave for work, and the battle was called a draw.
The big take out was that Vietnam battles take a lot longer than WWII. The high amount of terrain makes infantry hard to kill. And when killed, each side has their own special rules that keep units around. Vietnamese troops keep coming back using the Born in the North to Die in the South rule. And US Troops refuse to break using the 'No Where to Run' rule. Maybe 1000 points is a better points amount to play with.
Sunday, May 22, 2011
Club Challenge Trophy Presented
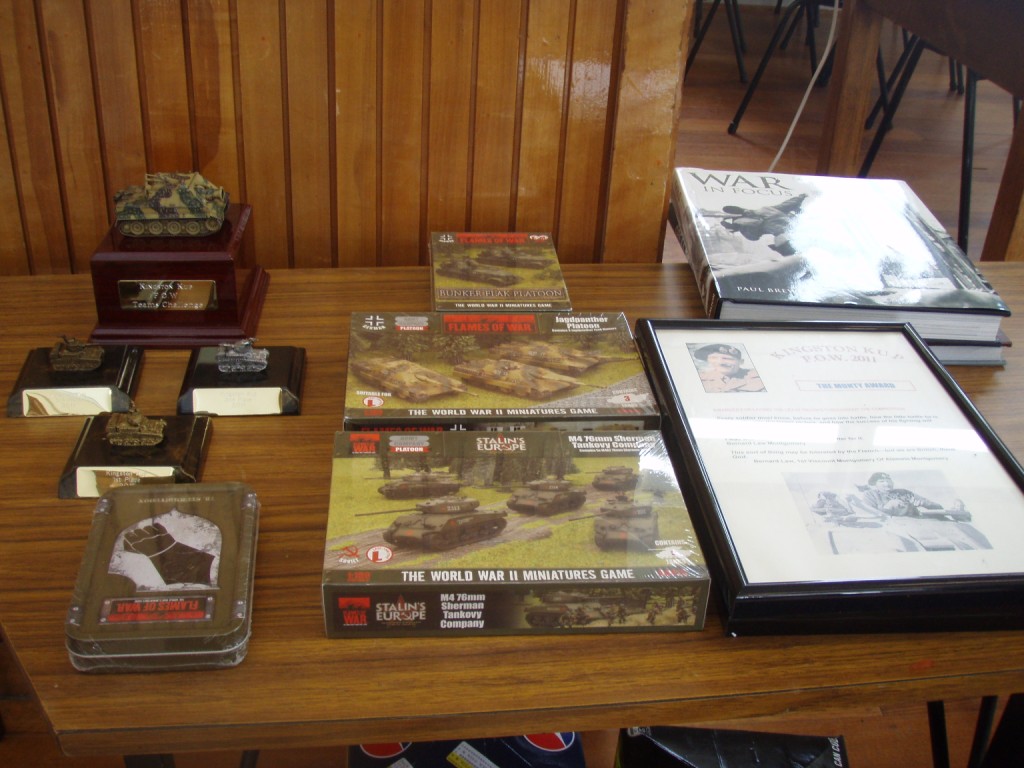
The Kingston Kup FOW Club Challenge Trophy contested last weekend was today formally presented to Camp Cromwell after its trip to the engravers to have our name inscribed. It is indeed a fine trophy & has pride of place on our trophy shelf. We're sure we will have a tough fight on our hands to hold off the envious hordes next year.
FOW Doubles Test
Jim's Grenadiers + Steve's 21st Panzer
v.
John's 2 x Russian Coys
All coys averaging 1250 pts.
Breakthrough Mission on 8x6 table.
Camp Cromwell are thinking of running Operation Cromwell 11 later in the year as a doubles comp (possibly the 1st weekend in November - which is a LWE for Launcestonians). Pairs of players to have a company each fighting on 8x6 tables. There is a set of rules for such a comp at http://www.flamesofwar.com/Portals/0/Documents/Tournaments/NZMWTournament2011.pdf which we could use, or maybe modify a bit. We did a test run this afternoon. We only had 3 players, but we made John an honary Tasmanian so he could run both Russian platoons.
The Germans put all of Jim's Grenadiers (a mix of infantry, anti-tank & artillery) on the table in blocking positions. Steve had 1 armoured PG plus a few KTs, & deployed the half tracks in position to rush the corner objective.
The Russians had one platoon with Gods & lots of ISUs on the table and the other one with IS2s & 2 x Strelk in reserve. The pics are taken with the Russian objectives in the far right corner. The German 88's evaporated on turn 1, the 1st Grenadiers & Paks were soon over-run as the big tanks pushed down the right flank.
v.
John's 2 x Russian Coys
All coys averaging 1250 pts.
Breakthrough Mission on 8x6 table.
Camp Cromwell are thinking of running Operation Cromwell 11 later in the year as a doubles comp (possibly the 1st weekend in November - which is a LWE for Launcestonians). Pairs of players to have a company each fighting on 8x6 tables. There is a set of rules for such a comp at http://www.flamesofwar.com/Portals/0/Documents/Tournaments/NZMWTournament2011.pdf which we could use, or maybe modify a bit. We did a test run this afternoon. We only had 3 players, but we made John an honary Tasmanian so he could run both Russian platoons.
The Germans put all of Jim's Grenadiers (a mix of infantry, anti-tank & artillery) on the table in blocking positions. Steve had 1 armoured PG plus a few KTs, & deployed the half tracks in position to rush the corner objective.
The Germans moved to cover the objectives but didn't get dug in before being swamped by the IS2s supported by a swarm of strelk & they lost the corner objective. The KTs were too slow & too far away to get over to take it back & the Russians won when turn 6 arrived.
The two platoon format seeemd to work fine. The big table makes it a much different game - with transport & artillery ranges coming into play to a much greater degree. At Camp Cromwell we have been using 2000pts on 8x6 table for our club comp and have a few house rules about deployment areas to maintain the balance between attacker & defender. There was some discussion about whether it should be 2x1,250 or 2x1,500, which period, etc, but we have a good lead time to canvas opinion before making any decisions.
Tuesday, May 17, 2011
Hail Caesar !
Jim's Britons v. Steve's Romans
Both sides deployed their mobile troops - cavalry, chariots & auxilia - on the British right with two long infantry lines covering the rest of the front.
The Brits advanced their infantry through the wood right of centre, held back their left and advanced their light cavalry on the right. The Romans held back their right but advanced on their left to meet the British left. This lead to a quick and wild melee on that flank. The British had the better of it destroying all the Roman horse & an auxila at the cost of 1 chariot unit.
The Brits in the wood got lost for a while but eventually blundered through & deployed in front of it only to be threatened in flank by the auxilia that by-passed the flank melee. But with some light cavalry support it saw off the auxila leaving the Brits in control on that flank.
Meanwhile on the other flank, the Romans realised they had to get moving before they were outflanked from the left. The British advanced to meet them. On the Roman right, that division had success pushing back and then routing the British left. But in the centre their formation was disrupted by the the need to face a flank threat and things started going badly. It soon got even worse when the chariots and light cavalry arrived in their rear.
Soon the Romans were reduced to just the 3 units of their right flank division (the Roman army morale was not affected by the loss of the auxilary troops - only legionaries count). The British calmly reorganised while sending their light troops to soften up the remaining Romans.
In the 3rd pic the last 3 Roman units are the 2 in the far left with slingers in front & one surrounded on the far right. The surrounded one routed next turn & the other were reduced to shaken status by the slingers causing the division & the army to break before the rest of Brits got reorganised.
We have fought 3 Roman v. Britain battles. They have all been decisive, but the winner has alternated - Brit, Romans, then Brits again. The Brit's plan was to first outflank the Roman right then attack their front. When the Brit advance on their right succeded, the Romans were in big trouble. On their far right where their line was intact they repeated last week's steamroller, but where the Brits were able to disrupt their formation it was different story. Familiarity with Hail Caesar does open up tactical opportunities - it isn't all luck (at least it isn't if you win).
Sunday, May 15, 2011
Kingston KUP FOW Tournament 14-15 May 2011
There was keen competiton for a nice range of trophies & prizes, but all fought in good spirit. The Inaugural Tasmanian FOW Club Championship was decided on the aggregate scores of the 4 entrants from each of the clubs, Kingston Bunker Rats, Camp Cromwell & Launceston Gaming Club.
The comp was 4 rounds, 2 a day on the usual Swiss system. The Missions were R1: Breakthrough, R2: Hasty Attack, R3: Cauldron, R4: Free for All. With one game morning and afternoon each day 3+ hours were available for each round.
A wide range of armies was represented, 5 German, 4 US, 2 Russian, 1 Hungarian, 1 Finn & 1 British, comprising 6 armoured, 3 mechanised & 5 infantry. All Late War, 1750 points.
Individual results:
1st: Andrew Smith (Kingston) - 4 wins with Russian Heavy Assault Guns.
2nd: Steve Jendrich (Camp Cromwell) - 3 wins with Panzerlehr Pzgr (lost to NickR).
3rd: Jim Gandy (Camp Cromwell) - 3 wins with Hungarian Infantry (lost to Smithy).
4th: Nick Ridge (Launceston) - 3 wins with British Rifles (lost to Smithy).
The Camp Cromwell team: Steve (3 wins), Jim (3 wins), Leigh (2 wins) & Byron (2 wins) won the club challenge trophy.
Steve also won the Monty Award for least casualties lost, Richard Taylor (Finnish armour) won the Patton Award for most casualties inflicted, Rob Holloway won the Zurkov award for most casualties lost, Carl Pearcy won the best presented army award & Tristan Goodwin won the nicest opponent award.
Congratulations to the Bunker Rats & John Mumford in particular for a most enjoyable & well run tournament.
Tuesday, May 10, 2011
Hail Caesar !
SteveJ's Romans
v.
SteveP & Barrie's Britons
We didn't have enough 28's available tonight, so we stuck with 15's on a 8x5 table.
The Britons tried to advance on the whole line, but the dice gods turned this into an advance in echelon leading from the right.
Both sides put all their horse (& chariots) on the near flank (Roman right). The Britons got first blood with some hot shooting from their light horse, but the cavalry fight was all downhill from there & the Briton cavalry division was quickly routed.
On the other flank, the Britons failed to quite make their charges go home on the very Roman straight line formation. The Romans countercharged chucking pila & better dice all along the line. After failing to break any Romans on the first charge, the Britons ran out of steam and their divisions were pushed back & crumbled one by one. The Romans lost only 1 unit in a crushing victory.
In the second pic the Romans have won on the far flank. In the centre the Britons are pushed back & about to break. Near the wood there is another warband surrounded & doomed.
Last week the Britons got on a roll & the Romans looked hopeless, this week the sandal was very much on the other foot & the Romans seemed invincible. I have commented before that Hail Caesar seems to suffer from wild swings of fortune, but it may be that is a function of the type of armies we are using. Both Romans & Warbands have high impact factors, so the first round can easily be decisive - Warbands either win first up or they lose - which is logical. Match-ups of armies with steadier troops like hoplites or phalangites with lower impact factors & better saves should make combats more of a grind & less prone to wild swings of fortune.
Despite the limited experience with the rules the players collectively have, the battle went very smoothly and rattled right along. Everyone enjoyed the experience & is keen to do more next week. We are hoping to round up enough 28's for next time.
Saturday, May 07, 2011
Weekend FOW
Jim's Hungarians v. Byron's US SSF
Cauldron Mission, Hungarians defending on a crowded table.
The battle turned around the objective in the wood on the lhs of the table centre. The US infantry attacked through the wood supported by lots of artillery. Shermans and another infantry platoon went around the Hungarian right flank, Honeys put pressure on the left.
The flank attack was beaten off by a counterattack by Hetzers & Zrinys, but Hungarians in the wood were eventually destroyed. The Hetzers disputed the objective while the 2nd infantry platoon came up. US artillery destroyed the Hetzers, but they lasted long enough for the grunts to arrive.
By the battle was now on a knife edge with both sides on the verge of army morale tests. The 2nd Hungarian infantry passed morale, then the Zrinys rampaged through the mortars in the US rear to force an army morale test on the US which gave the Hungarians victory.
Subscribe to:
Posts (Atom)