Modder Fokkers, our house rules for WWI air war work best with 3 or 4 players side & 1 plane each, so we took advantage of a good turnout & got out the 1/72 scale planes.
Game 1:
A free for all scenario:
3 Fokker DVII (Mike, John & SteveJ)
v.
2 Camels (Mark & Chris), 1 SPAD XIV (SteveD), I SEA (Jim)
7 planes makes for a very scary & exciting dogfight. The SE5a got one Fokker, but the SPAD & Chris' Camel went down & the other 2 Brits broke off & successfully ran for home. A clear win for the Germans.
Game 2:
The same players took up the same 7 fighters plus the Brits had a RE8 with a mission to fly straight down the table taking recon pics. The RE8 counted as 2 kills if the Germans shot it down.
The RE8 is flying down the middle of table away from the camera. The Germans came on from the left & the British fighters from the right. Mike's Fokker is on the tail of the RE8, but is under attack himself in the middle of an ugly pack. Between them Mike & Steve downed the RE8 but Mike was badly damaged & tried to break off with an SE5 on his tail. 2 Fokkers came to his rescue & the SE5 pilot decided his own life was worth more than a Hun & broke off his attack letting Mike escape. Steve pursued the SE5 but his Fokker was tailed in turn by Chris's Camel & shot down before he could finish the SE5 off. The last Fokker ran for home & got away. Both sides lost 1 plane & 2 Germans ran away, but the Germans were judged to have a narrow win because they prevented the 2 seater doing it's mission at an acceptable cost.
Wednesday, April 03, 2019
Wednesday, March 27, 2019
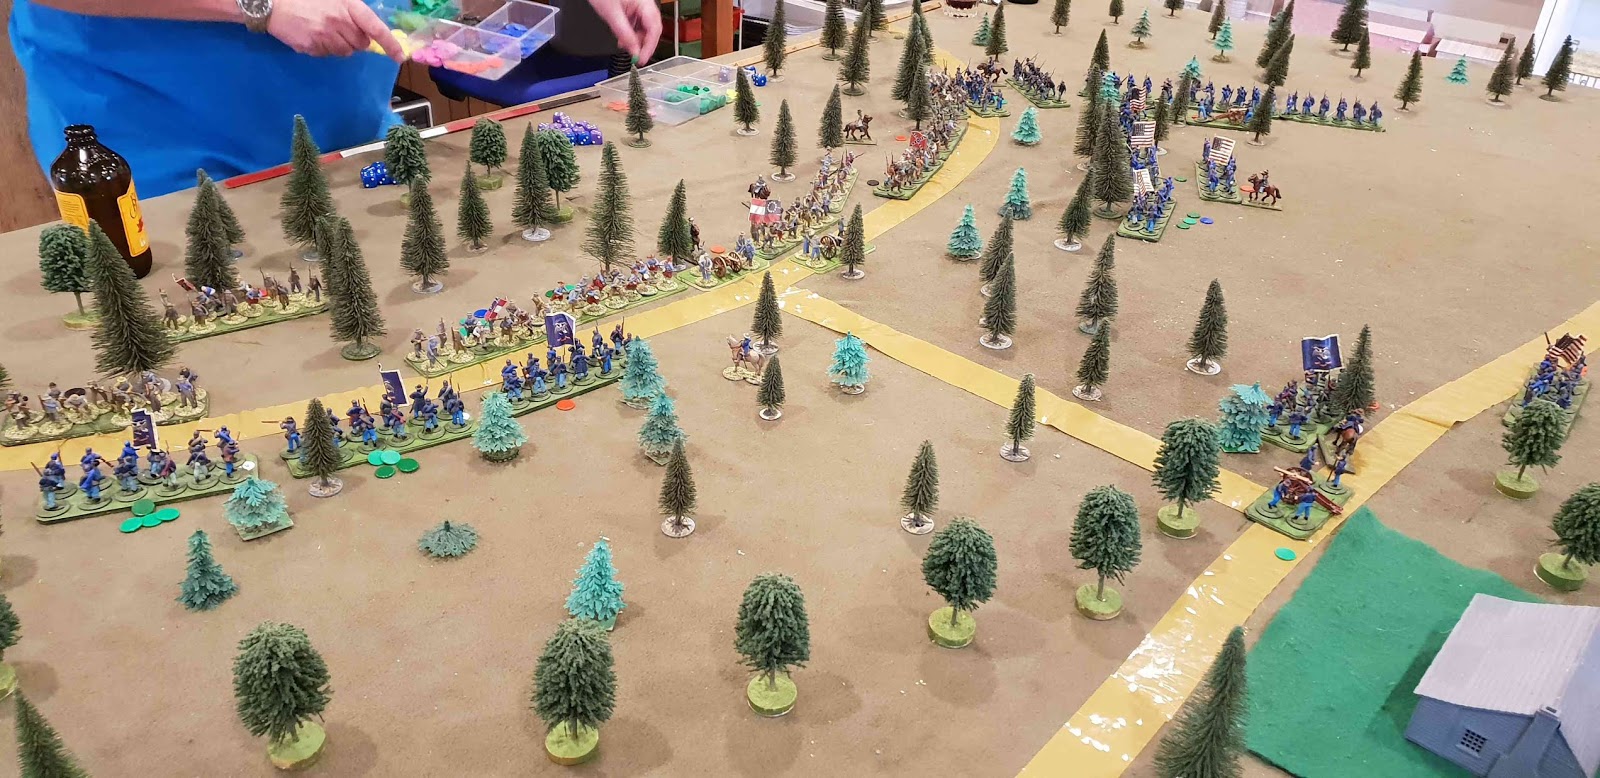
Bartlet's Farm 1863: ACW
Scenario from Glory Halehujah! modified a bit - fought with Hail Mr Lincoln, our ACW modification of Hail Ceasar.
Confederates: 4 brigades of 5 inf & 1 gun (John, Mike & SteveD).
Union: 4 brigades of 5 inf & 1 gun (Jim, Mark & Chris).
Mark commands 2 Union brigades around Barlet's Farm.
Jim & Chris' brigades will come on as reserves using FOW random reserves rule.
John's 2 brigade on the Reb right & Steve's brogade on their left have advanced smartly on the first turn while Mike's brigade in the centre has failed to activate.
John's 1st brigade has charged straight into action. Mark counterattacked his left flank from the house.
Jim's brigade has arrived on the Union left. Steve's brigade is in action on the far flank.
Jim's brigade is advancing too slowly & Chris 's has finally showed up on the far flank. Mark is hanging on desperately as Nike's brigade finaly gets moving in the Reb centre.
The Union centre has made a fighting withdrawal & still holds the centre as the flanking brigades advance at a madningly slow pace.
The arriuval of Mike's briagse in the centre was the last straw for Mark's RH brigade which has broken. The Union attack on the near flank was met with a hail of hot dice & has shuddered to a halt in front of John's 2nd brigade.
Chris' attack on the far flank met with a similar fate to the Union left. Both Union flank attacks have ground to a halt as the Rebs renewed the attack on Mark's remaining brigade, breaking it. With that the Union conceded the battle.
Confederates: 4 brigades of 5 inf & 1 gun (John, Mike & SteveD).
Union: 4 brigades of 5 inf & 1 gun (Jim, Mark & Chris).
Mark commands 2 Union brigades around Barlet's Farm.
Jim & Chris' brigades will come on as reserves using FOW random reserves rule.
John's 2 brigade on the Reb right & Steve's brogade on their left have advanced smartly on the first turn while Mike's brigade in the centre has failed to activate.
John's 1st brigade has charged straight into action. Mark counterattacked his left flank from the house.
Jim's brigade has arrived on the Union left. Steve's brigade is in action on the far flank.
Jim's brigade is advancing too slowly & Chris 's has finally showed up on the far flank. Mark is hanging on desperately as Nike's brigade finaly gets moving in the Reb centre.
The Union centre has made a fighting withdrawal & still holds the centre as the flanking brigades advance at a madningly slow pace.
The arriuval of Mike's briagse in the centre was the last straw for Mark's RH brigade which has broken. The Union attack on the near flank was met with a hail of hot dice & has shuddered to a halt in front of John's 2nd brigade.
Chris' attack on the far flank met with a similar fate to the Union left. Both Union flank attacks have ground to a halt as the Rebs renewed the attack on Mark's remaining brigade, breaking it. With that the Union conceded the battle.
Sunday, March 24, 2019
Operation Kamplinger: BA Tournament at Devonport
Camp Cromwell has been in recess for 3 weeks due to an extended Kayaking expedition around Cape Barren Island. But Chris & I were back in time for the Decvonport Gaming Club's first Bolt Action event for the year. Chris took Soviets, Mark & I took Germans. Steve Daniels was in Tas for hols & joined us. It meant a 5am start on Saturday morning, but we sensibly stayed overnight & came home Sunday morning.
The venue was a school gymnasium with 8 tables for 16 players - from Hobart, Launceston & Devonport.
The terrain was, as always at Devonport, pretty spectacular & varied. The games were played in good spirit with a great bunch of blokes. A good day was had by all.
Steve got one game as a fill-in for a player unable to play round 1.
Chris had a tough day with 3 losses.
Mark scored 1 win & 2 losses.
Jim lost 1, won 1 & tied 1 - to finish as 2nd best German.
The venue was a school gymnasium with 8 tables for 16 players - from Hobart, Launceston & Devonport.
The terrain was, as always at Devonport, pretty spectacular & varied. The games were played in good spirit with a great bunch of blokes. A good day was had by all.
Steve got one game as a fill-in for a player unable to play round 1.
Chris had a tough day with 3 losses.
Mark scored 1 win & 2 losses.
Jim lost 1, won 1 & tied 1 - to finish as 2nd best German.
Tuesday, February 26, 2019
Poles v. Ottomans: 17th century
Poles (Mike, Mark & Steve): 3 infantry brigades of 2 pike & 2 shot, a winged lancer brigade of 4 & a heavy cav brigade of 4 horse & 2 dragoons.
Ottomans (Jim & Chris): 2 brigades of 4 Levy, 2 skirmisher & 2 guns, 2 brigades of 4 heavy cavlry & 2 horse archers & a Jannisary brigade of 4.
Blind deployment by map within 18" of own table edge.
Initial deployment, Ottomans on the left. The Poles have concentrated their cavalry on the far flank.
The Ottomans send their light troops forward & start moving their right flank cavalry to their left behind the infantry. The Poles try to make a general advance, but their infantry fall behind with bad command dice.
The otoman cavalry on their left is outnumbered as well as out matched & is soon driven back. The Jannisaries face left as the right flank cavalry arrive in the nick of time to cover their flank.
The otttman left flank cavalry has been destroyed, but their left flank has been reformed.
As the Poles prepare for an assault on the Ottoman left, the Ottomans launch a counterattack with their levy on the right fearing that their left was doomed once the Poles attacked the angle.
The Ottoman left is holding on as their right attacks, but the writing is on the wall.
The the converging attack was too strong & the Ottoman army is broken with just the 2nd levy brigade left unbroken.
The next Camp Cromwell Tuesday will be March 26 as I will be away kayaking from the 4th to 19th March.
Ottomans (Jim & Chris): 2 brigades of 4 Levy, 2 skirmisher & 2 guns, 2 brigades of 4 heavy cavlry & 2 horse archers & a Jannisary brigade of 4.
Blind deployment by map within 18" of own table edge.
Initial deployment, Ottomans on the left. The Poles have concentrated their cavalry on the far flank.
The Ottomans send their light troops forward & start moving their right flank cavalry to their left behind the infantry. The Poles try to make a general advance, but their infantry fall behind with bad command dice.
The otoman cavalry on their left is outnumbered as well as out matched & is soon driven back. The Jannisaries face left as the right flank cavalry arrive in the nick of time to cover their flank.
The otttman left flank cavalry has been destroyed, but their left flank has been reformed.
As the Poles prepare for an assault on the Ottoman left, the Ottomans launch a counterattack with their levy on the right fearing that their left was doomed once the Poles attacked the angle.
The Ottoman left is holding on as their right attacks, but the writing is on the wall.
The the converging attack was too strong & the Ottoman army is broken with just the 2nd levy brigade left unbroken.
The next Camp Cromwell Tuesday will be March 26 as I will be away kayaking from the 4th to 19th March.
Tuesday, February 19, 2019
Iuka 1862
We fought the Iula scenario from the Black Powder supplement Glory Halleujah! (with a few tweaks).
The Union (Mike & Chris) are on the right with 2 brigades marching down the road surprised by Confederates (Mark & Jim) on their right flank. There is another Union brigade coming down the road behind the others. The Union have to drive the Confederates back & take the T junction on the left in 8 turns to win. The woods are open woods with no effect on movement, but count as cover & reduce range to 12".
The larger Reb brigade deploys to defend teh road. The smaller one advances to the edge of the wood on their left to delay the Union reserves.
On the near flank the two sides are blasting away at each other across the road. In the centre the Rebs are giving ground but hanging on. The 3rd Union brigade has been slowed by bad commnad dice.
The Reb left is giving ground to prevent it being outflanked, but the Rebel line is still holding.
The 3rd Union brigade has finally got into the action & the Rebel left has collapsed. But the Union left has also been broken allowing their remaining brigade to reface to their left.
The Union numbers are now counting, but the Rebs have held on to the T junction just long enough to claim victory.
The Union (Mike & Chris) are on the right with 2 brigades marching down the road surprised by Confederates (Mark & Jim) on their right flank. There is another Union brigade coming down the road behind the others. The Union have to drive the Confederates back & take the T junction on the left in 8 turns to win. The woods are open woods with no effect on movement, but count as cover & reduce range to 12".
The larger Reb brigade deploys to defend teh road. The smaller one advances to the edge of the wood on their left to delay the Union reserves.
On the near flank the two sides are blasting away at each other across the road. In the centre the Rebs are giving ground but hanging on. The 3rd Union brigade has been slowed by bad commnad dice.
The Reb left is giving ground to prevent it being outflanked, but the Rebel line is still holding.
The 3rd Union brigade has finally got into the action & the Rebel left has collapsed. But the Union left has also been broken allowing their remaining brigade to reface to their left.
The Union numbers are now counting, but the Rebs have held on to the T junction just long enough to claim victory.
Sunday, February 17, 2019
Tank War at Moleworth
Dave's Soviets v. Jim's Panzers in 1500 pts Tank War
There are 5 objectives. The German plan was to grab 3 & hang on. The Soviet plan was to attack the German's left & take one back. The German left was a bit weak, but they intended to support it with the Panzers in the centre after securing the centre objective on the road. But the Soviets got a nice combination of late command dice one move & early ones the next & their suicide squad in teh jeep took out the left hand hand panzer before the panzergrenadiers got a shot at them. They died, but too late. The Panzers then failed to hit a thing as the Soviet armour picked them off.
Robbed of support from the centre &under attack by Soviets throwing shirtloads of 6's the panzergreandiers on the left hand objective were destroyed & the Germans had nothing near enough to take it back. In some battles nothing goes right fro one side.
There are 5 objectives. The German plan was to grab 3 & hang on. The Soviet plan was to attack the German's left & take one back. The German left was a bit weak, but they intended to support it with the Panzers in the centre after securing the centre objective on the road. But the Soviets got a nice combination of late command dice one move & early ones the next & their suicide squad in teh jeep took out the left hand hand panzer before the panzergrenadiers got a shot at them. They died, but too late. The Panzers then failed to hit a thing as the Soviet armour picked them off.
Robbed of support from the centre &under attack by Soviets throwing shirtloads of 6's the panzergreandiers on the left hand objective were destroyed & the Germans had nothing near enough to take it back. In some battles nothing goes right fro one side.
Tuesday, February 12, 2019
American War of Independance
Chris bought a bunch of AWI miniatures cheap at Cancon, which brought our numbers of AWI figs up to Hail whoever level so we had our first AWI using Hail Frederick ratehr than Musket Action.
British (Mike & Chris): British infantry brigade of 6, 2 Hessian Brigadesof 4, 6 Indian bands, 2 Light Dragoons & 2 guns.
French & Colonials: 1 French brigade of 6, 1 Colonial brigade of 6, one of 4, 2 guns, 6 Woodsmen, 3 cavalry.
The Brits are on the left.
The only Colonial advance was to move their woodsmen forward through the woods on the far side of the table. The Brits advanced on the whole front.
The Hessians on the British left are driving the woodsmen back out of the isolate wood, but losing casulaties in the process.
The French cavalry have fallen back to avoid arrows from the wood.
The British regulars are preparing to attack the Colonials on the ridge.
The French regulars have deployed along the treelines & are waiting for the Hessians
Indians & woodsmen are skirmishing the far woods.
The French cavalry charged. The Indians evaded back into the woods & the British cavalry countercharged.
The Britsh attack on the ridge failed miserably due to unusually good shooting by the colonials.
The Hessians in the centre were stopped then broken by French fire.
Outflanked by French cavalry the British regulars have withdrawn.
Outflanked on the right by the French &their left by woodsmen, the surviving Hessians are also withdrawing.
The British conceded the battle.
British (Mike & Chris): British infantry brigade of 6, 2 Hessian Brigadesof 4, 6 Indian bands, 2 Light Dragoons & 2 guns.
French & Colonials: 1 French brigade of 6, 1 Colonial brigade of 6, one of 4, 2 guns, 6 Woodsmen, 3 cavalry.
The Brits are on the left.
The only Colonial advance was to move their woodsmen forward through the woods on the far side of the table. The Brits advanced on the whole front.
The Hessians on the British left are driving the woodsmen back out of the isolate wood, but losing casulaties in the process.
The French cavalry have fallen back to avoid arrows from the wood.
The British regulars are preparing to attack the Colonials on the ridge.
The French regulars have deployed along the treelines & are waiting for the Hessians
Indians & woodsmen are skirmishing the far woods.
The French cavalry charged. The Indians evaded back into the woods & the British cavalry countercharged.
The Britsh attack on the ridge failed miserably due to unusually good shooting by the colonials.
The Hessians in the centre were stopped then broken by French fire.
Outflanked by French cavalry the British regulars have withdrawn.
Outflanked on the right by the French &their left by woodsmen, the surviving Hessians are also withdrawing.
The British conceded the battle.
Tuesday, February 05, 2019
English Civil War: Scots v. English
Mark's Scots deployed first with most of his troops map deployed hidden by a ridge & woods.
2 infantry brigades of 2 pike & 4 shot, a cavalry brigade of 4 lancers & 2 dragoons & a highland brigade of 3 highland mobs & 2 muskteers skirmishers, plus 2 guns.
Jim Chris' English had 2 infantry brigades of 2 pike & 4 shot & 2 cavalry brigades of 4 cavalry & 1 dragoon.
Most of the Scots are out of sight. The English send cavalry around both flanks with infntry in the centre.
Dragoons scout the woods to cover teh cavalry advances. Skirmishers engage the guns. Musketeers attack the Scot's forlorn hope in the farm.
Both cavalry wings find a hedgehog behind the Scottish flank.
On the far flank it is supported by cavalry.
The highlanders charge over the hill against the English left.
On the English left half their cavlry pin down the hedgehog while the rest ride down the gunners. The highlanders break the musketeers in the English front line, but are themselves broken by a counterattack by pikes. The English attack right of centre is not doing well, nor is their cavalry on the far flank.
The English have broken thru left of centre, but teh Scots are counterattacking on their left & their cavalry is well on top.
The English cavalry on the right has broken as has their right flank infantry. The Scits have lost 1 brigade of 4, the English 2 of 4, so the English fail their army break test.
The Scots thought they had an ok plan & Mark made a pretty good defence resulting a close battle that coudl have gone either way right up to the last turn.
2 infantry brigades of 2 pike & 4 shot, a cavalry brigade of 4 lancers & 2 dragoons & a highland brigade of 3 highland mobs & 2 muskteers skirmishers, plus 2 guns.
Jim Chris' English had 2 infantry brigades of 2 pike & 4 shot & 2 cavalry brigades of 4 cavalry & 1 dragoon.
Most of the Scots are out of sight. The English send cavalry around both flanks with infntry in the centre.
Dragoons scout the woods to cover teh cavalry advances. Skirmishers engage the guns. Musketeers attack the Scot's forlorn hope in the farm.
Both cavalry wings find a hedgehog behind the Scottish flank.
On the far flank it is supported by cavalry.
The highlanders charge over the hill against the English left.
On the English left half their cavlry pin down the hedgehog while the rest ride down the gunners. The highlanders break the musketeers in the English front line, but are themselves broken by a counterattack by pikes. The English attack right of centre is not doing well, nor is their cavalry on the far flank.
The English have broken thru left of centre, but teh Scots are counterattacking on their left & their cavalry is well on top.
The English cavalry on the right has broken as has their right flank infantry. The Scits have lost 1 brigade of 4, the English 2 of 4, so the English fail their army break test.
The Scots thought they had an ok plan & Mark made a pretty good defence resulting a close battle that coudl have gone either way right up to the last turn.
Subscribe to:
Posts (Atom)