Wednesday, February 16, 2022

Crusaders v. Saracens again

We repeated the scenario from a few days back with mostly different players.
Saracens: Renfrey, Mark & Mitch.
Crusaders: Mike & Steve.

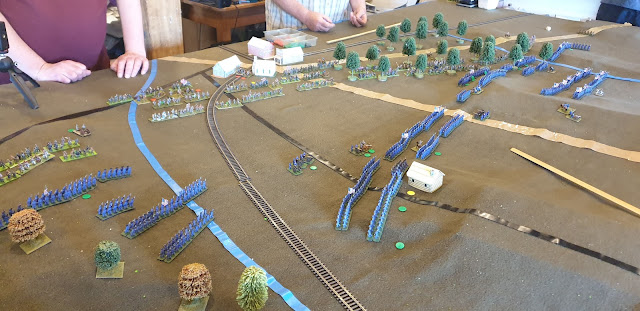
The Crusaders are on the right with infantry in centre, Seargents on their right, Knights & Turopoles on their left.  The Sarecens have all their cavalry on their right & infnatry on their left.
The Crusaders are advancing witht ehri cavalry while their infantry stand on a ridge. 
On the far flank, the Sergeants attack on the Saracen foot was beaten off in flurry of crap dice. 
In the centre Saracen cavalry tried an attack on the Crusade foot, but failed to break through.
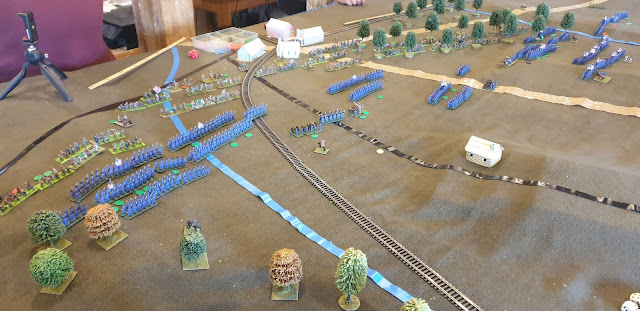
On the near flank half the knights have vahregd forward while half have wheeled right to support their foot while the light cavalry of each side mostly neutralise each other.
On the far flank the Sarecen foot is folowing up the Sergeant's retreat.
In the centre the Saracenn cavary have turend to face the knights.
On the near flank, the Sarcen heavy cavalry is losing the fight v. the knights but their superior  numbers of light cavalry are beginning to take effect. 
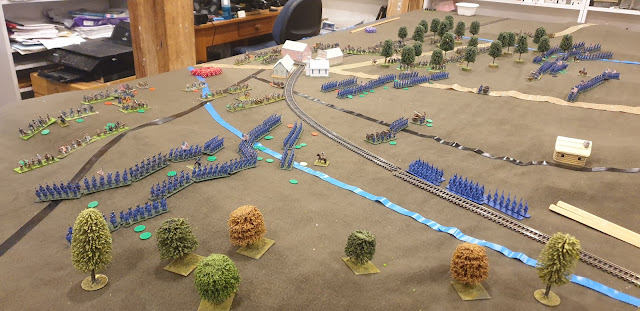
The knight's attack on the Saracen centre has been held up by the Saracen cavalry for now, but the Sarcen cavalry is running out of steam.
The Saracen heavy cavalry has now broken, but the knights have lost heavily & harrassed by the Saracen horse archers which have disposed of the Crusader's Turcoples.  
On the other flank the Sergeants have renewed their attack on the Sarcen foot, this time with better dice & inflicting significant casualties, beaking one of the Sarcen foot brigades.

The Saracens have now lost both heavy cavalry brigades & one of two infnatry brif=gades so fail their army morale test.
The Crusader knights are still on the table, but entiring shaken.  The Sergeants have heavy casualties with only one functioning unit left.  But the Crusadee foot has only light casualties & is now the dominant force.
A clear win for the Crusaders.

The Crusaders also won last week, but theSarcens had good plan & arguably only lost through some very lucky Crusader dice at critical points.  This time the Crusaders had the better plan & won decisively.


Saturday, February 12, 2022

Crusaders v. Saracens

 Renfrey's Crusaders v. Chris' Saracens

The Crusaders are on the left.  They have delpyed all their cavalry on their rightwith their foot on a  ridge on their left.  The Saracens have also put their foot ona ridge, but with their cavalry on both flanks.
Both side's advance their right flanks.  the cRusader foot also advance, leaving the ridge to cover the flank of their cavalry.
On the near flank, the Crusader's Turcoman light cavalry are being driven back, theri Seents have smashed through the oppisng cavalry while the Sarcen cavalry are for now holdon theri own v. the knights. 
On the flank the infnatry have engaged each other whle the Sarcen cavary manoeuvre around the Crusader's flank.
On the near flank the Crusader cavalry have smashed the Saracen horse.  The Srgents have reformed but teh Knights are still pursuing.
On the far flank the Crusaer fotot is under pressure as they reploy their second line to counter teh Saracen's flanking manoeuvers. 
Half the Sergeants are driving off the Sarecen light cavalry while the other half are moving on the Saracen foot's flank.  The knights have pursued off the field (but the figs are left on the edge of the table).
Some Saracen foot are moving to protect their comrade's while the Crusader foot hang on, saved from flank attacks by a run of hot dice. 
The Crusader left is beginning to crack despite their hot dice, but the Saracen foot are not so lucky as the Sergeants hit their flank & the Knights finally return to the field.
The Crusader foot have finally ran out dice & broken, but they held up the Saracen right for long enough  & inflicted enough casualties so they don't enough left to face the Crusader cavalry which has destroyed the Saracen left with little loss.  

The Crusaders have lost 2 of 4 divisions while the Saracens have lost 3 of 4.  Both sides failed their Army Morale test at the same time, but as the Crusdaers cavalry have suffered few lossses in defeating the Saracen left & are clearly stonger than the surviving Saracens, they have a Pyhic victory.


.  


Tuesday, February 08, 2022

Bolt Action Tank War

!500 pts Tank War scenario.
Brits: Mike, Chris & SteveJ.
Germans: Jim, Mark & Renfrey.


The Germans are on the left. 
There are 6 objectives - the village, the 3 hills on the centreline & the 2 ridges on each side.
Aftera  deployment turn within 18" of own table edge, both sides rushed infnatry forward in trucks.  The Germans held their tanks back hull down on their ridge to provide covering fire  The Brits rushed most of their armour forward.
On the nearest hill, the Brits tried to rush the germans, but were mown down by Hitler's buzzsaws.  In the centre boths sides hunkered down on their side of the hill.  On the far flank the brits occupied the village unopposed.
The Brits on the centre hill have been blown away by mortar fire but the objective remains in dispute by a Sherman.
The Brits have outflanked the far hill & destroyed the German infantry there giving them  victory with 3 objectives to the Germans 2 & 1 in dispute.  

The Germans erred in holding back hull down on the hill with their MkIII G's.  They needed to get closer to the Shermans & Grants to increase their chance of penetrating with their 50mm guns.

Tuesday, January 04, 2022

Rome v. Carthage

Rome: Mike, Renfrey & Mark
Carthage: Jim, Chris, Steve & Mitch
Rules: M2M Camp Cromwell house rules,

The Romans are on the right with cavalry on their right & allied infnatry on their left.
The Carthos have most of their cavalry on their left With a few cavalry onthe right with their elephants.
The carthos advanced their cavlry on their right & their elephants on their right.  They held their infantry centre back & ahave turned their right flank cavalry behind the elphants to support the centre.
There's a swriling cavalry melee on the far flank.  The innfatyr have come to grips in the centre.  The elephants are enagaged with the Roman'allied spearmen.  The Cartho right flank cavalry have suffered a command failure & held up on the creek line.
On the near flank the elpahanst have been defeated, but not withour loss.  The cavalry move on the legion's flank was blocked by triari.  In the centre the Carthaginan spearmen have defeated their oponents & the Scutari are still holding their own .  On the far flank the cavalry is  engaged in mutual destruction.
On the far flank the Punic cavalry have broken, but their opponents are in no fit state to make any further attack.
In the centre, the Legion ahs broken, but the Punic foot is no fit state to make any further attacks.
On the near flank, the Roman allied foot & the Punic cvalry are both still fit to fight, but disinclined to attack each other.  Boths sides are content to cease fighting & send news of victory back to Rome & Carthage.


.

Saturday, January 01, 2022

WWII Mech War

Chris' Soviets v. Renfrey's Germans
House rukles on 12'x6' table

The Germans are on the right.  2 tank platoons (5 Stugs & 5 MkIVs), 2 infantry platoons (each 6rmg+1mg+1p/f with 4 HTs), a heavy mortar platoon & 4 Pak40's.   All regulars with transports..
The soviets have 4 infantry platoons (each 10 rifles & 2 mgs), 6 med a/t guns, a medium mortar platoon & 2 tank platoons (8 T34/76 & 8 T34/85) all conscripts with no transport. 
The Soviet armour advanced en masse on the near flank & the Stugs fell back.  The MkIVs were on the far flank where they were faced by the Soviet a/tank guns & are now moving left ebhind teh german line to support the Stugs.  The Soviet infatry is advancing in the centre as the germasn infnatyr move to deploy in the wood right of their centte & thei Pak 40's move to the centre.
One of the German infantry platoons awas hit before it could deploy properly & wiped out, but the other deployed on the edge of the wood destroyed the 2 Soviet infantry platoons that attacked them.  
On the near flank, the Stugs fell back intto the dge of the wood on the ridge & disposed of the T34/76s for no loss.
In the centre the Pak 40's were destroyed before they hit anything, but bought time for the MkIVs to come up & take on the T34/85s.  The victoious Stugs joined in & the T34/85's were destroyed for the loss of 1 MkIV.
With no armour left, the Soviets were in a hopeless position & conceded defeat.


Tuesday, December 28, 2021

Bull Run Day 3: Part 2

 We picked up where we left off last week.

Having driven most of the Reb artillery out of the line the Union have limbered up their artillery in the centre & are moving forward into closer range as the Union infantry advance with them.
The Union are now putting the pressure of numbers with infantry against the Reb right & with artilelry in the centre.  On the far flank the Union have enagaged the Rebs in the wood  but are not pressing an attack, being content to tie the enemy down.
On the far flank the Union far left beyond the woods has been driven back, but the fight in the woods remains an indecisive sideshow as intended by the Union.  But on the near flank the Reb line east of manassas Junction is collapsing under the pressure.  With 6 turns of daylight left the Reb comander has decided his position is hiopeless and is ordering a general withdrawal conceding victory to the Union.

So ends our mini-compaign.  It produced a week or so of intersting email manoeuvring on map, leading to 3 great nights on the wargames table (at least the Union thought they were great).  

The battle went very differently to the real thing.  The Union command decided that long flank marches into s confused battel situation were not a good idea with green troops.  Instead of preparing on day 2 & then going out around the CSA left on day 3 as in the real thing, they attacked the fords directly on day 2.  When the Union succeded in gaining a crossing the Rebs fell back to defensive position in front of Manassas Junction.  So the main battle on day 3 was more of set piece making it much easier for the Union to control their green troops in an attack.


Tuesday, December 21, 2021

Bull Run Day 3

As night approached on day 2 the Confederates fell back towards Manassas & the Union consolidated their positions on the south side of Bull Run.

In the morning the Confederates were deployed defending Manassas Junction while the Union advanced to a new line just outside artillery range.  

The deployment was a slow process with green trooops, but once the infnatry was in a good line the Union artillery was advanced to within rifled artillery range to begin  a bombardment of the CSA centre.
A musket duel began on the Union right where the Union attempt to outflank the Rebs was countered by an infantry brigade advancing out of the woods & a cavalry regiment.
On the Union left the Rebs advanced a brigade, and 2 Union brigades have advanced to meet them. 
In the centre the superior numbers of Union rifled guns have forced most of the Reb artillery to withdraw.  

We were never going to finish this in one night, so we decided this seemed to be a good time to call a halt tonight.  The deployment phase is over & we can start into the serious fighting fresh next week. 

The battle was fought with 2 comanders for each side on the table, whuile the umpire, Union CIC & 2 other interested spectators were on Zoom from Canberra, Bruny Is & a distant suburb.  There is a fixed tablet camera on a high tripod giving an overview & a phone camera on a mini tripod for Zooming in close on request.

Wednesday, December 15, 2021

Bull Run: Day 2

We are fighting a Bull Run as a mini campaign over 4 campaign days.
CSA: Mark, Mitch, Chris.
USA: SteveD*, Renfrey, Jim, SteveJ.
Umpire: PeterW*.
* in Canberra by email & Zoom. 
The map covers an area 20x16km.
Figs are 15mm, CSA old metals of various makes, Union 3-D printed. 
Ground scale 400mm per km.

On day 1 the forces assembled, the Union north of Bull Run, the Rebs to the south.
On day 2 in the real thing, the Union spent the day resupplying & resting up, then on day 3 made a flank march to the west to cross the Run at Sudley Springs.  

In this campaign, the Union advanced on a broad front directly towards Manassas Junction on day 2.  All the fords were defended by Reb detachments.  

The table was set up 16' long & 6' to 8' wide to allow plenty of scope for movement hidden from the enemy.
View of the table from the east before any deployment.
It was turn 9 before your correspondant remembered to start taking photos (being too engrossed in commanding the Union left).  In the foreground a Union brigade stands back from Simpson ford defended by a small CSA brigade with artillery.  On their right a Union brigade supported by 3 batteries is threatening McCleans ford.  At the head of the big bend in the Run a Union brigade is attacking Blackburn ford.  In the distance 2 Union brigades supported by 5 batteries is attacking Michells ford.  Out of shot another Union brigade is watching Lewis & Balls fords.
The first Union success is at Blackburn ford where the Union attack is supported by artillery from their right flank & the Rebs are outnumbered.  The Reb regiment on the ford was broken by fire & 1 Union regiment has crossed the ford.
At Mitchels ford the Union artillery has forced the Rebs back & Union infantry have started crossing the ford.
At Balls ford a Union brigade is inactive guarding the Union flank, but the Rebs are withdrawing their forces from all the fords on that flank.
At McClains the Union are still waiting for their artillery to inflict serious damage.  At Blackburn the Union have crossed in strength & the Reb defence is in trouble.  At Mitchels Reb reinforcements have arrived & the the Union troops across the ford are copping a pounding.
At McClains CSA reinforcements have arrived before the Union even attempted a crossing.
At Blackburn the Reb have broken under musket fire from the front & artillery from the flank.  More Union troops have appeared & are advancing down the ridge.
At Mitchels the Union have been driven back across the ford.
After 16 turns with 6 left until nightfall, only 2 fords had been crossed by the Union & at one of them the attack was beaten back.  But the loss of Blackburn has compromised the Rebel line & the CSA commander has lost his nerve & ordered a general retreat back towards Manassas Junction.  The Union are happy to see them go.  They will occupy the fords before nightfall in a good position to renew the attack across open ground in the morning.

The butchers bill is not high for either, but favours the Union.  Most of the losses were from artillery fire.  The 2 sides had the same number of guns, but the Union's were better concentrated & more effective.